





Acrylic Bottle Display Stand: Well & Fit Spec
A stand that 'holds a 100 ml bottle' has not told the factory anything it can cut. Five numbers, three photos, and one fit statement do.
Need this made?Acrylic display manufacturer →

Key Takeaways
- A bottle is specified by its envelope: maximum body width, base diameter and shape, height to the shoulder, total height with cap, and weight. Those five numbers plus three photos are what the factory cuts to.
- A routed well needs three dimensions on the drawing: well diameter (bottle base plus 1–2 mm), pocket depth, and the floor left under it. Thinning the plate to save cost changes the floor first, so fit-critical wells are sampled before the thickness is changed.
- Static fit is not loading fit. Diametral clearance, vertical clearance under the tier above, and hand clearance for staff reloading the stand are three separate numbers.
- Foam or flocked inserts are a separate controlled part: foam thickness, firmness, color, inset or surface-mounted, and bonding method go on the drawing, not in the email.
- Production runs from 100 pieces per design; a paid sample takes 3–5 days, is paid separately and never credited, and is tested with the real bottle before the 15–20 day production run.
On this page
- The bottle envelope is the spec, not the bottle name
- Well depth and pocket geometry: what actually holds a bottle upright
- Clearance: static fit is not loading fit
- Foam and soft inserts: when the pocket should not be acrylic
- Wine bottle display stand vs perfume stand: same rules, different envelope
- What to attach to the RFQ: five numbers, three photos, one fit statement
- Approve fit on the sample, not on the render
The bottle envelope is the spec, not the bottle name
An acrylic bottle display stand is cut to the bottle’s envelope: maximum body width, base diameter and shape, height to the shoulder, total height including cap or pump, and filled weight. “Holds a 100 ml perfume bottle” or “fits a standard wine bottle” gives none of those, so the drawing cannot start until the numbers arrive.
The first thing I check on an incoming bottle display stand RFQ is whether the bottle has been measured or only named. Most briefs name it. A 100 ml fragrance bottle can be a slim cylinder 40 mm across or a squat rectangle 70 mm wide with a heavy shoulder; a 750 ml wine bottle can carry a body diameter anywhere from the low 70s to the mid 80s in millimeters depending on the shape family. The stand does not care what the bottle is called. It cares where the glass touches the acrylic.
Bottles also vary from unit to unit. Glass containers are molded, so body diameter and height move within a tolerance band across a production lot, and a well cut to one measured bottle with zero clearance will bind on the next one. That is why I ask for the envelope measured on several bottles from the actual lot, and why the well is drawn larger than the bottle by a stated clearance rather than “snug”.
Take a worked example we will carry through this guide: a rectangular 50 ml flacon that measures 42 mm across the body, 38 mm across the base, 78 mm to the shoulder, 95 mm to the top of the cap, and 165 g filled. Every number below comes from those five inputs. Swap in your own bottle and the method holds, whether the stand is a single-well counter block for a cosmetics and perfume counter or a tiered wine bottle display stand for a tasting room.
Put this in the RFQ: the five envelope numbers for every bottle format the stand must hold, measured with a caliper on three or more bottles from the real lot, plus the photos described in the RFQ section further down.
Well depth and pocket geometry: what actually holds a bottle upright
A routed well holds a bottle with three dimensions: the well diameter (bottle base plus 1–2 mm of clearance), the pocket depth, and the floor thickness left under the pocket. As drawing starting points for upright display we use a pocket depth of roughly 15–25% of the bottle body diameter and a floor of at least 5 mm, then confirm both on the sample.
For the worked flacon, that means a 40 mm well for a 38 mm base, a pocket about 8 mm deep, and a 20 mm plate so that 12 mm of acrylic remains under the floor. Cut in 20 mm cast sheet, the pocket has enough wall to stop the bottle skating when the counter is bumped, and enough floor to carry a glass bottle without flexing.
There are three ways to build the pocket, and the choice sets both the fit behavior and the price. The cross-section below shows all three at the same scale.
The routed pocket is the default for counter blocks and small tiered stands. It is a single machined part with a polished top face, so there is nothing to bond and nothing to work loose. Its cost driver is the plate thickness: a 20 mm pocketed plate uses far more sheet than a 5 mm panel, which is where thickness questions start.
The through-hole construction answers that question for larger stands. A 5 mm top plate with holes, standing on posts over a lower plate, uses less material than a solid block and lets a wine bottle display stand carry six or twelve bottles without becoming heavy. The bottle stands on the lower plate and is located by the hole, so the vertical drop between plates matters as much as the hole diameter.
Thickness is the request I hear most often after the first quote: can we take the plate from 20 mm to 12 mm, or the front panel from 8 mm to 5 mm, and keep the fit? On a plain panel, usually yes, because only stiffness changes. On a pocketed plate the answer is different, because the pocket depth stays where the bottle needs it and every millimeter removed comes out of the floor. Sheet stock also runs under and over nominal: a manufacturer tolerance table for extruded acrylic permits a nominal 3.0 mm sheet between 2.69 and 3.30 mm and a nominal 6.0 mm sheet between 5.69 and 6.30 mm1, so a floor that looks like 5 mm on paper can arrive thinner. We draw the floor as a stated minimum and, for fit-critical wells, quote the thinner plate only after a sample proves it with the real bottle.
Put this in the RFQ: whether bottles stand upright or lean, how many wells per tier, and whether you want a solid pocketed block or a lighter plate-and-post build. If you have a target thickness for cost reasons, say so, and we will tell you which construction keeps the fit at that thickness.
Clearance: static fit is not loading fit
Three clearances decide whether a bottle display stand works on a live counter: diametral clearance so the bottle drops in and lifts out, vertical clearance so the cap or pump clears the tier above, and hand clearance so a member of staff can reload the stand without knocking the neighbors. A stand that passes a static fit check on the bench can fail all three in a store.
Diametral clearance is the one buyers fixate on, and it is the least forgiving to get wrong in either direction. Zero clearance binds on the next bottle in the lot; 5 mm of clearance lets a slim flacon rattle and lean. We draw 1–2 mm on the diameter for glass in a rigid pocket, which is comfortably outside the general machining tolerance a drawing would otherwise imply. ISO 2768 medium-class general tolerances, for reference, allow ±0.2 mm on a 6–30 mm feature and ±0.3 mm on a 30–120 mm feature2, so a stated 1 mm gap survives both the bottle’s variation and ours.
Vertical clearance is where tiered stands go wrong after the drawing is approved. The worked flacon is 95 mm to the top of its cap; if it sits in an 8 mm pocket, the tier above needs at least 87 mm of open height plus room to tilt the bottle out. We add the hand: a bottle lifted straight up by its shoulder needs the tier gap to clear the cap plus roughly a finger’s width, so a tier spacing under about 110 mm on that bottle is drawn as a warning, not a saving.
Hand clearance also covers what happens between bottles. A row of wells at 45 mm pitch for a 42 mm bottle looks dense and efficient on the render, and it is the layout I push back on most often at drawing review. In practice a clerk cannot get a thumb and forefinger around one bottle without touching the two beside it, and the tight row is what gets reported back as “the display is too small” after the first restock. Product packaging changes have the same effect: when a brand moves a bottle into a taller cap or a wider carton after the stand is drawn, the pocket, the tier gap, and the loading room all shift. The drawing is revised and a revised sample is made; approving the old sample against the new bottle is how tight-fit complaints start.
| Clearance | What to measure | Drawing starting point | Where it fails if skipped |
|---|---|---|---|
| Diametral | Bottle base diameter across 3+ bottles from the lot | Base + 1–2 mm on the diameter for glass in a rigid well | Bottle binds, or rattles and leans |
| Vertical | Total height with cap or pump, minus pocket depth | Cap top + tilt-out room under the tier above | Bottle cannot be lifted out; cap scuffs the tier |
| Hand / loading | Widest body width, the staff loading motion | Well pitch that leaves finger room between bottles | Restocking knocks neighbors; “too tight” feedback |
Put this in the RFQ: where the stand lives (open counter, behind glass, a shelf with a fixed height above) and who reloads it. A tester stand handled by customers all day is drawn with more clearance than a locked cabinet loaded once a week.
Foam and soft inserts: when the pocket should not be acrylic
Glass on bare acrylic is fine for most retail stands, but heavy bottles, decanter-style bases, or anything that gets lifted in and out all day is better held in a soft insert: closed-cell EVA or PE foam, flocked foam, or velvet-covered board, routed to the bottle profile and set into a rebate in the acrylic top. The insert becomes its own controlled part on the drawing.
A foam insert changes what the acrylic has to do. In the foam-lined construction from the cross-section, the acrylic carries a 48 mm rebate and a 4 mm foam wall does the locating, so the bottle-to-bottle variation lives in the foam rather than in a hard edge. That is why an inset foam top is the usual route for a wine bottle display stand holding heavy or irregular bottles, and for any perfume display stand where the flacon has decorative glass corners that chip against a hard well.
I draw the insert as its own part number so a foam change never reopens the acrylic drawing. What we need specified, and what most briefs leave out: foam thickness (the rebate depth follows it), foam firmness or density, foam color, whether the foam sits flush with the acrylic face or stands proud of it, whether the cut profile is the bottle outline or a plain circle, and where any logo goes. Logo placement matters more than it sounds. A logo UV-printed on the acrylic next to a foam inset sits on a different plane from a logo printed on the foam, and the two read very differently under counter light.
The bonding method is the last item, and it is a real decision rather than a detail. A foam insert can be pressure-sensitive-adhesive backed and pressed into the rebate, which is fast and replaceable; or bonded with a foam-compatible adhesive for a permanent top; or left loose in a deep rebate so the store can swap it. We built a similar controlled-insert logic into the custom acrylic packaging insert case, where a foam restraint sits inside a product-profile cutout, and the same drawing discipline applies to a countertop stand.
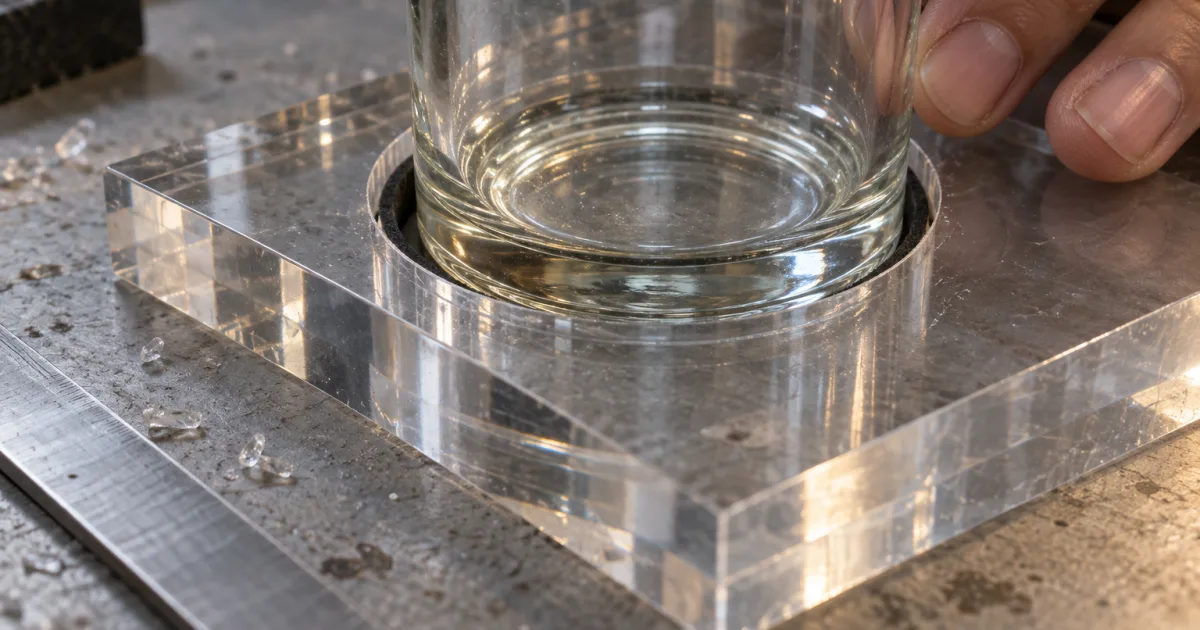
Put this in the RFQ: whether you want a bare acrylic well or a soft insert, and if soft, the foam thickness, firmness, color, flush or proud, profile or circle, logo position, and whether the insert must be replaceable.
Wine bottle display stand vs perfume stand: same rules, different envelope
The fit rules do not change between a wine bottle display stand and a perfume tester block; the envelope, the weight, and the center of mass do. A 750 ml bottle is tall, heavy, and top-light, so it wants a deeper pocket or a foam liner and a lower tier; a 50 ml flacon is short and wide for its height, so it wants a wider well and tighter diametral clearance.
| Input | Perfume or skincare flacon | 750 ml wine or spirits bottle |
|---|---|---|
| Envelope that governs the well | Base shape (often square or rectangular) and body width | Body diameter and punt (recessed base) shape |
| Typical construction | Routed pocket in 15–20 mm block, one or several wells | Through-hole plate with lower plate, or foam-lined rebate |
| Clearance emphasis | Diametral: slim flacons rattle at 5 mm, bind at 0 | Vertical and hand: tall neck plus lift-out room |
| Weight concern | Low; glass corners chipping on a hard well | High; pocket floor thickness and base footprint |
| Angle | Usually upright; tester slots sometimes 10–15° back | Upright, or leaned 30–45° in a cradle for label display |
Angled display deserves its own line on the drawing. A leaned bottle is held by a cradle, not a well, and the two contact points, base and shoulder, both need a clearance and a radius. The angle changes the footprint too: a bottle leaned 45° reaches further back than it stands tall, which is what makes a tiered wine stand deeper than the buyer’s counter allows if nobody drew it first.
Converting an existing wooden rack to acrylic is a request we get from small businesses and independent retailers, and the mistake is to send the wood drawing and ask for the same thing in clear. Wood is drilled and screwed; acrylic is routed, bonded, and polished. The bottle diameter that was cut with a hole saw into 18 mm pine becomes a routed pocket with a stated floor, the screwed shelf becomes a bonded or post-mounted tier, and the whole thing has to be re-drawn from the bottle envelope, not traced from the rack. The display case dimensions guide walks the same object-first sizing logic for enclosed pieces.
Put this in the RFQ: the bottle type family, upright or angled, how many bottles per tier, and, for a conversion, photos of the existing rack alongside the bottle dimensions rather than instead of them.
What to attach to the RFQ: five numbers, three photos, one fit statement
A complete bottle display stand RFQ carries three things: the five envelope numbers for each bottle format, three photos that let us check those numbers, and a one-line fit statement saying how the bottle is held. With those attached, we can return a drawing-based quote within 24 hours instead of a list of questions.
The five numbers are maximum body width, base diameter or base length and width, height to the shoulder, total height with cap or pump, and filled weight. Measure with a caliper on three or more bottles from the production lot, not the sample from the design agency, and send the range if the bottles differ.
The three photos are cheaper than they sound and they catch what numbers miss; I open the photos before the numbers on every bottle RFQ. Photo one is the bottle standing on a cutting mat or grid beside a ruler, shot straight on at bottle height. Photo two is the base, which shows a punt, a molded ring, or a square corner radius that decides the well profile. Photo three is the cap or pump, because a pump head that overhangs the neck is the part that snags the tier above. A phone photo is fine. A render of the bottle is not, because renders have no tolerance.
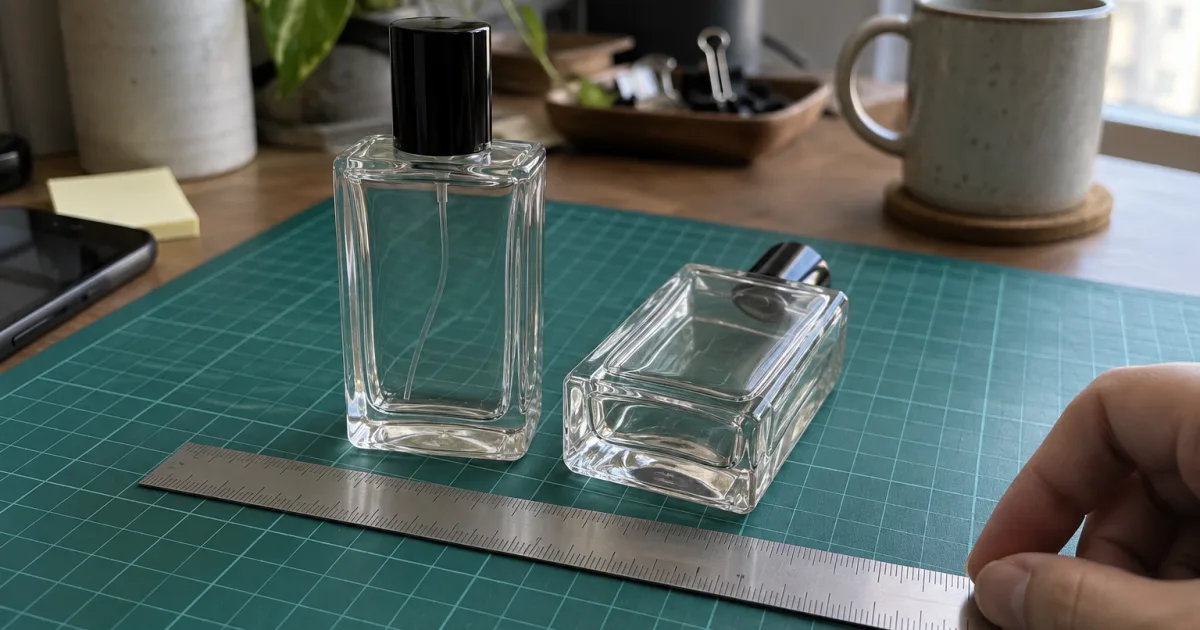
The fit statement is one sentence: “upright in a bare well”, “upright in a foam-lined well”, “leaned 45° in a cradle”, or “removable tester insert”. It tells us which of the three constructions to draw before we ask anything else. If the stand also holds a shade card, a tester strip, or a price cube, name that item and its size in the same sentence.
Then the commercial inputs, which decide the price more than the acrylic does. Quantity per design: production runs from 100 pieces per design, and a stand with two well layouts is two designs. Finish and color: clear, frosted, black, white, or a color matched to your target from in-stock sheet, approved on the sample. Branding: UV print, silk-screen, hot stamp, or laser engraving, with vector artwork. Packing: bulk in export cartons or individually boxed. Destination and delivery date: we quote FOB Shenzhen by default and can quote DDP to the door on request.
Tier pricing follows one rule: the same drawing at each quantity. For orientation, the acrylic display manufacturer page publishes a named price reference, a 250 × 180 × 220 mm two-tier stand in 5 mm clear acrylic with one-color UV branding, at $28 at 100 pieces, $16 at 500, and $12 at 1,000 FOB Shenzhen; a pocketed 20 mm bottle block prices differently because the sheet yield is different, which is exactly why the drawing comes first. Freight scales with carton volume, so a stand that ships flat with posts costs less to move than a solid block of the same footprint, and a quote that shows the carton dimensions lets your forwarder price it before you commit. The RFQ template guide covers the nine general fields; this section is the bottle-specific layer on top of it.
Put this in the RFQ: all of the above, in the quote form, with the photos attached to the same message. An RFQ with the envelope and photos attached goes to the front of the drawing queue because it can be drawn; one without them waits for a reply to our questions.
Approve fit on the sample, not on the render
A paid pre-production sample takes 3–5 days, typically costs USD 200–500 depending on complexity, is paid separately and never credited to production, and is the only place fit gets proven. We test it with the real bottle, or with a dimensionally accurate reference you send, and photograph the fit before you approve anything.
What the sample proves: the bottle drops in and lifts out with the stated clearance, it does not rock or lean in the well, the cap clears the tier above with hand room, a foam insert sits flush or proud as drawn, the finish and color read the way you expect under light, and the branding sits where the artwork says. What approval locks: the drawing revision, the material and thickness, the insert specification, the finish, and the packing. Production then runs 15–20 days from approval, under 100% inspection against the approved sample in our ISO 9001 facility, and a change to the bottle after approval reopens the drawing rather than the production line.
In 12+ years running our lines I have not seen a render catch a well that binds or a tier that traps a cap. Renders show intent; they cannot show a 0.6 mm glass variation or a clerk’s thumb. The pre-production sample approval checklist sets out the rework math, and the pre-production sample approval checklist is the list we ask you to work through with the sample in hand. For a multi-SKU program with replaceable inserts, the beauty counter display program case shows how the unchanged base and the swappable insert are separated on the drawing so a bottle refresh does not mean a new stand.
Send the five numbers, the three photos, and the fit statement through the quote form, or read how the custom acrylic fabrication process moves from drawing to sample to production. We reply within 24 hours with a drawing-based quote, the construction we recommend for your bottle, and a sample plan that tests it before the first sheet is cut.
Footnotes
-
Thickness tolerance of ACRYLITE extruded FF acrylic sheet — ACRYLITE knowledge base — manufacturer tolerance table listing nominal 0.118 in (3.0 mm) sheet at 0.106–0.130 in and nominal 0.236 in (6.0 mm) sheet at 0.224–0.248 in, the sheet-stock variation behind drawing the pocket floor as a stated minimum. ↩
-
ZEISS Quality Forum — ISO 2768-1 and ISO 2768-2 tolerance tables (PDF) — the general-tolerance table showing medium-class bands of ±0.2 mm for 6–30 mm and ±0.3 mm for 30–120 mm features, the machining variation the 1–2 mm diametral clearance is sized to absorb. ↩
Frequently Asked Questions
What dimensions do I need to send for a custom acrylic bottle display stand?
Send five numbers per bottle: maximum body width, base diameter (or base length and width for square bottles), height to the shoulder, total height with cap or pump, and filled weight. Add three photos: front view beside a ruler, base view, and cap or pump view. Wells, tier spacing, and clearances are drawn from those inputs, then confirmed on a paid sample before the 100-piece-per-design production run.
How deep should the well be on an acrylic bottle display stand?
Deep enough that the bottle cannot tip when the stand is bumped, shallow enough that staff can lift it out one-handed. As a drawing starting point we use a pocket depth of roughly 15–25% of the bottle body diameter for upright display, a well diameter of the base plus 1–2 mm, and at least 5 mm of acrylic left under the pocket floor. The sample with the real bottle confirms the number.
Can I reduce the acrylic thickness to lower the cost without affecting fit?
Sometimes. On flat panels a step from 8 mm to 5 mm usually only changes stiffness. On a plate with routed wells the pocket floor is what gets thinner, and below about 5 mm the floor can flex or crack under a glass bottle. For fit-critical wells we quote the thinner option only after a sample proves it with the actual product.
Can an acrylic display stand have a foam insert?
Yes. Closed-cell EVA or PE foam, flocked foam, or velvet-covered board can be routed to the bottle profile and set into a rebate in the acrylic top. Specify foam thickness, firmness, color, whether it sits flush or proud, logo placement, and bonding method. The insert is drawn as its own part so it can be revised or replaced without remaking the acrylic.
What if my bottle or packaging changes after the display is designed?
The drawing has to change with it. A new cap height, a wider base, or a redesigned carton changes well diameter, tier spacing, or loading clearance, so we issue a revised drawing and a revised sample before production. Approving the old sample against a new bottle is where tight-fit complaints come from.
Send the Bottle Envelope and Get a Fit-Checked Quote
Attach the five bottle dimensions, three photos, quantity per design, finish, and destination. We reply within 24 hours with a drawing-based quote and a sample plan that tests the real bottle before production.