Laser Cutting Acrylic vs CNC: Edge Finish, Cost, 20mm Limit
Choosing the wrong cutting method costs real money — a laser can't hold tolerance on thick blocks, and CNC is overkill for thin sheet work.
Key Takeaways
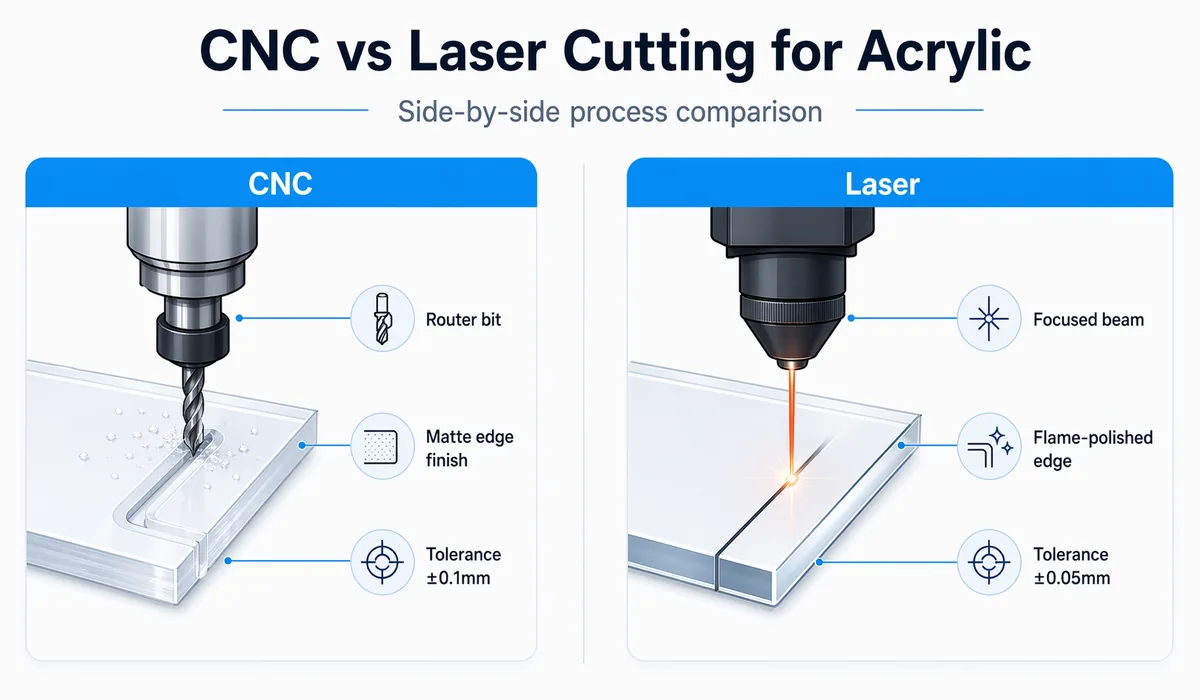
- Laser cutting acrylic is the standard method for sheet up to 20mm — above that, cut speed drops so sharply that CNC routing becomes faster and produces less edge stress.
- Laser-cut acrylic edges emerge semi-polished ('fire-polished') directly from the beam; CNC-routed edges come out matte and require a separate polishing step.
- CNC is the only method for 3D operations — chamfers, pockets, counterbores, and relief carving — which a laser beam cannot execute.
- In the 10–20mm middle zone, the decision comes down to three factors: shape complexity, edge-quality requirement, and production volume.
- Buying decisions based on 'laser sounds precise' or 'CNC sounds industrial' — rather than actual part requirements — are the most common spec mistakes I see on new B2B inquiries.
On this page
- What Each Method Actually Does to Acrylic
- When Laser Cutting Acrylic Wins
- When CNC Routing Acrylic Wins
- The Middle Zone: 10–20mm Decision Factors
- Full Comparison Matrix
- Edge Quality: What Buyers Actually See
- Cost Economics: Where Each Method Breaks Even
- Where Products Land: Real Application Mapping
- What I Tell Buyers Who Ask for the Wrong Method
What Each Method Actually Does to Acrylic
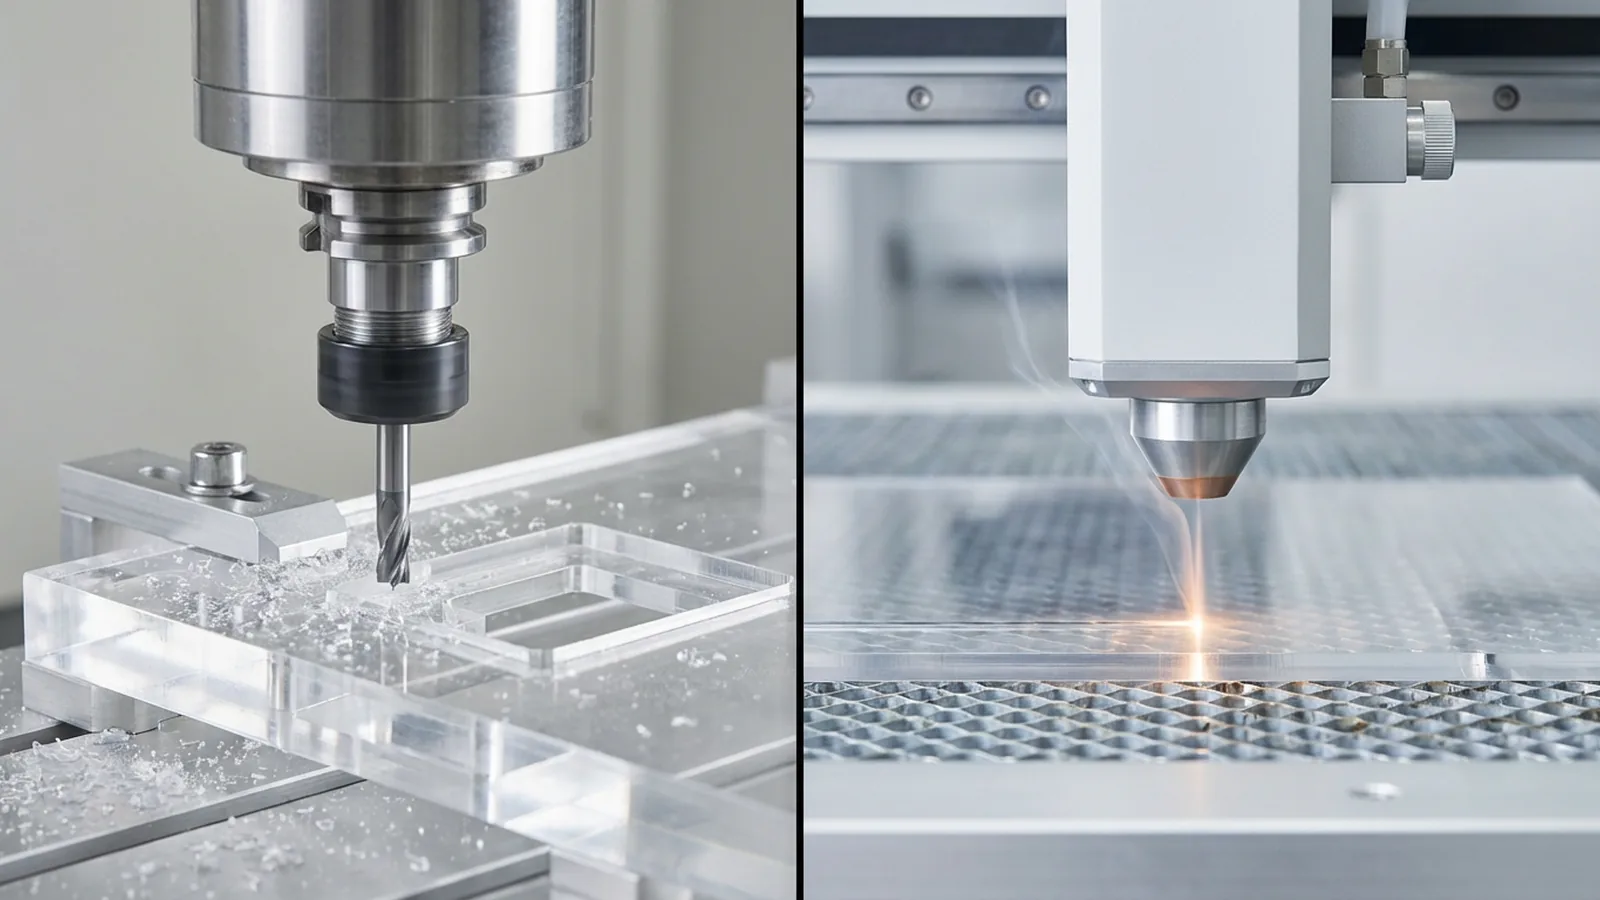
Laser cutting acrylic and CNC routing both remove material to produce a flat profile — but the physics behind each method produce very different results. A CO₂ laser vaporizes material along a programmed path using focused infrared energy; the cut edge is partially melted and re-solidified, leaving a semi-polished surface often called “fire-polished.” CNC routing uses a rotating carbide or diamond bit to mechanically mill material away; the result is a matte, slightly rough edge that requires a separate finishing step.
The difference in edge state is the single biggest practical distinction between the two methods — and it cascades into every downstream decision about polishing, assembly, and total fabrication cost. For an overview of where cutting fits in the full nine-stage production sequence, see our guide to how custom acrylic products are made.
When Laser Cutting Acrylic Wins
Laser cutting is the right choice when the part is thin sheet (≤10mm), the profile is a 2D shape, and edge polish quality matters without the cost of a separate finishing step. For the majority of custom acrylic work — sign holders, display risers, cosmetics stands, countertop organizers, trading card cases — laser is the default method and the right one.
The reasons come down to three practical advantages. First, speed: a CO₂ laser running at 15–40 mm/s on 3mm or 5mm acrylic completes most display-bracket profiles in under two minutes per part. CNC on the same profiles would be slower and would require a post-routing polish step. Second, edge quality: the heat from laser cutting acrylic partially melts the PMMA surface and re-solidifies it, producing a transparent edge that looks finished without additional processing. Third, complexity in 2D: laser paths can follow tight radii, fine lettering cutouts, and irregular curves that a rotating CNC bit would struggle to match cleanly at small scales. That fire-polished edge is not automatic, though — power, speed, and focus height decide whether it comes off the bed flaw-free, and our acrylic CO₂ laser cutting edge quality guide covers the parameters and the defects to inspect for.
I watch buyers request CNC for thin-sheet work when laser is clearly faster and cheaper — sometimes because “CNC” sounds more industrial and precise, which is a perception mismatch. For 3mm display parts with intricate profiles, laser wins on every metric.
Laser cutting acrylic — optimal conditions
| Factor | Laser Advantage |
|---|---|
| Thickness | ≤ 10mm optimal; acceptable to 20mm |
| Shape complexity | High 2D complexity, fine curves, tight radii |
| Edge quality | Semi-polished directly from beam — no extra step |
| Production volume | Fast cycle time, low per-part cost at any volume |
| Tolerance | ±0.1mm standard on 2D profiles |
| Material type | Cast or extruded PMMA sheet |
Epilog Laser, one of the leading CO₂ laser system manufacturers, documents PMMA as one of the cleanest-cutting materials on CO₂ systems — the wavelength (10.6 µm) is strongly absorbed by acrylic, producing a controlled vaporization with minimal charring when parameters are dialed correctly1.
When CNC Routing Acrylic Wins
CNC routing is the right choice when the part is thick (above 20mm), the operation is 3D (chamfers, pockets, relief routing), or the tolerance requirement is tighter than ±0.1mm. These conditions come up most often in award fabrication — block awards, trophies, trophy bases — and in structural components of large display systems.
The physics are straightforward. Laser cutting speed drops roughly in half with every thickness doubling: a parameter that cuts 5mm at 30 mm/s will cut 10mm at around 15 mm/s and 20mm at around 7–8 mm/s. By the time you reach 25mm acrylic, laser cutting is so slow that a CNC router — which does not lose proportional speed with thickness the way a laser does — becomes faster per part even after factoring in the post-routing polish step. Additionally, heat buildup in thick acrylic from repeated laser passes introduces micro-stress near the cut edge, which can lead to edge cloudiness or, in the worst cases, stress cracking at assembly joints. CNC removes material mechanically, so there is no heat-affected zone in the bulk of the part.
The 3D capability distinction is absolute. A laser is a 2D process — it can only cut a vertical path through a flat sheet. Chamfered bases, countersunk holes, scalloped pockets, angled faces on award blocks — none of these can be produced by a laser. CNC routing on a 3- or 4-axis machine handles all of them. I’ve seen 25mm acrylic award bases that a laser can technically cut (if slowly), but the chamfered perimeter that makes them look premium is a purely CNC operation.
CNC routing acrylic — optimal conditions
| Factor | CNC Advantage |
|---|---|
| Thickness | 20mm+; only option above 25mm |
| Operations | Chamfers, pockets, counterbores, relief routing, angled faces |
| Edge stress | No heat-affected zone — lower internal stress at cut edge |
| Tolerance | ±0.05mm and tighter, for precision assemblies |
| Material type | Cast block and thick sheet; handles solid cast stock |
| Post-processing | Edge requires flame or diamond polishing after routing |
The Middle Zone: 10–20mm Decision Factors
The 10–20mm range is where the decision gets genuinely case-specific. Both methods are technically capable at these thicknesses, and neither is a clear default. Three factors break the tie.
Shape complexity: If the part is a simple rectangle or clean polygon, CNC is often competitive — routing speed at 12–15mm is acceptable, and the post-polish step is predictable. If the part has fine interior cutouts, tight curves, or detailed 2D graphics, laser is still the cleaner choice because CNC bit diameter sets a minimum inside-corner radius that a laser doesn’t have.
Edge quality requirement: For a part where the edge is a visible feature — a premium display case panel, an award plaque with an exposed beveled edge — CNC followed by diamond polishing produces a flatter, more optically precise edge than laser at these thicknesses. The laser’s fire-polished edge at 15mm is acceptable but not glass-clear; diamond-polished CNC edges are. For a part where the edge is hidden in an assembly joint, the difference doesn’t matter and laser is faster.
Production volume: At high volumes (500+ pieces per run), laser’s per-cycle speed advantage is decisive even in the middle zone — the time savings compound across hundreds of parts. At low prototype volumes (10–50 pieces), CNC is often practical because setup time is a smaller proportion of total run time and the superior edge on thick material may be worth the slower cycle.
Selecting acrylic thickness is closely related to this decision — thicker designs push toward CNC. For a framework on choosing the right thickness in the first place, see our acrylic thickness guide.
Full Comparison Matrix
The table below summarizes the practical performance of laser cutting acrylic versus CNC routing across the dimensions that matter for custom B2B fabrication. These figures reflect production data from our facility across 2,000+ projects — not manufacturer specs, which are theoretical maximums.
| Metric | Laser Cutting | CNC Routing |
|---|---|---|
| Optimal thickness range | 1.5–20mm | 10mm–50mm+ |
| Cut speed at 5mm | 25–35 mm/s | 15–25 mm/s |
| Cut speed at 15mm | 7–10 mm/s | 10–18 mm/s |
| Edge quality (as-cut) | Semi-polished (fire-polished) | Matte / rough |
| Post-processing needed | Usually none ≤10mm | Flame or diamond polishing |
| 2D shape complexity | Excellent (tight radii, fine detail) | Good (limited by bit diameter) |
| 3D operations | Not possible | Full capability |
| Tolerance (standard) | ±0.1mm | ±0.05mm |
| Internal stress at cut | Moderate (heat-affected zone) | Minimal |
| Setup cost (first article) | Low (fast program load) | Low–moderate |
| Per-piece cost, thin sheet | Lower | Higher (+ polish step) |
| Per-piece cost, thick stock | Higher (slow cycle) | Lower |
| Best applications | Displays, cases, organizers, signage | Awards, block trophies, structural parts |
Edge Quality: What Buyers Actually See
Edge quality is the most visible output difference between the two cutting methods, and it directly affects product tier. Understanding what each method produces — and what finishing restores — helps you spec the right process without overspending on polish steps you don’t need, or underspending and delivering a product that looks raw.
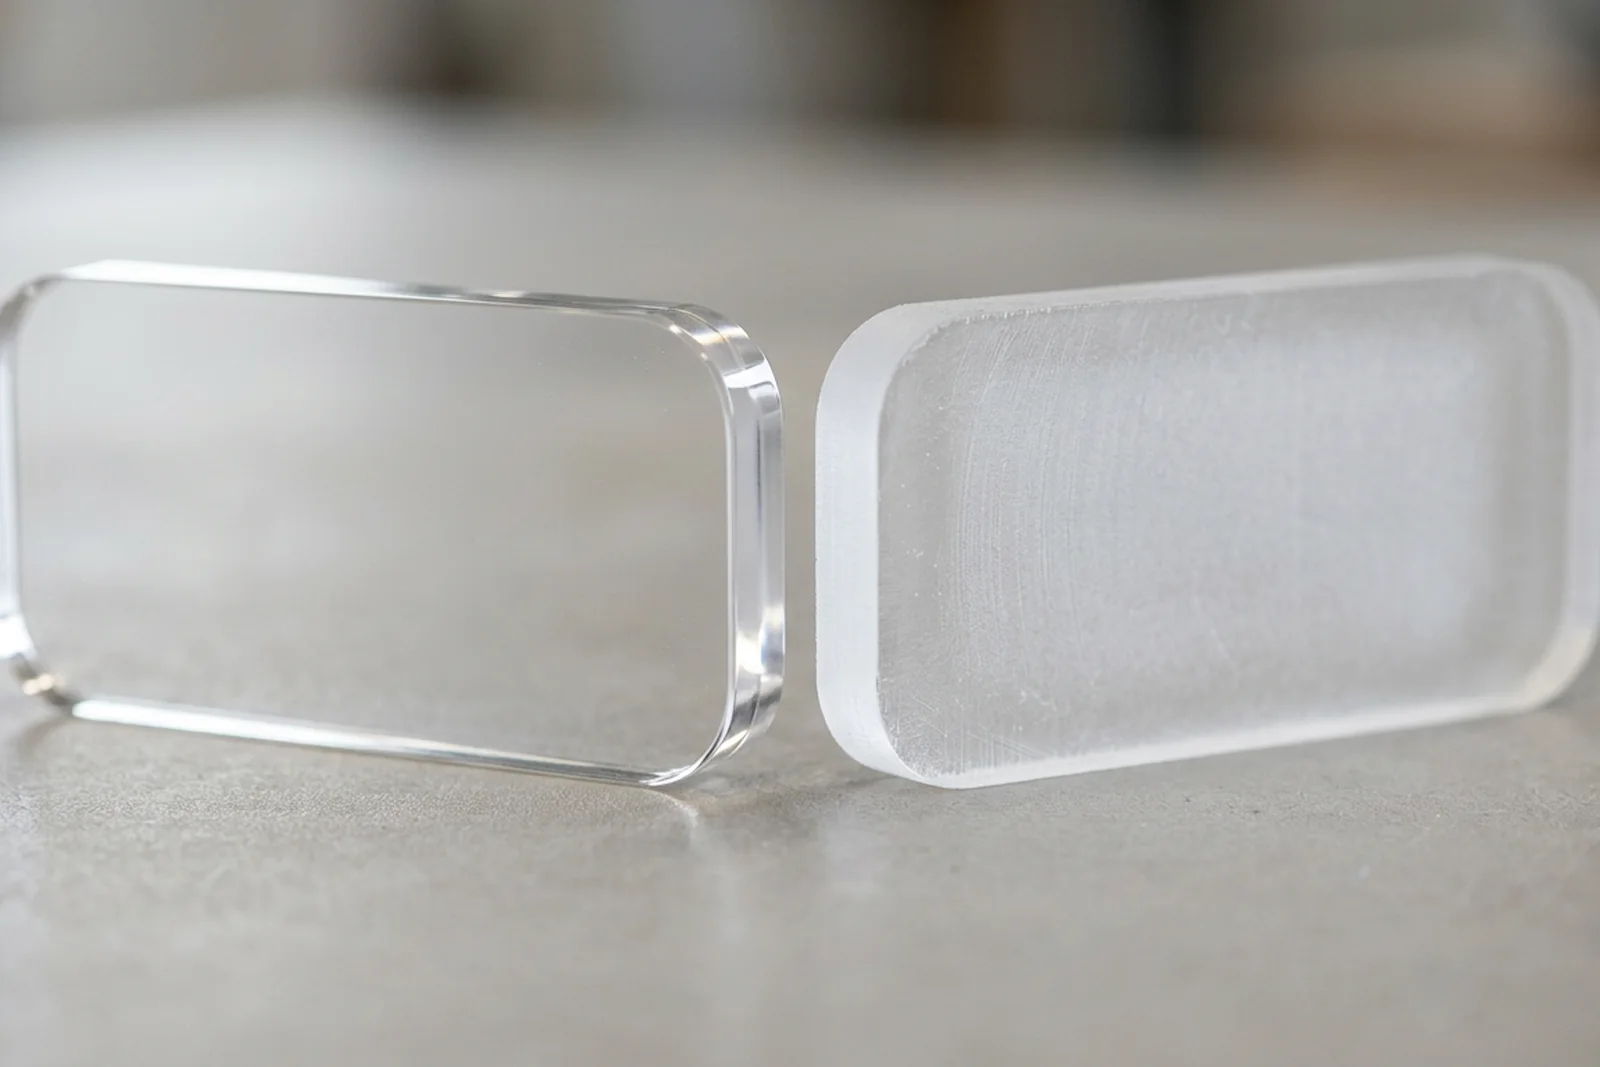
A laser-cut edge on 5mm clear cast acrylic emerges from the machine transparent and smooth. Under normal display lighting, it reads as finished. This is why laser cutting acrylic dominates production for retail display panels, sign holders, and cosmetics display stands — the edge is commercially acceptable straight out of the machine, and additional polishing is a cost that isn’t required.
A CNC-routed edge on the same 5mm material comes out matte and slightly scored from the bit. It transmits light poorly and looks unfinished. Flame polishing — a 30-second pass per edge — restores transparency. Diamond polishing goes further: a rotating diamond abrasive produces a glass-clear, optically flat edge that surpasses even the laser’s fire-polished result. For a full breakdown of when each method is the right call, see our guide on diamond vs flame polishing acrylic. For acrylic awards and premium display cases where the edge is a design feature, CNC followed by diamond polishing is the specification — the edge clarity is visibly superior to any laser-only result.
On the shop floor I check laser head alignment and focus depth every shift. A laser head that’s drifted even 0.5mm out of focus produces a wider kerf, more melt re-solidification on the edge walls, and a translucent rather than transparent result — which looks fine at a glance but shows cloudiness under direct lighting. This is one of the quality variables buyers can’t see in a photo or spec sheet: a laser cutting acrylic at the correct focus produces a visibly different edge from one that’s marginally out of spec.
The Plastics Industry Association reports that surface and edge quality defects — visible finish inconsistency, cloudiness, and dimensional variation — are the leading cause of quality rejects in plastics fabrication2. Correct process selection and machine calibration are the upstream controls; the polish step is a correction, not a substitute for them.
Cost Economics: Where Each Method Breaks Even
Fabrication cost for laser cutting acrylic and CNC routing is not fixed — it shifts with thickness, volume, and how much post-processing the part requires. Understanding the breakeven points helps you evaluate quotes and ask the right questions when your fabricator proposes one method over the other.
For thin-sheet work (under 10mm), laser has a structural cost advantage: faster cycle time, no post-routing polish step, and lower scrap rate from the more controlled cut. A 5mm acrylic display bracket that takes 90 seconds per piece on a laser might take 3–4 minutes on a CNC (including tool-path overhead) plus a 30-second flame polish step. At 300 pieces, that difference is real money.
For thick stock (above 20mm), the economics flip. Laser cutting 25mm acrylic is so slow — and the post-laser polishing requirement is higher because the fire-polished edge at that thickness is less optically clean — that CNC routing plus diamond polishing is often faster and cheaper total. The Plaskolite PMMA technical documentation notes that PMMA’s thermal sensitivity means laser heat input increases non-linearly with thickness, making thick-material laser cutting progressively less efficient3.
Setup cost is roughly equivalent for both methods: programming a laser or a CNC tool path takes similar time for a new job. The break-even is in run time. For acrylic display stands in 3–8mm sheet — the bulk of retail display fabrication — laser is the economical default. For thick award blocks and structural bases, CNC is both faster and higher quality.
Where Products Land: Real Application Mapping
The cutting method decision is ultimately determined by the product category. Here is how the split plays out across the product types we fabricate most often.
Laser-dominant products: Display risers and shelves (3–8mm), sign holders (3–5mm), countertop organizers (3–5mm), brochure holders (3mm), cosmetics display stands (3–8mm), acrylic frames (3–5mm), gift boxes (3–5mm), and most thin trading card display panels. These products share two properties: they’re thin sheet, and their edges are either hidden in joints or are a finished surface that laser’s fire-polished result handles correctly. For precision-cut trading card display cases where collectors expect glass-clear panels and tight dimensional tolerances, we laser-cut the 5mm panels and CNC-route the 15mm base. For an applied example of laser-dominant production on a branded signage program, see the 3D acrylic letters dimensional logo signage case study.
CNC-dominant products: Solid block awards (15–50mm), corporate trophies (20–50mm), heavy display bases (20–25mm), trophy plinths, and thick structural components in large floor-standing display systems. These require either the 3D capability CNC provides (chamfers, pocketed text, angled faces) or the thickness range where CNC becomes faster and produces less edge stress. I’ve run award base programs where we machine five faces of a 40mm block on a 4-axis CNC — a laser cannot touch that geometry.
Mixed-method products: Large display cases (5mm walls laser-cut, 20mm base CNC-routed), premium cosmetics countertop displays (thin panels laser, thick back support CNC), and complex branded retail fixtures that combine thin graphic panels with thick structural elements. Mixing methods within a single project is normal and often optimal — use each process for the part geometry it handles best.
For a full picture of how we handle customization across cutting methods and finishing options, see our customization and capabilities overview.
What I Tell Buyers Who Ask for the Wrong Method
I handle the shop-floor side of about half our incoming B2B inquiries, and the method mismatch I see most often runs in one direction: buyers request laser when CNC is cheaper and better for their application. The reverse — requesting CNC for thin sheet — is less common, usually because buyers assume CNC is the “premium” option.
The typical scenario: a buyer specifies a 25mm clear acrylic award block and asks for laser cutting because they associate laser with “precision” and “clean edges.” What they’ll get from laser at 25mm is a slow cut, a fire-polished edge that isn’t optically flat at that thickness, and a price premium for the time on the machine. The same block CNC-routed takes less time, produces a flatter cut edge that polishes to a better final finish, and costs less per piece. When I walk buyers through these three realities on a quote call, they almost always pivot to CNC without pushback — the logic is clear once you see the numbers.
The other mismatch: buyers who send in a thin 5mm display panel design and ask for CNC because a previous supplier used it. Usually the previous supplier used CNC because they didn’t have a well-calibrated laser, not because CNC was the right process. We run both methods in-house across 8 laser cutters and 4 CNC machines — we have no financial incentive to push one over the other, which means our recommendation on any given quote is based on what the part actually needs.
If you’re unsure which method is right for your design, send the drawing to inquiry@wetopacrylic.com and we’ll specify both cutting method and edge finish in the quote with a brief explanation of why.
Footnotes
-
Epilog Laser — Laser Cutting and Engraving Resources — technical library from a leading CO₂ and fiber laser system manufacturer documenting material behavior, optimal parameters, and cutting performance for PMMA and other common fabrication materials. ↩
-
Plastics Industry Association — the US trade association representing the full plastics manufacturing supply chain. Industry process efficiency and quality defect data referenced from their operational benchmarking publications. ↩
-
Plaskolite PMMA technical resources — US-based acrylic sheet manufacturer; their technical library documents cast and extruded PMMA thermal properties, cutting behavior, and thickness-specific fabrication guidance that informs our process parameter selection. ↩
Frequently Asked Questions
Is laser cutting or CNC better for acrylic?
It depends on thickness and shape. Laser cutting acrylic is faster and cleaner for sheet under 20mm with 2D profiles — the beam leaves a semi-polished edge that often needs no further finishing. CNC routing is better above 20mm, for 3D operations (chamfers, pocketing), and for interior cutouts that require tight-tolerance routing. Most custom acrylic work uses both methods across different parts of the same project.
What thickness can you laser cut acrylic?
CO2 laser cutters handle acrylic up to about 20mm efficiently. Above 20mm, cutting speed drops sharply — roughly halving with each thickness doubling — and heat buildup near the cut edge introduces stress that can cause micro-cracking. At our facility we transition to CNC routing above 20mm as standard practice; anything above 25mm uses CNC exclusively.
Does CNC routing leave a clean edge on acrylic?
No — a freshly CNC-routed acrylic edge is matte and rough from the carbide bit. It requires a separate flame polishing or diamond polishing step to become optically clear. Laser-cut edges emerge semi-polished directly from the beam due to the heat of the cutting process, reducing post-processing on thin sheet work.
Which acrylic cutting method is cheaper?
For thin sheet (under 10mm) in standard 2D shapes, laser cutting is almost always cheaper — faster cycle time, lower per-piece cost, and no post-polishing needed on edges. For thick stock or complex 3D routing, CNC is more cost-effective because laser cutting at those thicknesses becomes slow enough to flip the economics. Setup cost is roughly equal for both methods once a job is programmed.
Can the same acrylic project use both laser and CNC?
Yes, and many do. A common example: a display case where thin wall panels (5mm) are laser-cut for speed and clean edges, while the thick base (20mm) is CNC-routed to hold tight tolerances on the assembly footprint. Running both methods within the same project is standard practice at any full-capability acrylic fabricator.
Got geometry that's pushing limits?
Send us a sketch or CAD file. I'll tell you whether it's a laser job, a CNC job, or both — and what tolerance and edge quality to expect on your material.