Diamond vs Flame Acrylic Polishing: Which Method to Spec
The wrong polishing spec on a display case order doesn't show up until the edges start to haze — here's how to get it right before you quote.
Key Takeaways
- Flame-polished acrylic edges can stress-craze in as little as 72 hours when cleaned with isopropyl alcohol — a common display-case maintenance routine that no one warns buyers about.
- Diamond polishing produces a flatter, more optically precise edge than flame — measurably clearer on thicknesses above 8mm where flame heat haze becomes visible.
- Geometry sets the hard limit: diamond tooling requires a straight or gently curved edge; flame polishing is the only practical option for tight inside curves and internal cutouts.
- Cast acrylic polishes cleanly with both methods; extruded acrylic flame-polishes poorly — the material's internal stress causes uneven surface melting that leaves a mottled finish.
- RFQ language matters: writing 'polished edges' on your spec sheet tells your fabricator nothing. Specify 'diamond polished to mirror finish' or 'flame polished, clear edge' to get what you actually want.
On this page
- How Diamond Polishing on Acrylic Actually Works
- How Flame Polishing Acrylic Actually Works
- Edge Quality Side by Side
- Stress Crazing: The Risk Buyers Don’t Know About
- Material Compatibility: Cast vs Extruded Acrylic
- Thickness Limits and Geometry Rules
- Full Comparison: Diamond vs Flame Polishing
- Cost and Time at Scale
- The Sanded-and-Buffed Alternative
- Which to Spec: Application-by-Application Guide
- How to Specify Acrylic Polishing on Your RFQ
- Wetop’s Acrylic Polishing Capability
How Diamond Polishing on Acrylic Actually Works
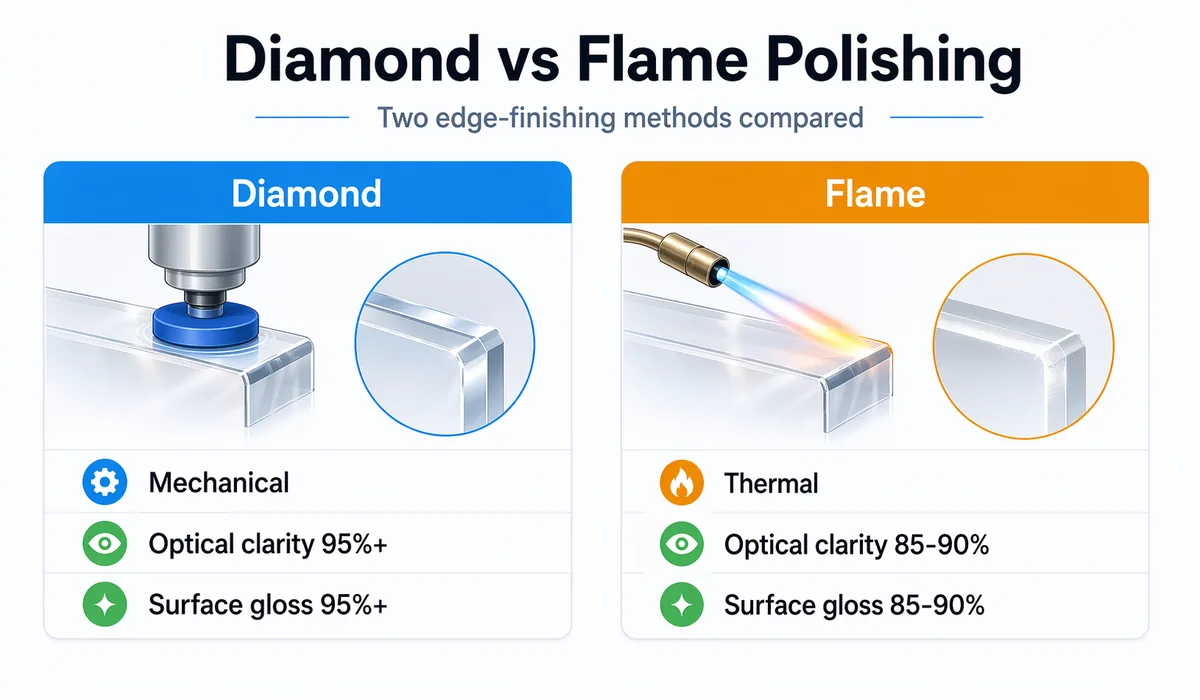
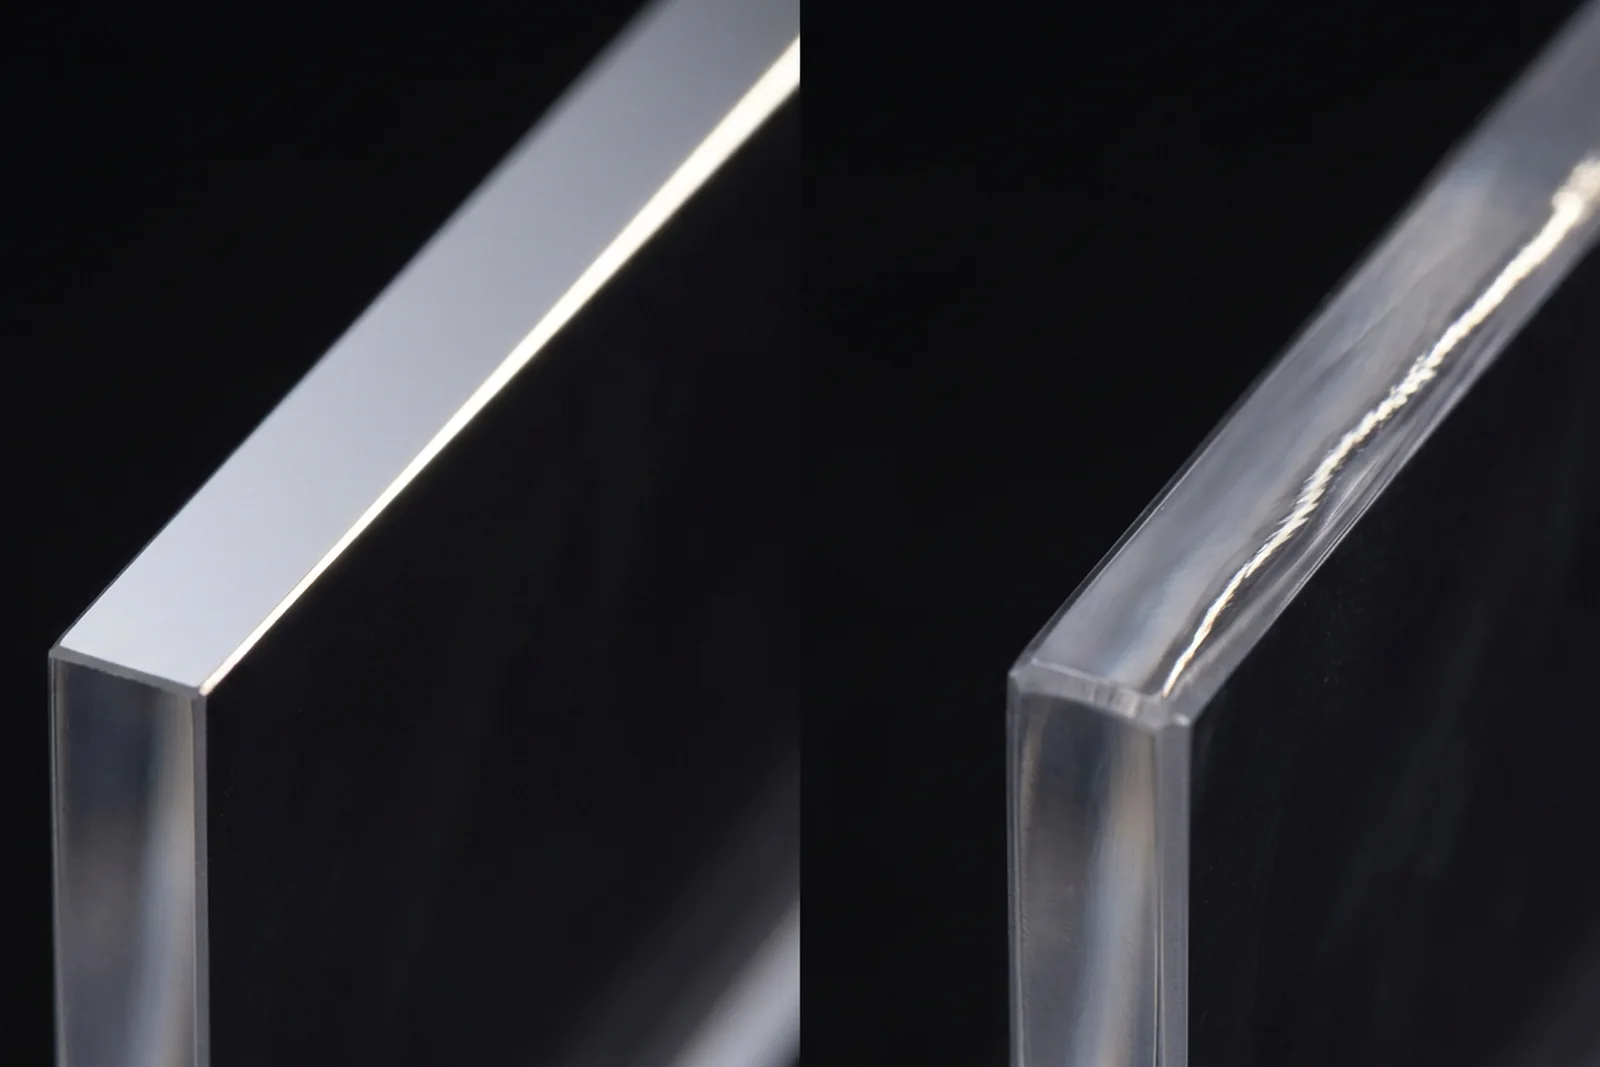
Acrylic polishing method — diamond or flame — is the spec decision that determines long-term edge clarity on every custom display. Diamond polishing uses a CNC-controlled cutting head fitted with a diamond-tipped tool to skim the acrylic edge at high speed. The tool removes a precise layer of material — typically 0.1 to 0.3mm — leaving a mechanically flat, optically clear surface without applying heat. The result is called a mirror finish because the edge genuinely reflects like glass.
The process runs on a dedicated diamond polishing machine, not a standard CNC router. The diamond tool rotates at high RPM against a programmed edge path, removing surface irregularities left by the preceding cut — whether laser or CNC routed. Because material is removed mechanically and not thermally, there is no heat-affected zone, no surface stress introduction, and no reflow of the acrylic polymer. The edge you see after diamond polishing is flat at the molecular level in a way that heat-based methods cannot match. This mechanical precision is why diamond polishing is the standard finish for acrylic awards and premium display cases where the edge itself is a visible design element, not a concealed joint.
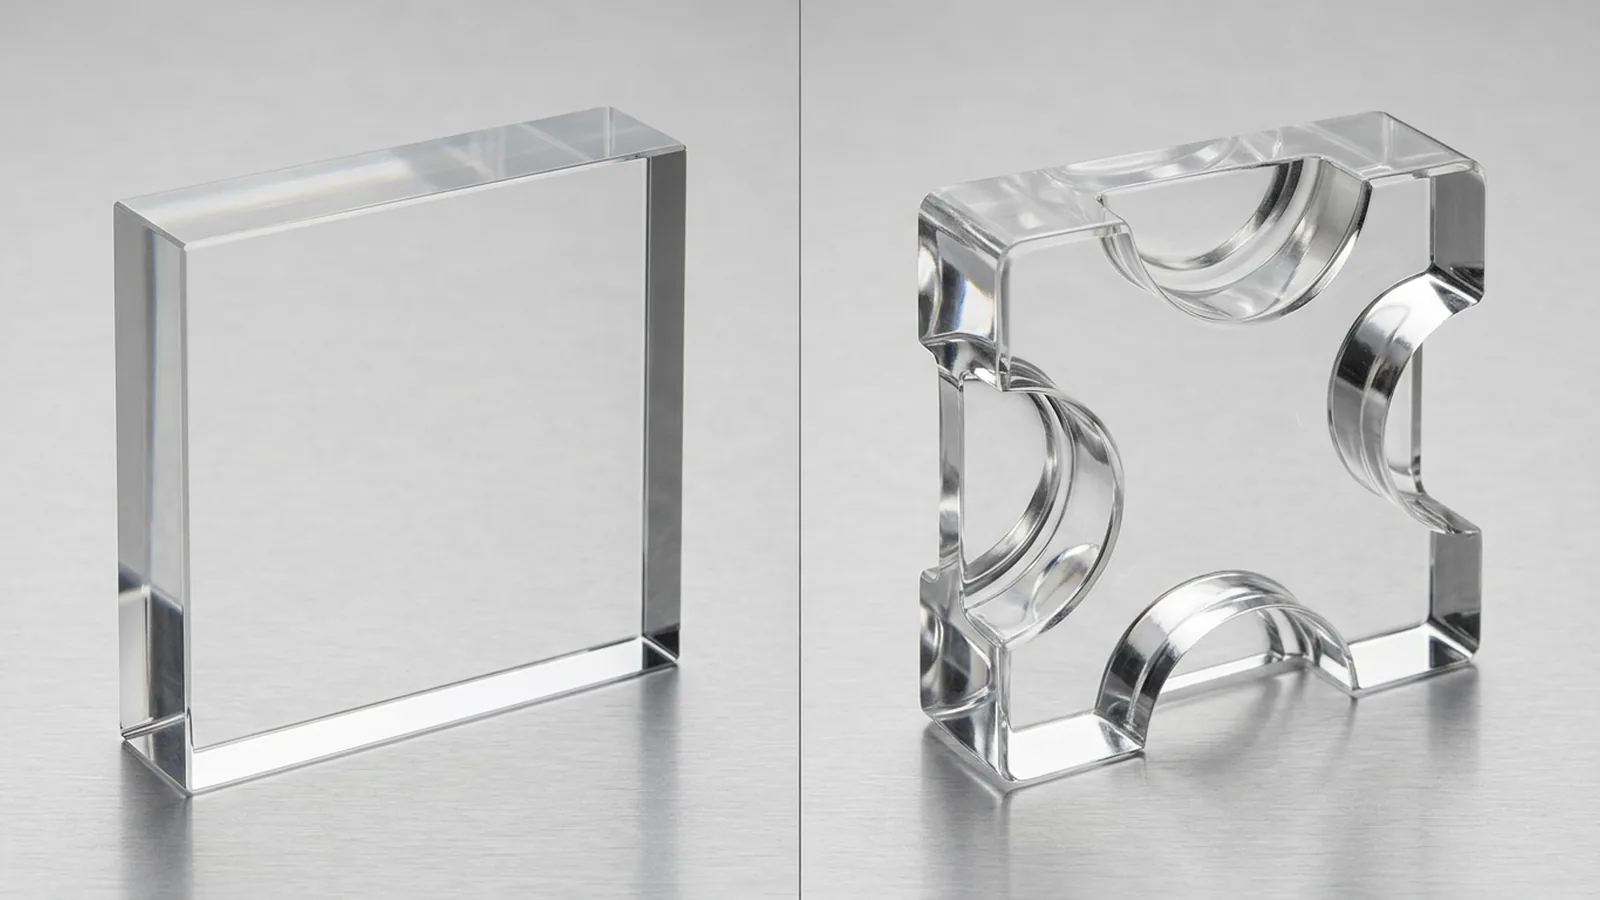
The geometry constraint is real: the diamond tool must traverse the edge in a straight or gently curved path. Tight inside curves, internal cutouts, and irregular profiles are inaccessible to the tool head. For those geometries, flame is the only option — or the design must be changed to give the diamond tool room to run.
How Flame Polishing Acrylic Actually Works
Flame polishing melts the surface of the acrylic edge using a hydrogen-oxygen torch tuned to approximately 2,000°C. The torch passes along the edge at a controlled speed — typically 3 to 8 inches per minute — melting the top 0.1 to 0.2mm of the polymer. Surface tension pulls the molten layer smooth as it re-solidifies, eliminating the micro-scratches and saw marks left by cutting. When done correctly, the result is a glass-clear edge with no mechanical surface left behind.
The critical word is “when done correctly.” Flame polishing is operator-dependent in a way diamond polishing is not. Torch distance, travel speed, and dwell time at any given point must all be calibrated to the specific acrylic thickness and grade. Move too fast and the edge remains matte in patches; move too slow and the surface overheats, bubbling and turning white — a defect called “blushing” that cannot be reversed without re-cutting the edge. I still remember the first time I watched a buyer reject a flame-polished display case on sight — the edges showed faint cloud patterns where the torch had hesitated at each corner. The operator had been rushing to hit a production quota, and the result was $800 of unusable assemblies.
The geometry advantage over diamond is absolute. A hydrogen-oxygen torch can follow any edge — straight, curved, tight radius, internal cutout — without fixture changes or accessibility limits. This makes flame polishing the only practical method for cosmetics display stands with curved top rails, acrylic organizers with rounded interior compartments, and any design where an inside corner needs a polished finish.
Edge Quality Side by Side
Diamond and flame polishing both produce clear acrylic edges — but “clear” covers a wide range, and the two methods land at different points on that range depending on thickness and material.
On 3-5mm cast acrylic, flame polishing produces an edge that is visually indistinguishable from diamond to the unaided eye under normal display lighting. Both methods deliver a transparent, glass-smooth result. The difference shows up under direct raking light or when the edge is viewed at an angle: diamond-polished edges have a flatter optical plane and show less internal scatter. Flame-polished edges at this thickness are commercially excellent and the right choice when cost or geometry favors them.
Above 8mm, the comparison shifts meaningfully. Flame polishing at 10mm and above requires more heat input to reach the full depth of the edge. That additional heat increases the probability of two visible defects: heat haze (a faint cloud or amber tint in the melted zone) and micro-bubbles (tiny gas pockets trapped as the polymer re-solidifies under cooling). Neither defect is guaranteed — a skilled operator using the right torch parameters on cast acrylic can produce clean results at 10mm — but the failure rate climbs and quality becomes harder to control consistently across a production run. Diamond polishing at 10mm or 15mm produces the same mechanically flat result regardless of thickness, because the material removal is mechanical and does not depend on heat penetration depth.
Stress Crazing: The Risk Buyers Don’t Know About
Stress crazing is the most consequential difference between the two polishing methods for display case buyers — and almost nobody talks about it in product spec discussions.
Flame polishing works by rapidly melting the acrylic surface and allowing it to re-solidify. That thermal cycle introduces residual stress into the polymer immediately beneath the polished surface. The stress is compressive on the outer face and tensile just below it — stable under normal conditions, but primed to release when the edge contacts certain chemicals. Isopropyl alcohol (IPA) is the most common trigger, and IPA is also the most common cleaning agent used on acrylic display cases in retail environments. When IPA contacts a flame-polished edge, it penetrates the surface and acts as a plasticizer, relieving the residual stress. The polymer re-organizes along stress lines, forming a network of fine surface cracks called crazing. The timeline is not “eventually” — it can occur within 72 hours of first IPA contact and is irreversible without re-cutting and re-polishing the edge1.
Diamond polishing does not introduce thermal stress. The edge is mechanically skimmed, not melted. Residual stress from the original cutting step is reduced, not amplified. Diamond-polished edges are not immune to every chemical — aggressive solvents like acetone or MEK will attack any acrylic surface — but they are substantially more resistant to IPA-induced crazing than flame-polished edges.
For acrylic display cases that will be cleaned regularly with IPA or alcohol-based retail cleaning products, this is not a minor spec detail. It is the difference between a product that lasts three years of retail deployment and one that begins crazing within the first six months. I walk every new buyer who orders polished cases through a sample of both finishes before we quote, because the price gap is real and the stress-crazing risk is something they need to understand before they commit to flame.
Material Compatibility: Cast vs Extruded Acrylic
Both polishing methods work on cast acrylic (PMMA cast sheet). The performance difference on extruded acrylic is significant enough to be a hard constraint in many cases.
Cast acrylic is manufactured by pouring liquid methyl methacrylate monomer between glass molds and curing it under controlled conditions. The resulting sheet has a relatively uniform internal stress state and a polymer structure that responds predictably to both heat and mechanical tooling. Flame polishing on cast acrylic produces a smooth, consistent melt-and-reflow. Diamond polishing on cast acrylic produces a flat, clear mechanical surface. Both methods produce the finishes described in this article when applied to cast sheet.
Extruded acrylic is manufactured by pushing molten PMMA through a die — a faster, cheaper process that leaves the polymer chains with a preferred orientation (machine direction) and higher internal stress than cast sheet. When you apply flame heat to an extruded acrylic edge, that locked-in stress releases unevenly as the polymer softens, causing the surface to pucker, warp, or develop a mottled finish instead of flowing smooth. The result is rarely acceptable on polished visible edges. Extruded acrylic also has lower optical clarity than cast above 6mm — a difference that compounds with any polishing irregularity2. ASTM D48023 classifies acrylic sheet by grade and optical properties, making it the reference standard for confirming cast vs extruded on any incoming batch.
The rule: specify cast acrylic for any polished-edge application. If your RFQ does not specify cast, you may receive extruded — cheaper to source, but incompatible with the edge quality you’re expecting. This applies to both polishing methods, but the failure mode is more visible and more common with flame.
Thickness Limits and Geometry Rules
The practical operating range for each polishing method follows directly from the physics described above.
Diamond polishing works reliably from 3mm through the upper limits of typical custom fabrication (50mm+). There is no thickness at which diamond polishing performance degrades — the tool removes material at the same rate regardless of part thickness. The constraint is geometry: the diamond tool head requires a straight or gently curved edge with enough clearance for the cutter housing. Inside corners with a radius under approximately 10mm are typically inaccessible. Designs with complex internal cutouts, tight curved profiles, or asymmetric edge angles need to route those edges to flame polishing.
Flame polishing works best on 1.5mm to 6mm. Quality is reliable and repeatable in this range on cast acrylic by a skilled operator. From 6mm to 10mm, flame polishing is technically achievable but requires tighter process control and carries elevated risk of heat haze. Above 10mm, we do not recommend flame polishing for any application where edge clarity is a design requirement — the risk of visible thermal defects is high enough that diamond polishing or a sanded-and-buffed finish is a more honest recommendation. Flame’s geometry advantage is unlimited: the torch follows any path the operator can access.
| Dimension | Diamond Polishing | Flame Polishing |
|---|---|---|
| Minimum thickness | 3mm | 1.5mm |
| Optimal thickness range | 3mm–50mm+ | 1.5mm–6mm |
| Acceptable upper limit | No upper limit | 10mm (with caution) |
| Not recommended above | N/A | 10mm |
| Straight edges | Yes | Yes |
| Gently curved edges | Yes (R > ~10mm) | Yes |
| Tight inside curves (R < 10mm) | No | Yes |
| Internal cutouts | No | Yes |
Full Comparison: Diamond vs Flame Polishing
The table below reflects production data from our facility across 2,000+ custom acrylic projects — not theoretical specs. Where ranges are shown, the spread reflects thickness and geometry variation across real orders.
| Factor | Diamond Polishing | Flame Polishing |
|---|---|---|
| Edge clarity (≤6mm) | Mirror — optically flat | Glass-clear — visually excellent |
| Edge clarity (>8mm) | Mirror — consistent | Variable — heat haze risk increases |
| Geometry compatibility | Straight + gentle curves only | Any geometry including tight curves |
| Material compatibility | Cast + extruded (both acceptable) | Cast acrylic only (extruded = poor result) |
| Thermal stress introduced | None | Yes — residual compressive surface stress |
| IPA/solvent crazing risk | Low | High — visible within 72 hours of contact |
| Speed per linear inch (volume) | Faster (CNC-controlled, consistent) | Slower (manual, operator-paced) |
| Tooling cost | Higher (diamond cutter equipment) | Lower (hydrogen-oxygen torch setup) |
| Operator skill dependency | Low (CNC-programmed) | High (torch speed + distance) |
| Best thickness range | 3mm–50mm+ | 1.5mm–6mm |
| Post-processing compatibility | Excellent for solvent bonding | Stress zone must be avoided at glue lines |
Cost and Time at Scale
The per-unit cost of acrylic polishing depends on three variables: method, linear edge length per piece, and order volume. The economics shift depending on which direction you’re optimizing.
Flame polishing has a lower tooling cost — a hydrogen-oxygen torch setup is inexpensive compared to a diamond polishing machine. For a one-off sample or a low-volume order with short total edge length, flame is the cheaper method and the faster one to set up. There is no CNC program to write, no tool head to mount, no fixture to design for the part geometry.
Diamond polishing becomes the more economical choice as volume increases. The machine runs at a consistent, CNC-programmed speed that does not depend on the operator’s pace on a given day. For a production run where each piece has 20+ linear inches of polished edge, diamond is faster per inch and more consistent in output quality. Quality consistency at volume is itself a cost factor: rework and rejects from flame polishing variability add real cost that doesn’t show up in the per-piece polishing quote.
| Scenario | Pieces | Total polished edge/piece | Diamond cost delta | Recommendation |
|---|---|---|---|---|
| Sample order | 5–10 | Any | Not meaningful | Flame (faster to set up) |
| Short run | 50 | ~10 linear inches | ~$0.30–$0.50/piece higher | Flame or diamond depending on geometry |
| Mid run | 200 | ~20 linear inches | ~$0.10–$0.20/piece higher | Diamond (speed + consistency) |
| High volume | 500+ | ~20 linear inches | Diamond equal or cheaper | Diamond (machine speed advantage) |
Note: these are directional figures reflecting our production economics, not published price lists. Actual cost differences vary by part complexity, geometry, and specific thickness. Request a comparative quote to get numbers tied to your actual design.
The Sanded-and-Buffed Alternative
There is a third option buyers sometimes encounter on low-cost quotes: sanding followed by buffing with a polishing compound. The edge is sanded through progressive grits (typically 400 → 800 → 1200 → 2000) and then buffed with a polishing wheel and compound to restore clarity.
The result is lower optical quality than either diamond or flame polishing on cast acrylic — a sanded-and-buffed edge has a slight milkiness under direct light that neither machine method produces. It is an acceptable finish for interior edges that are not design-visible, for frosted acrylic pieces where the edge is expected to scatter light, or for budget applications where the buyer understands the tradeoff.
I mention it here as context, not as a recommendation for any premium B2B application. If a supplier quotes “polished” without specifying the method and the price is significantly below your other quotes, it is worth asking whether the quoted finish is machine polished or hand-sanded-and-buffed. They are not the same result.
Which to Spec: Application-by-Application Guide
The right polishing method is determined by the product, its use conditions, and its geometry — not by a general preference for one method over the other.
| Product Category | Recommended Method | Reason |
|---|---|---|
| Acrylic display cases (retail) | Diamond | IPA cleaning exposure — flame crazing risk; edge is a visible design feature |
| Acrylic awards and plaques | Diamond | Mirror-clear edges expected; thick material (15-50mm) suits diamond |
| Acrylic blocks and paperweights | Diamond | Optically clear solid stock; edges polished as premium finish |
| Countertop display stands (straight panels, 5mm) | Flame or diamond | Geometry is simple; flame acceptable if IPA exposure is low |
| Cosmetics display stands with curved tops | Flame (curves) + Diamond (straight) | Mixed spec — curved rail needs flame, flat shelves suit diamond |
| Cosmetics/perfume display risers | Diamond preferred | Solvent cleaning in beauty environments; premium finish expectation |
| Signage and sign holders (3-5mm, indoor) | Flame | Simple geometry, low cost, no solvent exposure |
| Architectural acrylic panels | Diamond | Flatness and optical precision over large edge spans |
| Trading card display cases | Diamond | Collector-grade finish; cases handled repeatedly and cleaned with IPA |
| Watertight assemblies (solvent-bonded joints) | Diamond | Flame-stressed edges at glue lines risk crazing under bonding agent |
For acrylic jewelry displays and high-end cosmetics cases, I recommend diamond as a near-universal default — the buyers in those categories expect a finish that reads as premium, and they clean frequently. The added cost is almost never the reason a deal is lost; the reason is when someone specs flame to save $0.40 per piece and the cases come back hazy after the first store cleaning.
How to Specify Acrylic Polishing on Your RFQ
The most common polishing mistake I see on incoming quotes is an RFQ that says “polished edges” and nothing else. That instruction is ambiguous enough to mean anything from a $0.10 hand-buff to a $1.20 per-inch diamond pass. Here is the language that removes ambiguity.
| What you want | How to write it on the RFQ |
|---|---|
| Best possible optical clarity, straight edges | ”Diamond polished to mirror finish, all visible edges” |
| Clear edge on a curved profile | ”Flame polished, clear edge, [specify which edges or all edges]“ |
| Mixed: straight panels diamond, curved cutout flame | ”Diamond polished on all straight edges; flame polished on [describe curved feature]“ |
| Budget-acceptable, edge not design-visible | ”Sanded and buffed, 1200 grit minimum” |
| No polishing required (edge hidden in assembly) | “Sawn edge, no polishing required” (saves cost) |
Two additional spec notes that affect polishing decisions:
Specify cast acrylic. If you want flame polishing and do not specify “cast acrylic,” your fabricator may use extruded sheet. Write “cast acrylic sheet, [thickness]mm” in your material spec.
Flag IPA exposure. If your product will be cleaned with alcohol-based products, note it in your RFQ: “display case — will be cleaned with IPA.” A fabricator who knows this will recommend diamond polishing without you having to ask.
For a complete view of the fabrication process that polishing fits into, see our guide to how custom acrylic products are made and the related article on CNC vs laser cutting acrylic — cutting method determines the edge state that polishing starts from. For what a clean laser edge should look like before any polishing pass, see the acrylic CO₂ laser cutting edge quality guide.
Wetop’s Acrylic Polishing Capability
We run both methods in-house at our 5,000 m² Shenzhen facility. Diamond polishing runs on a dedicated CNC diamond polishing line — the same line we’ve used across 2,000+ B2B projects since we invested in it as part of our 2012 facility build-out. Flame polishing is done by operators who have been working these torches for years, not operators rotated in from other stations. We have no financial incentive to push one method over the other — we own both machines and they share floor space.
Standard practice: when a buyer’s order arrives and the RFQ says “polished” without a method, we assess the geometry and the application context before defaulting. If the geometry allows diamond and the application is a retail display case, we quote diamond and note why. If the geometry requires flame, we flag the stress-crazing consideration and confirm the buyer is aware.
For display cases and award pieces where polished edges are part of the product value proposition, we offer physical samples of both finishes before production. The cost to send a sample set of two edge finishes is marginal; the value of a buyer making an informed finish decision before production is not.
Specifications:
- MOQ: 50 pieces
- Production lead time: 15–20 days
- Sample lead time: 3–5 days
- Certifications: ISO 9001, SGS, ROHS
- 100% inspection on every piece before shipment
Send your design to inquiry@wetopacrylic.com with the quantity and your cleaning/use environment noted. We respond within 24 hours with a method recommendation and quote.
For a representative product where diamond polishing is non-negotiable, see our acrylic brand blocks destined for reception desks and boardrooms. Under angled office lighting, flame-polished edges reveal a slight haze that diamond-polished edges don’t — a difference your client’s eye catches in the first 5 seconds and never forgets. For a real-world example of polish spec on a high-visibility retail project, see the jewelry boutique mirror acrylic pedestal case study. Ready to spec your polish method? Send us your design and application context and we’ll quote both options with sample edges available on request.
Footnotes
-
Evonik PLEXIGLAS Technical Information — Chemical Resistance and Stress Crazing — Evonik, the manufacturer of PLEXIGLAS brand acrylic, documents the stress-crazing mechanism in their technical product library, including solvent compatibility data, IPA exposure effects, and how residual stress from thermal processing (including flame polishing) affects chemical resistance at the part surface. ↩
-
Plaskolite Technical Resources — Cast vs Extruded Acrylic — Plaskolite is one of North America’s largest PMMA sheet producers; their technical library covers the manufacturing and performance differences between cast and extruded acrylic sheet, including polymer orientation, internal stress profiles, optical clarity differences, and fabrication behavior under heat-based finishing operations. ↩
-
ASTM D4802 — Standard Specification for Poly(Methyl Methacrylate) Acrylic Plastic Sheet — the ASTM standard classifying acrylic sheet by grade, optical properties, and thermal characteristics. Relevant to understanding the material property differences between cast and extruded PMMA that affect polishing performance and residual stress behavior. ↩
Frequently Asked Questions
Which acrylic polishing method produces the clearer edge — diamond or flame?
Diamond polishing produces the optically flatter, more mirror-precise edge — especially above 8mm thickness where heat from flame polishing can introduce faint haze or micro-bubbles. Flame polishing produces a glass-clear result on thin cast acrylic (3-6mm) that is visually excellent under normal display lighting. For premium display cases and award pieces where edge clarity is a design feature, diamond is the correct spec.
Can flame-polished acrylic edges crack over time?
Yes — flame polishing creates residual surface stress by rapidly melting and re-solidifying the acrylic edge. When that edge contacts solvents like isopropyl alcohol (a common cleaning agent), the stress is released as surface crazing — a network of fine cracks that appears within hours of exposure. Diamond-polished edges do not carry the same heat-induced stress and are significantly more resistant to solvent crazing.
Which polishing method costs more?
Diamond polishing carries a higher tooling investment — the CNC diamond cutter line requires capital equipment that flame torches do not. At high volumes (200+ linear inches per run), diamond polishing is actually faster per linear inch than flame, which is slow and operator-dependent. At low volumes or for complex geometries, flame polishing is cheaper. The per-unit cost delta is typically $0.30-$0.80 per linear inch in favor of diamond at volume, with flame being cheaper below roughly 50-100 linear inches per order.
Does the polishing method affect lead time?
Marginally. Diamond polishing runs on a machine — it is programmable, repeatable, and does not depend on operator pace. Flame polishing is manual: a skilled operator with a torch moves edge by edge, and quality depends on their consistency. For high-volume orders with many polished edges, diamond is faster. For low-volume projects or complex geometries with curves, flame is often faster because it does not require fixture setup. Lead times at our facility are 15-20 days regardless of polishing method for production runs.
Can you use both diamond and flame polishing on the same piece?
Yes, and it is sometimes the correct specification. A display case with straight wall panels and a curved cutout at the top is a real example: we diamond-polish the straight panel edges for maximum clarity, then flame-polish the curved cutout because diamond tooling cannot follow that geometry. We specify the method per edge on the shop traveler. Buyers should feel free to ask for a mixed spec — it is standard practice at a full-capability fabricator.
Polish makes or breaks acrylic
Send us product type, budget, and finish target — glass-clear or functional. We'll quote diamond, flame, or hybrid, with edge samples on request before you commit.