





Serving Tray With Lid: Compartments & Cover Specs
Loose cover, hinged, snap-fit, or gasket-sealed — and bonded dividers vs routed wells vs removable inserts. The four decisions that shape the quote.
Need this made?Custom acrylic serving trays →
Key Takeaways
- An acrylic serving tray with lid and compartments is fully custom: you choose the lid type (loose cover, hinged, snap/friction-fit, or gasket-sealed), the divider method, the depth, and — for food service — a food-grade sheet.
- Dividers are built three ways: bonded acrylic walls (most rigid, permanent layout), single-piece routed wells (seamless, easiest to wipe, tooling-driven), or removable inserts (reconfigurable, easiest to ship flat).
- A lid needs its own depth budget: a snap or telescoping cover adds clearance above the tallest compartment, so plan internal depth around contents plus lid engagement, not contents alone.
- Thin flat lids are the warpage risk on a lidded tray — cast PMMA softens near 95 °C, so a lid trapped over warm or freshly-washed contents can bow if it is too thin for its span; 3–4 mm and a slight rib solve it.
- Compartments and lids raise tooling and finishing work, so the MOQ (100 pieces per design) and the 15–20 day production window matter more here than on a plain tray — get one sample before the bulk run.
On this page
- The four decisions behind a lidded, compartmented tray
- Lid types — loose, hinged, snap, or gasket-sealed
- Divider construction — bonded walls, routed wells, or removable inserts
- The depth math a lid quietly adds
- Thin lids and warpage — the failure mode to design out
- Food-safe and dishwasher caveats for a lidded tray
- Stacking and nesting with lids
- MOQ, tooling, and cost drivers for compartments and lids
The four decisions behind a lidded, compartmented tray
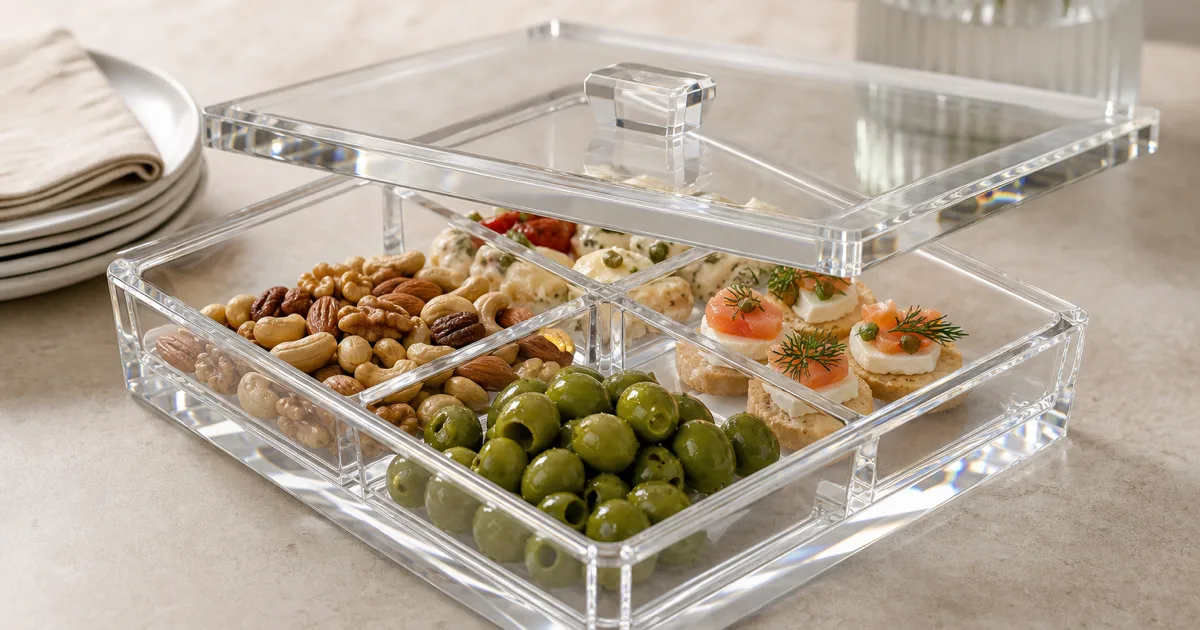
A serving tray with lid is spec’d on four choices: the lid type, how the dividers are built, the depth, and the sheet grade. Yes — you can order an acrylic serving tray with lid and internal compartments in any combination of the four, because it is a made-to-order piece — cast PMMA walls and base, plus a separate cover and internal partitions — and once those decisions are locked, everything else (printing, handles, packaging) is a finish layered on top.
The reason these four dominate is that each one changes a different cost line. The lid type sets extra material, extra tooling, and a separate finishing pass. The divider method decides whether the tray is one machined piece or an assembly of bonded walls. Depth has to cover the contents and the lid engagement, not the contents alone. And the grade decides whether the tray is food-safe or display-only. Miss any one at the RFQ stage and the quote comes back with a question instead of a price.
The lidded compartment tray is the request I most often see under-specified — running our laser, CNC, and polishing lines since 2014 has not changed that. A buyer sends “tray with lid and dividers, 12 x 9 inches” and every one of the four decisions is still open. This guide walks each decision the way we walk buyers through it on a real RFQ, including the depth math a lid quietly adds and the thin-lid warpage trap that surfaces after the sample ships.
One framing note, because this term pulls both household and trade searches. Everything below describes a custom production run, not a shelf purchase: we cut lidded trays to drawing at a MOQ of 100 pieces per design, FOB Shenzhen, for restaurant groups, catering companies, hotel banquet departments, and brands building a house format. A catering tray with lid ordered by the hundred is the same build as one — the difference is that the lid fit, the divider layout, and the finishing pass get engineered once and then repeat. If what you need is a single tray for a home kitchen, a retailer will serve you faster than a factory will; if you need the same tray a hundred times over, keep reading, because the four decisions below are exactly what a production quote is priced on.
Lid types — loose, hinged, snap, or gasket-sealed
There are four practical lid types for an acrylic serving tray, and they climb in cost and complexity in that order: a loose telescoping cover, a hinged lid, a snap or friction-fit lid, and a gasket-sealed lid. Each answers a different question — is the lid there for dust, for handling, for repeated service, or for keeping moisture out — and the answer drives both the tooling and the price.
A loose telescoping cover is the default: a shallow acrylic box that drops over the outside of the tray rim. It is the cheapest lid, adds no hardware, and is the right call when the lid exists for dust protection, display, or a clean retail look. The trade-off is that nothing holds it down — tip the tray and the cover slides off — so it suits a tray that sits and displays more than one that travels full.
A snap or friction-fit lid has a downturned edge sized to grip the tray rim, so it stays seated during handling and light transport. It costs more than a loose cover because the fit tolerance is tighter: too loose and it falls off, too tight and it stresses the rim every time it comes off. On our side that fit is a sampling check, not a drawing guarantee — when my operators dial in a snap lid, the first sample tells us whether the drawn clearance actually grips, because acrylic’s spring-back after forming means the real fit is confirmed in hand, not on paper.
A hinged lid stays attached to the tray at the back edge and swings open, which is the right choice when staff open and close the same tray dozens of times a service. The hinge is the cost driver — metal piano, pin or barrel hinge hardware bonded or screwed to the lid and wall (acrylic cannot flex as a one-piece living hinge) — and it becomes a QC line item, because a hinge that binds or a screw that loosens is the classic lidded-tray defect. A gasket-sealed lid carries a compressible seal seated in a groove machined into the rim, and it is the only lid that meaningfully resists spills and airborne moisture. It is the most expensive route: the seal groove is extra machining, the gasket is a sourced part, and the whole assembly gets checked for closure at final inspection.
Divider construction — bonded walls, routed wells, or removable inserts
Compartments in an acrylic tray are built three ways, and the method decides the tray’s rigidity, how easily it cleans, and how it ships. The three routes are bonded acrylic dividers, single-piece routed wells, and removable inserts — and unlike the lid, this choice is usually invisible in the buyer’s brief even though it changes the whole build.
Bonded acrylic dividers are separate walls cut to size and solvent-cemented into the tray in a grid. This is the most rigid, most precise layout — you get crisp vertical partitions at exactly the positions you draw — and it is a common route for fixed-layout serving and presentation trays. The trade-offs are that the layout is permanent once bonded, and every cemented joint is a finish-quality point: a clean solvent joint is nearly invisible, while a stressed or over-wetted joint clouds and can craze later. Work on the bonding bench since 2014 taught me that the divider layout is where a rushed job shows first — the joints are also where liquid would collect, so for food or wet service the bond line has to be genuinely tight, which is a fabrication-depth issue more than a design one.
Single-piece routed wells are pockets CNC-machined directly into a thick acrylic base, then polished. There are no seams at all — the compartments and the base are one piece — which makes this the easiest layout to wipe down and the cleanest-looking under light. It is the natural pick for food-contact trays and premium presentation. The cost driver is different from bonding: you start with a thicker, more expensive slab and machine material away, and the pocket geometry (depth, corner radius, spacing) is set at the drawing and tooling stage, so changing it later means new machining. Radiused internal corners come free with the router and are actually easier to clean than the square corners a bonded grid produces.
Removable inserts are a divider frame — bonded or routed — that drops into an open tray and lifts back out. This is the route when the contents change: one tray, several insert layouts, or an insert that comes out for cleaning. It also ships flattest, because the tray and inserts pack as separate low-profile pieces. The trade-off is a small amount of play between insert and tray, and two parts to make instead of one, so it is not the most rigid option. For a serving program that reconfigures by season or by service, though, it is often the most economical over the life of the order.
The depth math a lid quietly adds
A lid changes the depth math, and this is the spec buyers most often get wrong on a lidded tray: internal depth has to cover the tallest contents plus the vertical distance the lid engages, not the contents alone. Budget only for the contents and the lid either won’t close or will crush what’s inside. The rule of thumb we give buyers is to measure the tallest item, add clearance, then add the lid’s engagement depth on top before setting the tray wall height.
That engagement depth depends on the lid type from earlier. A loose telescoping cover overlaps the rim by roughly 10–20 mm so it doesn’t slip off at a touch, and that overlap sits outside the tray wall, so it adds to overall closed height but not to internal clearance. A snap or friction-fit lid needs its gripping edge to clear the contents before it seats, so the tallest item must sit below the rim by at least the lid’s inner lip. A hinged lid needs swing clearance at the back. A gasket-sealed lid needs the seal to compress fully, which means the contents cannot hold the lid open even slightly — a canapé standing one millimeter too tall breaks the seal.
Depth also feeds weight and freight, exactly as it does on a plain tray: every extra millimeter of wall height is more acrylic, more mass per piece, and more mass per carton. On a lidded tray the effect roughly doubles, because the lid walls grow with the tray walls. Cast PMMA runs about 1.2 g/cm³,1 so you can compute the added weight before you commit to a depth — sheet area times thickness times density, for both the tray and the lid. Running that math at RFQ stage is why the quote holds; skipping it is why a lidded tray comes back heavier and pricier than the buyer pictured. Our custom serving tray depth and weight guide covers the base weight math in full, and the lid simply adds a second body of acrylic to the same calculation.
Thin lids and warpage — the failure mode to design out
The thin flat lid is the part of a lidded tray most likely to disappoint, and the failure mode is warpage: a lid that bows so it no longer sits flat or seals. Acrylic is dimensionally stable in normal service, but two things push a thin lid out of flat — heat and unsupported span. Cast PMMA softens as it approaches its heat-deflection temperature of about 95 °C,2 so a lid left over warm contents, in a hot car during delivery, or closed while the base is still warm from washing can take a set. And a large flat panel with no support across its middle will sag under its own weight over time even without heat, the same way any wide unsupported sheet does.
The fix is a spec choice, not a quality gamble, and I flag it on every large-lid RFQ that crosses my desk. First, thickness: a lid spanning a small tray is fine at 3 mm, but as the footprint grows the lid wants 4 mm or a stiffening detail, because flat stiffness climbs steeply with thickness. Second, a rib or a slight dome — a shallow raised center or a downturned edge flange turns a floppy flat panel into a rigid one without much added material, the same principle that keeps a snap lid’s gripping edge stiff. Third, and this is the operational half: a lidded tray must be dried fully before it is closed. Trapped condensation from warm or freshly washed contents both clouds the inside and keeps the lid warm and humid against the acrylic, which is the exact condition that lets a marginal lid bow. For the full picture on why heat and moisture attack acrylic, and why hand-washing is non-negotiable, see our guide to food-safe and dishwasher-safe acrylic trays. Specify the lid thickness for its span, add a rib on anything large, and put “dry before closing” on the care card, and the warpage failure never reaches the buyer.
Food-safe and dishwasher caveats for a lidded tray
For food service, a lidded compartment tray adds one requirement to the base spec and one operational caution. The requirement: the tray, the dividers, and the lid must all be cut from food-grade acrylic. Acrylic is permitted for food contact under FDA regulation 21 CFR 177.1010,3 but only material made to a food-grade formulation qualifies — a display-grade signage sheet does not become food-safe by being shaped into a tray. Declare food contact in the RFQ so the sheet grade, and the adhesives on any bonded divider joints, are chosen for it.
The operational caution is the lid trapping moisture. An acrylic tray of any kind is not dishwasher-safe — PMMA softens near 95 °C, and a hot wash-and-dry cycle with strong detergent crazes the surface into permanent hairline cracks. That is doubly true for a lidded tray, because a lid closed over a wet base traps condensation that clouds the interior and, as covered above, keeps the acrylic warm and humid enough to stress a thin lid. So the care spec for a lidded tray is: hand-wash tray, dividers, and lid separately in warm water with mild soap, dry every surface fully, and only then close the lid for storage. Compartments make this slightly fussier than a plain tray — routed wells and bonded corners hold a little water — so a soft cloth into each pocket is part of the routine. None of this is a defect; it is the operating envelope of clear acrylic, and it is the trade a buyer accepts in exchange for the clarity no opaque material matches. Our acrylic serving trays page and the wider acrylic trays range show the formats these food-service builds start from.
Stacking and nesting with lids
Lids change how trays travel and store, and a lidded tray can be designed to either stack or nest — but rarely both, so pick one at the RFQ stage. Stacking means loaded trays sit on top of each other, with the lid of the lower tray carrying the weight of the one above. This is what a catering or amenity program wants — trays go out prepped and stacked — and it puts a real load spec on the lid: the lid is now structural, so it needs the thickness and rib treatment from the warpage section, and the tray rim needs a lip or foot detail so stacked trays locate on each other instead of sliding. A loose cover with a flat top stacks well; a domed lid does not.
Nesting means empty trays collapse into each other to save space in the carton and in storage, which cuts freight and warehouse footprint. Nesting wants a slight taper on the tray walls so an empty tray drops partway into the one below, and the lids nest as a separate stack. The two goals pull against each other because the taper that helps empties nest can undermine the flat seating that stacking loaded trays needs. The practical answer is to decide the dominant use — does this program move loaded and stacked, or store empty and nested — and design the rim and wall for that. Either way, say it in the RFQ in one line; retrofitting a stacking foot or a nesting taper after samples is a redraw, and a stacked serving program that can’t stack safely is a problem discovered in the field, not the factory.
Compartments interact with both goals in a way plain trays don’t. Routed wells and bonded dividers add internal structure that actually helps a loaded tray resist crushing under a stack, because the dividers carry some of the load path down to the base — a point in favor of rigid compartments for a stacking program. For a nesting program the compartments matter less, since empties nest on their outer walls, but a removable insert has to come out before empties can nest fully, which is one more reason inserts and nesting pair well: the trays nest flat and the insert frames stack separately. Match the compartment method to the travel plan and the two decisions reinforce each other instead of fighting.
MOQ, tooling, and cost drivers for compartments and lids
A lidded compartment tray costs more than a plain tray for concrete, nameable reasons, and knowing them helps a buyer spec to a budget instead of being surprised by the quote. Our MOQ is 100 pieces per design, and a tray-plus-lid-plus-dividers still counts as one design — the lid and compartments do not multiply the minimum. What they multiply is the work per piece. A plain tray is cut, polished, and finished; a lidded compartment tray adds divider fabrication (cut-and-bond or extra CNC time for routed wells), a whole second part in the lid (its own cutting, forming, and polishing), and, for hinged or sealed lids, sourced hardware or a gasket plus an assembly and closure check.
Those steps are the cost drivers, and they scale differently. Routed wells are tooling- and machine-time-heavy — the cost sits in the thick starting slab and the CNC hours — so they favor larger runs where that setup spreads across more pieces. Bonded dividers are labor-driven at the bench, so they scale more linearly. A gasket-sealed lid carries a per-piece part cost (the seal) on top. This is why the sample step matters more on a lidded tray than on a plain one: samples run 3–5 days, bulk production 15–20 days after approval, and the sample is where you confirm the lid fit, the divider fit, and the closed height in hand before committing to the 100-piece production run. We run 100% inspection before shipment and work under ISO 9001, and on a lidded tray that final check specifically covers lid closure, hinge action, and hardware count — the accessory failures a plain tray never has. When your spec is ready — lid type, divider method, depth including lid engagement, food grade if applicable, and stacking or nesting — send it to us for a quote, or start with what you have and we’ll build the spec sheet together. The bespoke printed tray project shows how we added artwork, color proof, finish, inspection, and packing once the base specification was stable.
Footnotes
-
MakeItFrom — PMMA (acrylic) material properties — materials database listing cast PMMA density of 1.2 g/cm³, the value behind the per-piece weight math for the tray and the added lid. ↩
-
AZoM — PMMA (acrylic) properties and applications — lists PMMA’s heat-deflection temperature at roughly 95 °C (1.80 MPa), the softening threshold behind the thin-lid warpage and no-dishwasher cautions. ↩
-
FDA 21 CFR 177.1010 — acrylic and modified acrylic plastics in food-contact articles — the US federal regulation defining conditions for safe food-contact use of acrylic polymers, supporting the food-grade sheet requirement for lidded food-service trays. ↩
Frequently Asked Questions
Can I get an acrylic serving tray with a lid and internal compartments?
Yes — it is a fully custom build. You specify the lid type (loose cover, hinged, snap/friction-fit, or gasket-sealed), how the compartments are made (bonded acrylic dividers, single-piece routed wells, or removable inserts), the depth, and the sheet grade. For food service, ask for food-grade cast acrylic. Our MOQ is 100 pieces per design.
What kind of lid is best for an acrylic serving tray?
It depends on the job. A loose telescoping cover is simplest and cheapest and suits display and dust protection. A snap or friction-fit lid stays put during handling. A hinged lid keeps the cover attached for repeated open-close service. A gasket-sealed lid resists spills and moisture. Loose and snap covers are the most common on serving trays; sealed lids cost more.
How are the compartments in an acrylic tray made?
Three ways. Bonded dividers are separate acrylic walls solvent-cemented into the tray — rigid and precise, but the layout is permanent. Single-piece routed wells are CNC-machined into a thick base, giving seamless, easy-to-clean pockets. Removable inserts drop in and lift out, so the layout reconfigures and the tray ships flat. Bonded and routed suit food service; inserts suit changing contents.
Are acrylic trays with lids dishwasher-safe and food-safe?
A food-grade acrylic tray is permitted for food contact under FDA 21 CFR 177.1010, but it is not dishwasher-safe — PMMA softens near 95 °C, so heat plus detergent crazes it. Hand-wash only. On a lidded tray, dry the lid and base fully before closing them, because trapped condensation clouds the inside and can stress a thin lid over time.
What is the minimum order and lead time for a lidded compartment tray?
Our MOQ is 100 pieces per design, and a lidded compartment tray still counts as one design even with the lid and dividers. Samples run 3–5 days, bulk production 15–20 days after you approve the sample, plus freight. Because lids and compartments add tooling and finishing, the sample step matters more here than on a plain tray — approve fit and depth in hand first.
Explore Custom Acrylic Products
Browse product categories to compare formats, materials, and customization options before choosing the closest fit for your project.