Magnetic Picture Frames — B2B Buyer's Guide to Bulk Orders
The event date is fixed, the stock doesn't exist, and the order math has to close. This is how magnetic frames actually get built, specced, and shipped in bulk.
Key Takeaways
- Magnetic picture frames close with embedded magnets instead of screws or clips — a photo swap takes seconds, which is why hotels, print shops, and event programs spec them for rotating content.
- Two acrylic panels sandwich the print: 3mm + 3mm for lightweight tabletop sizes, 5mm + 5mm as the standard pairing, and 8–10mm panels for premium floating frames.
- Custom magnetic frames are made to order: expect samples in 3–5 days and production in 15–20 days at a 50-piece MOQ. Marketplace 'in stock' listings are fixed sizes with no branding.
- Sea freight runs roughly 4–6 weeks door-to-door (3–5 weeks port-to-port); air freight cuts transit to days. For event deadlines, an air-first split shipment flies 10–15% of the order ahead while the balance follows by sea — compare landed cost per frame, not unit cost.
- Approve a pre-production sample of any printed insert before bulk duplex printing; it is the single most common rework trigger on magnetic frame orders.
On this page
- What a magnetic picture frame is — and why B2B buyers spec them
- How the magnetic closure works — magnet count, placement, and pull strength
- Magnetic vs snap frame vs screw-post — photo-swap speed compared
- Sizes and thickness pairings that actually work
- Double sided magnetic frames — menus, table talkers, two-way retail
- Insert printing — duplex printing and the pre-production approval gate
- Magnetic photo frame wholesale — MOQ, price drivers, quantity tiers
- Event-deadline orders — what’s possible in 10, 15, and 25 days
- QC checkpoints for magnetic frames — seating, polarity, edge polish
- How to brief the factory — a magnetic frame spec checklist
What a magnetic picture frame is — and why B2B buyers spec them
Magnetic picture frames are built from two clear acrylic panels that sandwich a photo or print, held shut by small magnets embedded in the acrylic itself. There are no screws, clips, or backing boards. You pull the panels apart, drop the print in, and let the magnets snap them closed. A photo swap takes seconds.
The classic version of this problem lands in our inbox on a tight clock: a trade-show booth opens in a few weeks, the marketplace frames that arrived are scratched and mismatched, and someone needs a few hundred magnetic picture frames with a branded insert on the show floor before the doors open. No stock exists anywhere, because acrylic magnetic photo frames in custom sizes are made to order. What saves an order like that isn’t luck; it’s the fact that the math of made-to-order — sample, production, freight — still closes. This guide walks through that math.
That swap speed is the whole reason B2B buyers spec them. A hotel rotating guest-experience photos across dozens of branches, a print shop selling frames alongside its prints, an event program updating sponsor graphics between sessions: all of them need someone with no tools and no training to change the content without scratching the panel or losing hardware. In our production experience, the buyers who come back for reorders are almost always running some kind of rotating-content program. The frame is infrastructure, and the print is the product that changes.
We build magnetic frames as one closure family inside a larger custom frame line — floating frames, tabletop frames, certificate frames, double-sided menu frames — all cut, polished, and assembled in our own Shenzhen facility. That matters for program buyers because the magnetic units and the fixed units in the same rollout come off the same sheets with the same edge finish, and because we’ve shipped enough of these programs (2,000+ custom projects across 25+ countries) to know where frame orders actually go wrong. Spoiler: it’s almost never the acrylic. It’s the closure spec, the insert workflow, and the calendar, and those three are exactly what the rest of this guide covers.
How the magnetic closure works — magnet count, placement, and pull strength
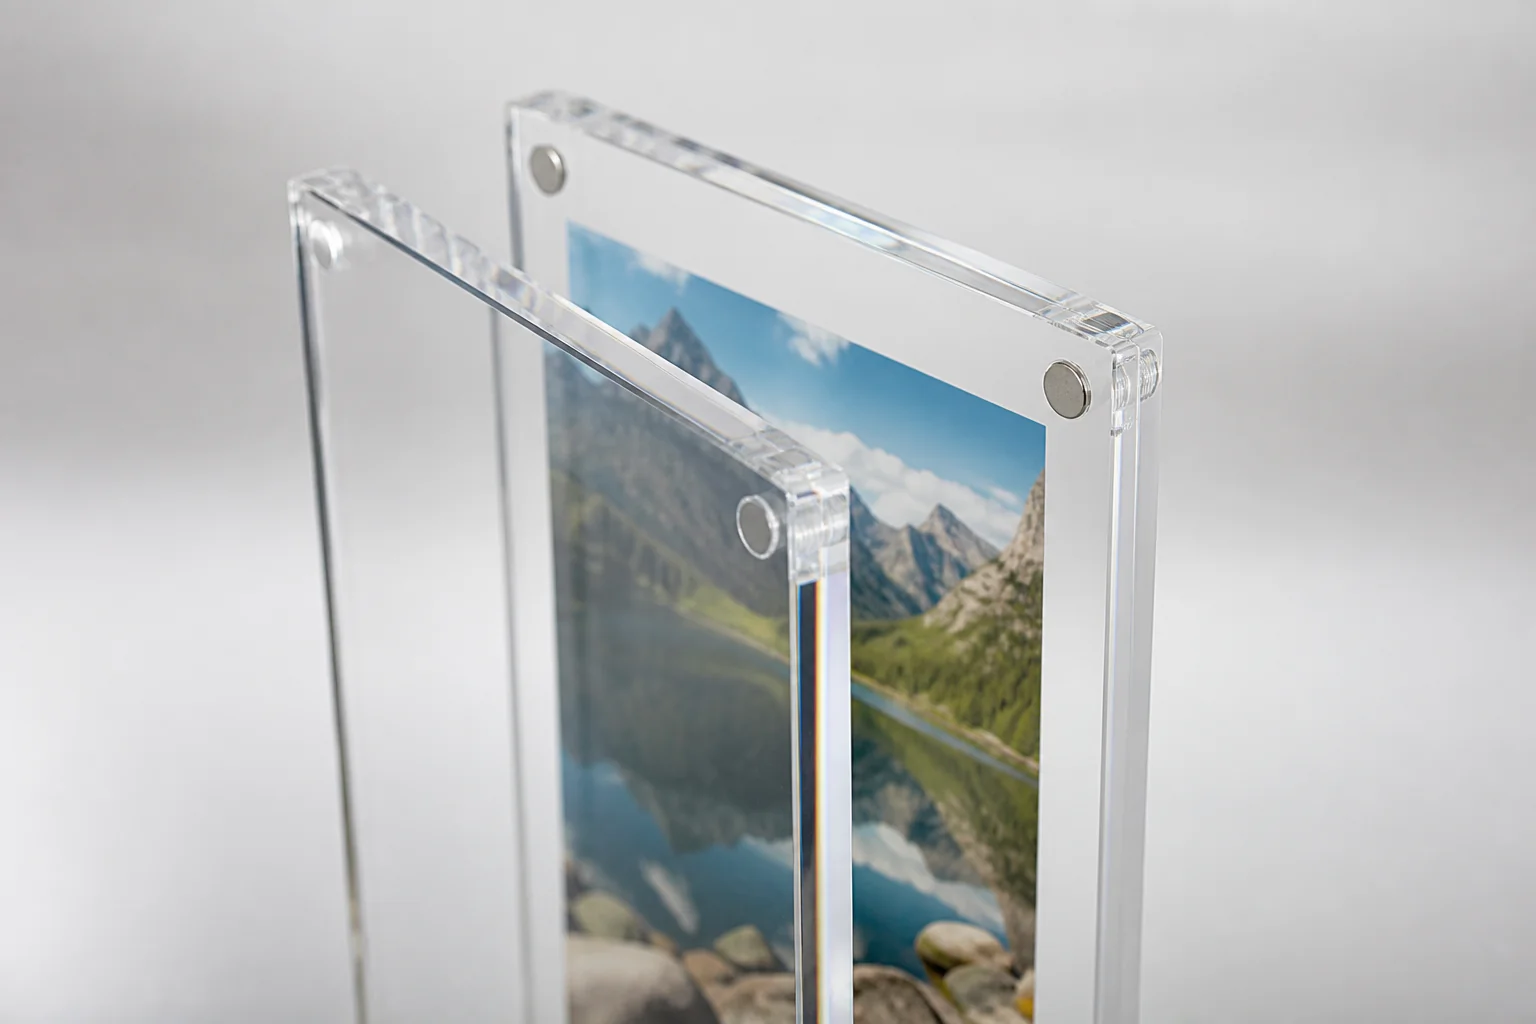
The closure is a set of neodymium magnets recessed into matching positions in both acrylic panels, typically hidden inside the panel edges so nothing interrupts the visible face. Opposite poles face each other, so the panels self-align as they close and grip the print flat across its full surface.
I get asked how strong the magnets are on almost every first frame call, and the honest answer is that strength is a system, not a single number. Magnet count and placement scale with the panel: a 4×6 inch tabletop frame usually carries one magnet pair per corner, and as panels grow, unsupported spans between magnets grow with them, so larger formats add mid-edge pairs to keep the print from bowing away from the acrylic. The three variables that matter on a spec sheet are count, position, and magnet grade — the N number (N35 through N52) that describes the energy density of the neodymium material. A higher grade delivers more holding force from the same magnet size, which is how a slim frame edge can still grip firmly.1
There is a trade-off we walk buyers through: stronger is not automatically better. A closure that grips too hard makes the frame frustrating to open. End users pry at the panel edge and leave fingernail marks, or chip a polished corner. The target feel is a closure you can open by hand at a corner but that never slips when the frame is picked up or bumped. If your program involves magnetic mounting to walls as well as magnetic closure, the two magnet systems need to be specced together; our magnet mounting spec chart covers the wall-side half of that conversation.
One production note buyers rarely think to ask about: polarity. If one magnet in a pair is seated backwards, that corner repels instead of attracting, and the defect is invisible until someone closes the frame. It’s a specific inspection point: polarity is verified on 100% of units at final inspection, and the QC section below shows where it sits in the checklist.
Magnetic vs snap frame vs screw-post — photo-swap speed compared
Three closure systems dominate the custom frame market: magnetic, snap (spring-hinged aluminum profiles, common on poster frames), and screw-post, where threaded barrels pass through drilled corner holes and clamp the panels together. The right one depends on how often the content changes and who changes it.
| Criterion | Magnetic | Snap frame | Screw-post |
|---|---|---|---|
| Photo swap | Seconds, no tools | Under a minute, no tools | Several minutes, tools or careful hands |
| Who can do it | Anyone | Anyone | Trained staff |
| Look | Frameless, all-acrylic | Visible aluminum border | Frameless with visible hardware points |
| Content change frequency | Daily to monthly | Weekly to monthly | Quarterly or never |
| Failure mode | Weak grip if under-specced | Bent rails, pinched prints | Lost or cross-threaded posts |
Screw-post construction is the more secure choice when the print never changes: certificate walls, permanent donor recognition, archival displays. The posts physically lock the sandwich, and nothing short of deliberate disassembly opens it. If your program mixes permanent artwork in corridors with rotating photos at reception, order both closure types from the same production run. Panel thickness and edge finish then match across the property, and the program carries one spec instead of two.
Snap frames win on large-format poster economics but lose the frameless look; the aluminum border is the aesthetic price. For content that rotates and needs to look like a premium object rather than a poster holder, magnetic closure is the default, and it’s what most of our frame buyers land on after comparing all three.
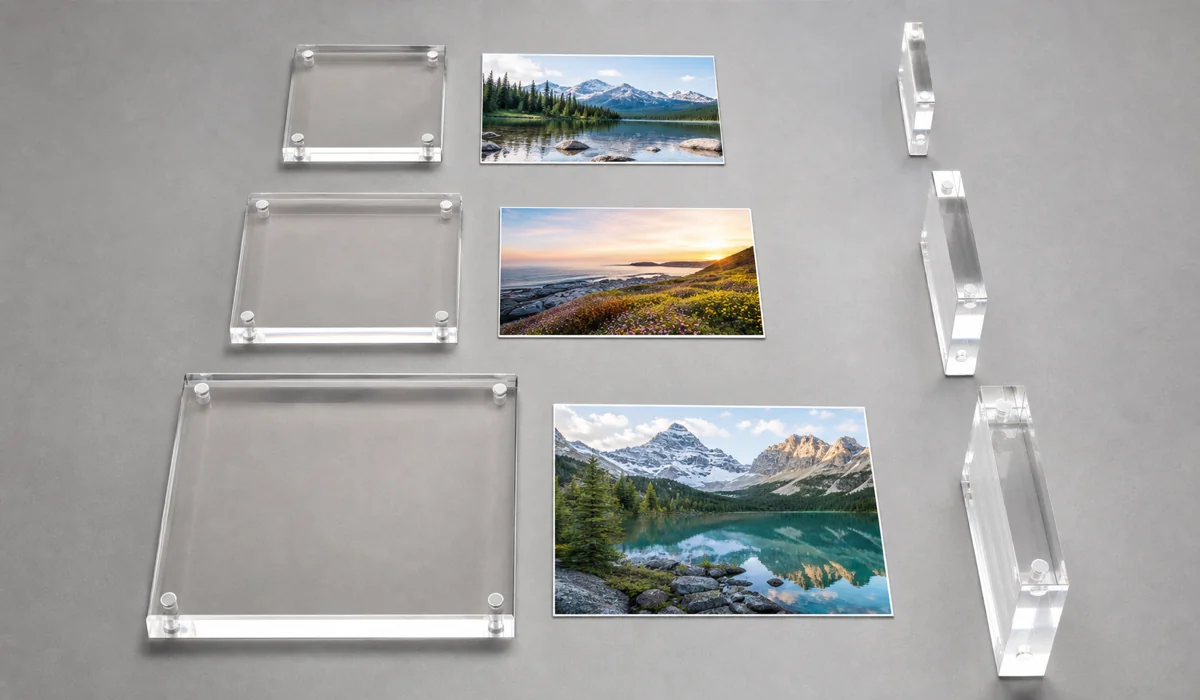
Sizes and thickness pairings that actually work
Standard magnetic picture frames run from 4×6 inches to 16×20 inches, with custom sizes available at the same 50-piece MOQ. Thickness is the spec that buyers most often get wrong, usually by assuming one number fits every size.
The pairings that work in practice follow the panel span. At 3mm + 3mm, a small tabletop frame stays light and inexpensive; push 3mm past roughly 8×10 inches and the panels start to flex when handled, which telegraphs “cheap” the moment someone picks it up. The 5mm + 5mm pairing is the standard for retail and corporate sizes: stiff enough to feel substantial, still light enough for tabletop stands. At 8–10mm per panel, the frame reads as a premium floating display: the thick polished edge catches light, the print appears suspended, and the weight in hand matches a gallery price point.
Weight is computable before the order is placed, and it matters for freight. Cast acrylic runs about 1.2 g/cm³,2 so an 8×10 inch frame in 5mm + 5mm panels carries about 0.6 kg of acrylic; a 16×20 inch frame in the same pairing is closer to 2.5 kg. Multiply by 500 units and the difference between a 3mm and 5mm spec is a meaningful line on the freight quote, which is why the first thing I ask on a frame RFQ is where the frames will sit, before anyone talks thickness.
Custom dimensions don’t carry a penalty beyond the normal MOQ. We cut every order to spec anyway, so a 200×200mm square frame or an A4 certificate format prices the same way a catalog size does: by sheet area, thickness, and quantity. The one place to expect pushback is aspect ratio. Panels much wider than 3:1 flex along the long axis regardless of thickness, so formats that wide get a redesign conversation before production rather than frames that bow on a shelf. The full thickness bands, from 3mm tabletop pairings up to the 15–20mm solid block styles, are on the acrylic frames product page spec table.
Double sided magnetic frames — menus, table talkers, two-way retail
A double sided magnetic frame displays content on both faces: two prints back-to-back inside the same two-panel sandwich, or a single duplex-printed insert readable from either side. Add a T-shaped base or a self-standing fold and it becomes a table talker — restaurant menus, hotel room rate cards, salon price lists, two-way retail signage at a counter where customers approach from both directions.
The construction logic is identical to a single-sided frame, but the spec conversation changes in two ways. First, both faces are now “front,” so edge finish, magnet concealment, and print alignment have to hold up from every viewing angle, and there’s no hidden back panel to bury cosmetic compromises in. Second, the insert itself usually becomes a duplex print, which introduces a registration question: the front and back images must align through the sheet, or a menu looks subtly crooked when flipped.
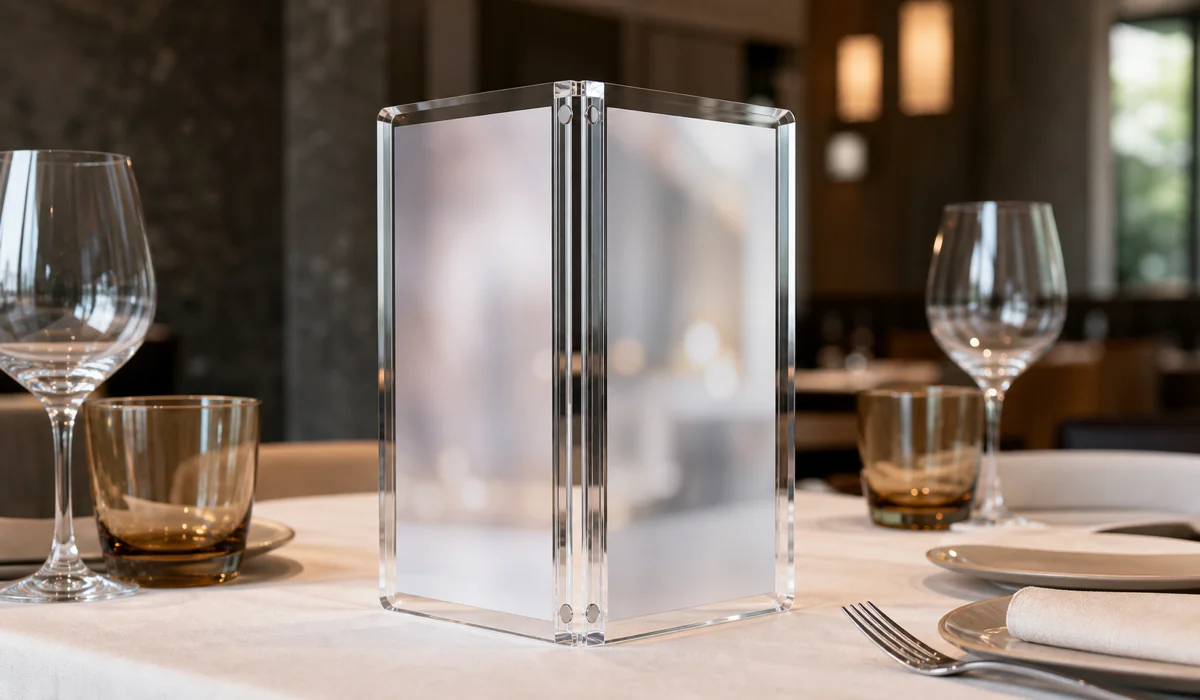
Hospitality buyers drive most of the double-sided volume we produce, and the reorder pattern I see from them says something useful: the frames get bought once, and the inserts get reprinted forever. If that’s your program, spec the frame around the insert workflow — a standard paper size your print vendor already runs, a magnet layout that doesn’t overlap the printable area, and enough panel margin that a slightly mis-trimmed insert still hides its edges. The approved insert dimensions stay on file with your frame spec, so your reorder inserts fit frames from any earlier batch.
Insert printing — duplex printing and the pre-production approval gate
There are two ways to get branded content into a magnetic frame: print the insert (paper, card, or synthetic film that slips between the panels) or print directly on the acrylic itself. We brought UV printing in-house in 2020 — direct-to-acrylic, full color — which suits permanent branding like a logo mark on the panel edge or a frosted-band treatment. For content that rotates, printed inserts are the workhorse, and we print those in-house too when buyers want frames and inserts to arrive as one finished kit.
The pattern behind most rework on magnetic frame orders isn’t the frames. It’s the printed insert going to bulk duplex printing before anyone looked at a physical proof. On screen, the artwork looks fine. In the frame, the duplex registration drifts a millimeter, or the color runs darker behind 5mm of acrylic than the buyer expected, or the trim line clips a headline. The programs that avoid a reprint are the ones where a pre-production sample of the printed insert goes to the brand approvers for sign-off before a single bulk sheet runs — even when those approvers sit in another time zone and the proof costs a few days.
That’s the approval gate we now recommend on every printed-insert order: bulk production of frames can start on schedule, but bulk printing of inserts waits for an approved physical proof. It costs a few days once. Skipping it risks reprinting the entire insert run, and unlike the frames, inserts are usually the part with a marketing deadline attached.
One more spec note: acrylic panels do the UV-filtering work of protecting inserts to a point, but inks and papers vary. If inserts will sit in direct sun (window-facing retail), tell your supplier, because insert stock and print method should be chosen for the exposure.
Magnetic photo frame wholesale — MOQ, price drivers, quantity tiers
Buyers searching for magnetic photo frame wholesale usually mean one of two things: a distributor reselling stock frames, or factory-direct custom production. We’re the second. Factory-direct starts at a 50-piece MOQ per design, everything is built to your spec, and the per-unit price is driven by five inputs: panel size, thickness pairing, magnet count, printing (insert, direct UV, or none), and packaging.
Custom work has no fixed price list, so the useful thing I can give you is the tier logic. From 50 to 200 units, per-unit cost falls fast as tooling setup, artwork prep, and QC setup amortize over more pieces. From 200 to 500, sheet utilization takes over: our production planning nests the panel sizes across standard acrylic sheets, and quantities that fill sheets cleanly waste less material. Past 1,000 units, packaging and freight optimization matter as much as fabrication: master-carton design and container math start moving the landed cost more than the acrylic does. Payment terms are the same at every tier: 30% deposit, 70% before shipment.
Packaging deserves its own line in any wholesale conversation, because frames are a retail-adjacent product and half our frame buyers resell them. Choose from three packaging levels: bulk-packed with protective film and foam interleaving (for programs that install in-house), individual white boxes (for units shipping onward one at a time), and custom-branded gift boxes (for retail-style unboxing). The protective film stays on every panel until the end user peels it. That’s standard on our line, and it’s the difference between frames that survive three handling steps and frames that arrive with hairline scratches nobody can trace. Packed-carton dimensions and gross weights are supplied with the quote, so your forwarder can price the shipment before you commit.
Two things distributor wholesale can’t do, and where factory-direct earns its lead time: custom sizes at low quantity (a 200×200mm square frame is a normal order for us, not a special), and branding built into the frame rather than stickered on. The trade is planning: 15–20 day production plus freight, instead of a warehouse pick. For program buyers running repeat orders, that trade usually settles after the first cycle: reorders reuse the approved spec and sample, so the second order is mostly production time. The commercial details, including size options, closures, and current spec tables, live on our magnetic photo frames product page.
Event-deadline orders — what’s possible in 10, 15, and 25 days
Custom magnetic picture frames need roughly 25 days minimum: a 3–5 day sample, 15–20 day production, and air freight for transit. Deadline orders come to me weekly, so here is the calendar math for made-to-order frames, counted in days before the event.
25+ days out: the full path fits. Sample in 3–5 days, approval, 15–20 day production, air freight for transit. This is the window where the insert approval gate still runs properly. The trade-show scenario above lives here — barely — and it only works when the buyer approves the sample in one round. The workflow that makes this reliable is the same one in our sample-to-bulk trade show guide: compress approvals, not production.
15 days out: skip the physical sample, accept the risk consciously. Production can run against digital proofs and our standard spec, which works best when the order matches something we’ve built before: standard sizes, known thickness pairing, no experimental finishes. A first-time custom spec at 15 days means the design gets approved on a screen. Most orders land fine, but the safety gate is gone.
10 days out: stock or nothing. Made-to-order production doesn’t compress below its floor without quality paying for it, and we say so rather than promise a calendar we can’t hold. At 10 days the realistic options are a marketplace stock frame now and a proper branded order behind it for the next event.
Air vs sea vs split shipment
Sea freight is the default for frame orders without a deadline — and useless against one, at roughly 4–6 weeks door-to-door (3–5 weeks port-to-port). Air closes transit to days, at a real cost premium: on a small program, the air quote for the same cartons commonly lands several times the sea quote, so the number is worth pulling before you commit either way. The middle path is the one buyers ask about most after seeing both figures: an air-first split shipment, where the units needed for opening day fly ahead and the balance follows by sea on the same purchase order. Frames pack dense, which keeps the air leg’s chargeable weight sane, and we prepare both document sets so the two consignments reconcile against one PO. The lane math, documentation, and break-even points are in our air-first split shipment guide. The short version: compare landed cost per frame across the three options, not the freight invoice alone.
QC checkpoints for magnetic frames — seating, polarity, edge polish
Magnetic frames add two inspection points on top of standard acrylic QC, and both exist because the defects they catch are invisible in a stack of packed product.
Magnet seating. Every magnet must sit flush at its specified depth. A magnet seated proud holds the panels apart by its own thickness; the print ripples and dust migrates into the gap. Seated too deep, the grip weakens at that point and the corner lifts. Inspection is by feel and gauge across every unit, because a seating defect on one corner of one frame is exactly the kind of thing a sampled inspection misses.
Polarity. Reversed polarity on a single magnet makes a corner push instead of pull. The check is fast — close every frame once — but it has to happen on 100% of units, which is why it’s built into our piece-by-piece final inspection rather than treated as a batch check. We inspect every product before it ships; magnetic frames just have two extra line items on the sheet.
Edge polish. On a frameless product the edge is the finish. Diamond-polished edges should read optically clear with light catching cleanly at the chamfer: no saw marks, no haze bands. This is also the spec to nail down at the sample stage. “Polished edges” means different things at different factories, so approve the sample’s edge as the acceptance criterion for the bulk run, the way the gallery program in our colored floating frames case study did before committing to a multi-store rollout.
What I send you before shipment is the practical output of all this: inspection photos of your actual order — edges, closures, printed inserts in place — so approval happens on evidence, not assumption. Production runs under ISO 9001, but on a frame order it’s the inspection photos that get forwarded to stakeholders.
How to brief the factory — a magnetic frame spec checklist
A complete brief earns a same-week quote and heads off the two classic frame-order surprises: wrong closure feel and insert misfit. Here is what I need from a buyer to quote a magnetic picture frame order accurately. Copy it into your RFQ as-is.
- Outside dimensions — width × height, and say whether they’re fixed or adaptable to a standard size.
- Insert size — the exact print dimensions the frame must hold, and who supplies the prints (buyer-supplied, a print vendor, or our UV line).
- Thickness pairing — or tell us where your frames will sit (tabletop / wall / floating premium) and we’ll recommend one.
- Orientation and stand — portrait, landscape, or convertible; freestanding, wall-mounted, or double-sided with a base.
- Single or double sided — and if double, whether inserts are duplex-printed.
- Branding — none, UV print on acrylic, or printed insert; artwork files in vector where possible.
- Quantity and target date — MOQ is 50 per design; a real deadline changes freight planning, so state it up front.
- Destination — country, and whether you need FOB or a door-to-door quote. Carton dimensions and gross weights come back with the quote either way.
Send that list and we’ll return a quote on standard terms (30% deposit, 70% before shipment), a sample plan (3–5 days), and a production calendar (15–20 days) we hold ourselves to. If the closure system or size is still undecided, send us your design or reference photos and we’ll spec it with you, or request a quote with what you have. Half-formed briefs are normal; plenty of orders start with nothing more than a photo of a scratched marketplace frame and a date.
Footnotes
-
K&J Magnetics — neodymium magnet grade specifications — magnet supplier’s published table of neodymium grades (N35–N52) and their magnetic properties, supporting the claim that higher grades deliver more holding force from the same magnet size. ↩
-
MakeItFrom — PMMA (acrylic) material properties — materials database listing cast PMMA density of about 1.2 g/cm³, the value behind the per-frame weight estimates in the sizing section. ↩
Frequently Asked Questions
Can I get custom magnetic picture frames in time for an event four weeks out?
Custom magnetic picture frames can usually be delivered inside four weeks if the spec is locked fast. The made-to-order math is 3–5 days for a sample, 15–20 days for production at a 50-piece MOQ, and air freight for transit. Four weeks works when artwork is approved in week one; it fails when the insert file goes back and forth for ten days.
Is there a faster shipping option than sea freight for magnetic photo frames?
Air freight is the faster option: it cuts transit from roughly 4–6 weeks door-to-door by sea (3–5 weeks port-to-port) down to days. A split shipment gives you both — 10–15% of the order flies ahead to hit the deadline while the balance follows by sea. Magnetic frames are compact and dense, so per-unit air cost is more manageable than for large displays.
What is the minimum order for custom magnetic photo frames?
Our MOQ is 50 pieces per design. Most program buyers order a paid sample first — a sample typically runs in the $100–$350 range including air courier, quoted exactly with your RFQ — approve the size, magnet feel, and printed insert, then release the bulk run. Quantity tiers at 200, 500, and 1,000+ units drop per-unit cost through sheet utilization and setup amortization.
What sizes do magnetic picture frames come in?
Standard sizes run 4×6 inches up to 16×20 inches, with custom dimensions available on request. Thickness pairs with size: 3mm + 3mm panels for small tabletop frames, 5mm + 5mm for standard retail and corporate sizes, and 8–10mm panels for premium floating-style wall frames.
How strong are the magnets in a magnetic picture frame?
Strong enough that the panels grip a print flat without slipping, but easy enough to open by hand at a corner. Magnet count and size scale with panel dimensions and weight — a 4×6 frame may use four corner magnets, larger formats add mid-edge pairs. We verify seating depth and polarity on every unit during inspection.
Have specs in hand? Get a quote for your specific project.
Send us your drawings, reference photos, or a description of what you're making. We reply within 24 hours with a material recommendation, thickness, fabrication method, and a per-unit quote.