Acrylic Brochure Holders — Wall-Mount vs Countertop Spec
Lobby ops managers and reception fit-out leads ask whether to spec wall-mount or countertop brochure holders. The honest answer is the mounting substrate decides — wall-mount on drywall and wall-mount on glass-front fixture are different products.
Key Takeaways
- Wall-mount back-plate spec is substrate-driven: drywall needs anchor + spreader plate; concrete needs lag-bolt + plug; glass-front fixture needs adhesive + safety tether. Same brochure holder body, different mounting hardware.
- Countertop holders need base weight above 800 g for tip-over resistance and anti-slip silicone footprint matched to counter substrate (glass / wood / laminate). Below 800 g the holder slides on contact.
- Multi-pocket layouts: 3-tier wins on shelf-edge counters where vertical depth is constrained; 4-tier wins on freestanding lobby installs; side-by-side wins for mixed-format inserts (DL + Tri-fold + 4×9 rack card).
- Bulk pricing breakpoints at 100 and 500 units. Below 100 the per-unit cost makes the program difficult to justify; above 500 material discount and line scheduling efficiency dominate.
On this page
- Mounting hardware is what separates wall-mount from countertop
- Wall-mount engineering — back-plate spec for 8 substrates
- Countertop spec — base weight + anti-slip + tip-over math
- Multi-pocket layouts — 3-tier vs 4-tier vs side-by-side
- Insert dimensions — DL / Tri-fold / 4×9 / Letter / A4
- Edge finishing and bonded-joint expectations
- Common install mistakes I see
- Bulk pricing math at 50 / 100 / 250 / 500 unit tiers
Mounting hardware is what separates wall-mount from countertop
Wall-mount and countertop brochure holders are different products even when they look identical in product photos, because the mounting hardware is what makes them work. Wall-mount needs a substrate-specific back-plate (drywall / concrete / metal stud / glass-front / wood / brick / curtain wall — each with different hardware). Countertop needs base weight above 800 g + anti-slip footprint matched to counter substrate. Multi-pocket layouts: 3-tier for shelf-edge, 4-tier for freestanding lobby, side-by-side for mixed-format inserts. Bulk pricing breakpoints at 100 and 500 units.
I get the wall-mount-vs-countertop question from lobby fit-out leads about 3-4 times a month. The conversation always starts with “we want brochure holders” and the productive questions are: where exactly are they mounting, what brochure formats are you holding, and what’s the install crew. The five sections below cover the substrate-driven mounting hardware and the layout decision tree.
Wall-mount engineering — back-plate spec for 8 substrates
Wall-mount brochure holders use a back-plate that bonds the holder body to the wall substrate. The back-plate needs to be sized and hardware-specified for the actual substrate. Here’s the production matrix across 8 common substrates.
| Substrate | Back-plate spec | Hardware | Notes |
|---|---|---|---|
| Drywall | 6 mm cast PMMA, 200 × 100 mm | Drywall anchor + 30 × 30 mm spreader plate | Spreader plate distributes load across anchor area; without it, the anchor pulls through |
| Concrete | 4 mm back-plate, 150 × 100 mm | M6 × 50 mm sleeve anchor + lag bolt | Drill 6.5 mm pilot hole; sleeve expands on bolt tightening |
| Metal stud | 4 mm back-plate, 150 × 100 mm | Self-drilling screw + cup washer | Hits stud directly; no anchor needed |
| Glass-front fixture | 4 mm back-plate, 200 × 100 mm | 3M VHB structural adhesive + safety tether | Drilling glass rarely permitted by retailer |
| Wood-paneled wall | 6 mm back-plate, 150 × 100 mm | #10 wood screw + countersunk washer | Pre-drill pilot to prevent panel splitting |
| Brick / concrete-block | 4 mm back-plate, 150 × 100 mm | Masonry plug + lag bolt | Drill 8 mm hole; insert plug; bolt to plug |
| Curtain wall | 4 mm back-plate, 200 × 100 mm | Cable suspension to overhead structure | No penetration of curtain-wall substrate |
| Unfinished column | 4 mm back-plate, 150 × 100 mm | Strap clamp around column | Adjustable diameter; no permanent mount |
The same brochure holder body ships with different mounting hardware kits depending on the install substrate. For a multi-vertical fit-out (e.g., a hotel chain with mixed substrates across properties), we recommend ordering a single body inventory plus mounting hardware kits matched to the substrate map of the rollout.
Countertop spec — base weight + anti-slip + tip-over math
Countertop brochure holders need three operational characteristics: stable footprint, tip-over resistance, anti-slip retention.
Stable footprint. Base plate dimensions of at least 200 × 100 mm with 6 mm cast PMMA thickness. Cast PMMA is dimensionally stable across the temperature range a lobby ever sees, with material properties governed by the standard specification for acrylic sheet. Smaller bases tip easily; thinner bases flex under loaded brochures and create visible warpage.
Tip-over resistance. Loaded brochure holders shift center of mass forward as brochures are pulled from front pockets. Base weight above 800 g (achieved at 200 × 100 × 6 mm cast PMMA = ~140 g, supplemented with steel weight insert or thicker base = +700-800 g) resists tip-over up to 200 g of forward pull force.
Anti-slip footprint. Silicone or rubber footprint pads matched to counter substrate. Glass counters need PVA-coated silicone (won’t slip even when wet); wood counters need EPDM (won’t mark the wood); laminate counters need PVA silicone or felt (matches the lower-friction surface). Without anti-slip, the loaded holder slides on contact during brochure extraction.
For the production-side context — how the back-plate and base get cut, polished, and bonded — see our acrylic brochure holders product page, which covers the standard body geometries we run before substrate-specific hardware is added. A 32-location dental network rollout where wall-mount + countertop variants shipped together is documented in our dental reception sneeze-guard with brochure-integrated case study.
For the broader countertop sign-holder context, our companion guide on acrylic shelf talkers covers shelf-edge mounting which is operationally adjacent to countertop installs.
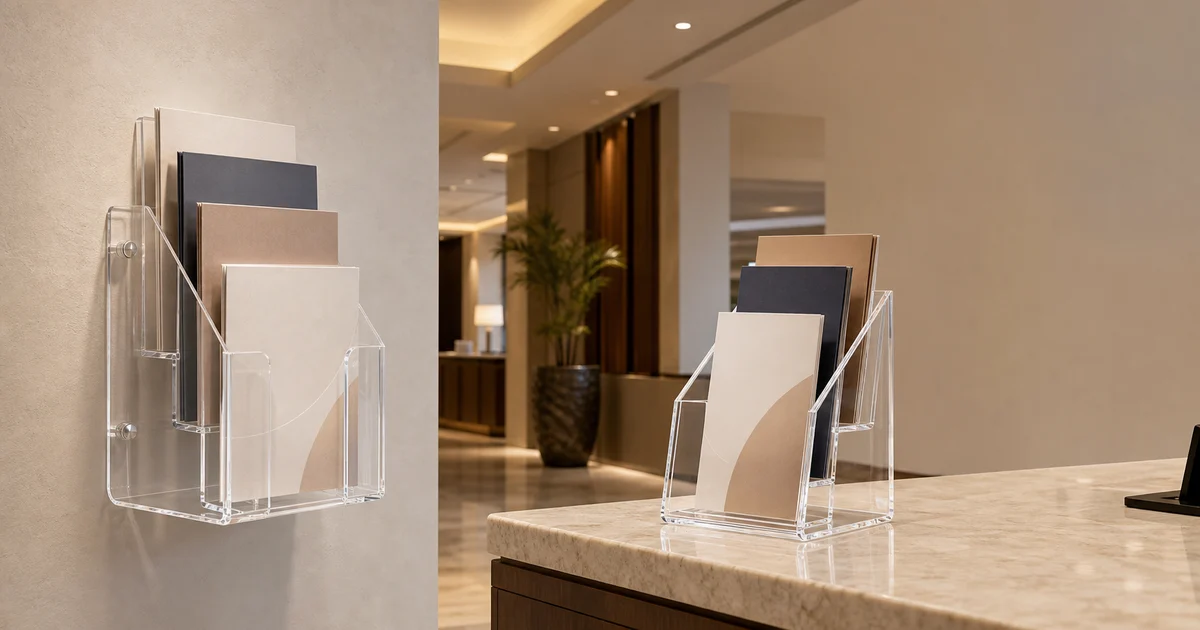
Multi-pocket layouts — 3-tier vs 4-tier vs side-by-side
Layout choice depends on install context, brochure format mix, and total content count.
3-tier vertical (3 pockets stacked). Standard for shelf-edge installs and wall-mount where vertical depth above 250 mm makes the holder visually heavy. Total height typically 280-320 mm. Holds DL or Tri-fold format brochures; less suitable for Letter or A4 (those become awkward at 3-tier height).
4-tier vertical (4 pockets stacked). Standard for freestanding lobby installs and coworking literature racks where vertical real estate is plentiful. Total height typically 380-420 mm. Holds DL, Tri-fold, or 4×9 rack card formats.
Side-by-side horizontal (2-4 pockets side-by-side). Standard for mixed-format inserts where brochures have different dimensions. Each pocket can be sized independently — so a 4-pocket side-by-side might hold one DL, one Tri-fold, one 4×9 rack card, and one Letter brochure. Total width typically 400-600 mm.
Mixed (vertical + side-by-side). Some boutique hotel and luxury retail programs combine both — a 2 × 2 grid of 4 pockets, or a 3 × 2 grid of 6 pockets. Adds production complexity but offers flexibility for evolving content mix over the program’s life.
For literature racks scoping mixed-format content, side-by-side or mixed grid is usually the right call. For homogeneous content (all DL brochures, all Tri-folds), vertical 3-tier or 4-tier is operationally simpler and visually cleaner.
Insert dimensions — DL / Tri-fold / 4×9 / Letter / A4
Brochure holder pocket dimensions need to match the actual insert format with a small tolerance for ease of extraction.
| Insert format | Dimensions | Pocket inner dimensions |
|---|---|---|
| DL (1/3 A4) | 99 × 210 mm | 102 × 213 mm (3 mm clearance) |
| Tri-fold (US) | 99 × 216 mm | 102 × 219 mm |
| 4 × 9 rack card | 102 × 229 mm | 105 × 232 mm |
| Letter (US) | 216 × 280 mm | 219 × 283 mm |
| A4 | 210 × 297 mm | 213 × 300 mm |
| Legal (US) | 216 × 356 mm | 219 × 359 mm |
The 3 mm clearance in each dimension allows for paper variability and ease of extraction without the brochure falling through. Mixed-format inserts in a single pocket fail because the largest format requires the larger pocket while the smaller formats fall through. Side-by-side or per-pocket sizing solves this.
Edge finishing and bonded-joint expectations
Brochure holder bodies are usually cast PMMA with three or four bonded joints: the back-plate-to-side-walls joint, the base-to-front-wall joint, and the pocket-divider joints when the holder has more than one tier. Each joint is the visual signature of build quality, so the buyer’s eye lands there before anywhere else.
Edge polish. The customer-facing front lip of every pocket gets a flame or diamond polish. Flame polish is faster and cheaper but leaves a slight surface undulation that catches reflected light unevenly under lobby downlights — fine for back-of-house, distracting on a reception desk. Diamond polish runs a tipped tool across the edge at controlled depth and produces a near-optical surface; the trade-off is roughly 2-3× the per-edge cost. For lobby and reception installs we default to diamond polish on customer-facing edges and flame polish on hidden edges (back-plate sides, hardware-side base).
Bonded joints. Solvent-bond using methylene chloride or a UV-cure acrylic adhesive. Solvent-bonded joints are nearly invisible when the geometry is clean and the bond gap is below 0.1 mm; UV-cure joints are slightly more forgiving on geometry but show a faint amber line under raking light. Bond strength on cast PMMA solvent joints reaches 60-80% of parent-material tensile strength,1 which is more than adequate for any brochure-holder load. Quality-system traceability for the bonding process — batch logs, operator IDs, cure-time confirmation — is what an ISO 9001 certified line will surface during a buyer audit.
Polish-line orientation. When the brochure holder sits on a counter under directional lighting, the orientation of the polish lines (running with the longer axis vs. across it) changes how the holder reads. Polish lines that run with the long axis of the front lip pull the eye along the brochure pocket — usually the right call. Lines running across the lip create a horizontal banding effect that competes with the brochure graphics. Spec the polish-line orientation explicitly when the brochure inside is graphically dense.
Common install mistakes I see
About a quarter of brochure-holder programs come back with avoidable install issues. Three patterns repeat:
Wrong hardware shipped for the actual wall substrate. A property’s drawings call for drywall but the actual install location is a structural concrete column the buyer didn’t notice on the site survey. Drywall anchors don’t bite into concrete, the holder falls off, and the buyer files a defect complaint that’s actually an install-substrate mismatch. Resolution: capture wall-substrate photos in the site survey, not just drawings — drywall and metal-stud-framed walls look identical until you tap them.
Glass-front fixture installs without a safety tether. VHB structural adhesive holds 200-300 N of static load, which is plenty for a loaded brochure holder. But adhesives degrade under heat, humidity, and time, and an adhesive failure with no tether means a falling holder can hit a glass counter or a guest. The safety tether costs $3-5 per install and prevents a $500-$5,000 incident.2
Anti-slip pads applied to the wrong surface. PVA silicone on glass counters works because PVA bonds to silica; the same PVA on wood counters slides because wood doesn’t have the same surface chemistry. The buyer assumes “anti-slip is anti-slip” and ships PVA across all installs, then sees holders sliding on the wood-counter properties. Resolution: ship counter-substrate-matched pads (PVA for glass, EPDM for wood, felt for laminate) labeled by counter type at each install location.
I capture the substrate map at quote stage and ship the right hardware kit per install location — even if it means 3 hardware kit variants for a single property mix. The 5-10 minutes per location of mapping at quote stage prevents 30-60 minutes per location of in-field troubleshooting.
Bulk pricing math at 50 / 100 / 250 / 500 unit tiers
Per-unit pricing on brochure holders follows the standard non-linear curve with breakpoints at 100 and 500 units. Indexed to 100 at the 50-unit baseline:
| Volume tier | Per-unit cost index |
|---|---|
| 50 units | 100 (baseline; tooling overhead heavy) |
| 100 units | 78 (first breakpoint — tooling amortizes) |
| 250 units | 58 (continued tooling amortization) |
| 500 units | 47 (second breakpoint — material discount + line scheduling) |
| 1,000 units | 41 (continued discount and freight efficiency) |
For lobby fit-out programs running 100-300 units across multiple properties, the right batch size is 250-500 — covering the door count with a buffer for replacement and minor format changes. Below 100 units the tooling burden makes the program difficult to justify.
Brochure holders are one format inside our broader acrylic displays range, and they share production lines with the sign holders and counter fixtures most lobby programs also need. For lobby ops managers or reception fit-out leads scoping a brochure holder rollout, send the brief over to our team — we’ll come back with substrate-specific back-plate recommendations across your property mix, multi-pocket layout suggestions for your brochure format mix, and a unit-cost projection at your volume tier.
Footnotes
-
International Association of Plastics Distribution. Acrylic (PMMA) Fabrication Guidelines — Bonding and Assembly. https://www.iapd.org/ — IAPD fabrication data on solvent-bond shear strength relative to parent-material tensile strength for cast PMMA joints. ↩
-
National Retail Federation. Visual Merchandising and Store Design — Fixture Safety Standards. https://nrf.com/research-insights — NRF retail fixture safety guidance covering adhesive-mounted hardware tethering requirements and incident-cost benchmarks for in-store display installations. ↩
Frequently Asked Questions
What back-plate spec do I need for wall-mount on different substrates?
Drywall: 6 mm cast PMMA back-plate + drywall anchor with 30 × 30 mm spreader plate to distribute load across the anchor area. Concrete: 4 mm back-plate + lag bolt with M6 × 50 mm sleeve anchor. Metal stud: 4 mm back-plate + self-drilling screw + cup washer. Glass-front fixture: 4 mm back-plate + 3M VHB structural adhesive + safety tether (drilling glass is rarely permitted by retailer). Wood-paneled wall: 6 mm back-plate + #10 wood screw + countersunk washer. Brick / concrete-block: 4 mm back-plate + masonry plug + lag bolt. Curtain wall: 4 mm back-plate + cable suspension to overhead structure (no penetration of curtain-wall substrate).
Why does countertop base weight matter for tip-over resistance?
A brochure holder loaded with 30-50 brochures has a center of mass that shifts forward as the brochures are pulled from the front pocket. If the base weight is below 800 g, the loaded holder can tip forward when a guest grabs a brochure aggressively. 800 g of base weight (typically 6 mm cast PMMA base plate at 200 × 100 mm) provides tip-over resistance up to 200 g of forward pull force, which covers any normal extraction. Anti-slip silicone footprint matched to counter substrate prevents the holder from sliding under contact.
When does 3-tier vs 4-tier vs side-by-side multi-pocket win?
3-tier (3 vertical pockets stacked): wins on shelf-edge or wall-mount installs where vertical depth above 250 mm makes the holder feel heavy. 4-tier wins on freestanding lobby or coworking installs where total content is 4 brochure types and vertical real estate is plentiful. Side-by-side wins for mixed-format inserts — when the brochures are different dimensions (DL + Tri-fold + 4×9 rack card + Letter), individual sizing per pocket is easier to read than vertical stacking with mixed depths.
What about cosmetics counters — do they use brochure holders?
Rarely. Cosmetics counters typically use product-positioning displays and tester stations rather than brochure holders. When literature is needed (typically promotional cards or service menus), the format is usually wall-mount on a back-counter or counter-stand on the customer-facing side of the counter. The mounting hardware is similar to the glass-front fixture spec for any wall-mount work near cosmetics displays.
Spec'ing brochure holders for a multi-vertical fit-out?
Send us your install substrate mix (drywall / concrete / metal / glass-front / wood-paneled), insert dimensions, target unit volume, and venue context (hotel lobby / dental reception / library / showroom / coworking). We'll come back with a back-plate / base-weight recommendation by venue, sample holder with your mounting hardware, and bulk-pricing across 50 / 100 / 250 / 500 unit tiers.