---
title: "Pre-Production Sample Approval: Buyer Checklist"
description: "A QC manager's pre-production sample approval checklist: dimension lock, real-product fit test, carton fit, the QC photo set, and what approval does not lock."
category: "Buyer Guide"
author: "Deniz Chen"
authorCredential: "QC Manager at Wetop Acrylic — leading 4-stage quality inspection since 2016, 1,000+ custom orders inspected piece-by-piece before ship"
datePublished: 2026-08-13
dateModified: 2026-08-13
primaryKeyword: "pre-production sample approval"
url: https://wetopacrylic.com/guide/pre-production-sample-approval-checklist/
---
## What pre-production sample approval actually locks {#what-approval-locks}
Pre-production sample approval, done properly, is twenty minutes of physical checks before anyone types the word "approved": calipers on every critical dimension with the values written down, the buyer's actual product seated in its wells, the sample packed into its real shipping carton with the foam in place, and a reference photo set both sides keep. The sample on my bench this morning — a clear [acrylic countertop display](/products/acrylic-displays/) bound for a supplement brand, 300 mm wide, three wells, polished front edges — earned its signature that way.
Most samples are approved from a photo and a feeling instead, and that is precisely the trap. Approval freezes four things — dimensions, material and finish, construction, and decoration — and everything caught after it is priced as bulk rework, not as a revision. Yet since 2016, I've seen far more bulk-order problems traced to a beautiful sample approved by eye than to an ugly sample rejected properly. The eye checks gloss. It does not check whether the wells hold the buyer's jar, whether the width matches the carton already ordered, or whether "approved" meant the sample as measured or the drawing as imagined.
So the checklist below is deliberately physical. Four checks — dimension lock, real-product fit, carton fit, and the QC photo set — then a sign-off packet that turns the approved part into the standard we inspect the production run against. For projects still upstream of a physical sample, our [prototype-to-production bridge guide](/guide/acrylic-prototype-to-production-bridge/) covers how a one-off becomes a production spec; this guide starts the day the sample box lands on your desk.
---
## Dimension lock: measure the sample, not the drawing {#dimension-lock}
The first check is twenty minutes with calipers: measure the sample and write the numbers onto the spec sheet, then approve those measured values. The drawing states intent; the sample states what the production line actually produces. The two are usually close — and "usually close" is exactly what a dimension lock exists to confirm.
The caliper points we log on every acrylic sample — and the ones we ask buyers to repeat on theirs:
- Exterior length, width, and height — each measured twice, at different points, because panels can taper
- Wall thickness on every panel that matters for strength or fit
- Interior dimensions of every well, slot, or compartment the product must enter
- Corner radius, if packaging or a mating fixture assumes square corners
- Hole diameters and center-to-center positions for any hardware
Wall thickness is the first number I check on an incoming sample, because the sheet stock itself is allowed to vary. Published tolerance tables for extruded acrylic show a nominal 3.0 mm sheet legitimately arriving anywhere from about 2.7 to 3.3 mm[^sheet-tolerance] — which means an interior well dimensioned from nominal thickness can shift by more than half a millimeter without anyone making a mistake. We build fit-critical dimensions from the measured sheet, not the nominal label, and our spec sheet carries those measured values when the sample ships; the approval email should reference the same numbers.
This is also where the wrong-size-but-beautiful sample gets caught. Buyers sometimes hesitate to reject a sample whose finish is excellent, as if the craftsmanship earns a pass on the tape measure. It doesn't, and no fabricator worth keeping expects it to. Quality of finish and correctness of size are independent gates; a sample can pass one and fail the other, and the checklist treats them separately on purpose.
---
## The fit test: put your real product in the sample {#fit-test}
The second check takes one minute and prevents the most expensive category of bulk failure: seat your actual product in the sample. Not a similar product, not the dimensions from its datasheet — the physical item, in its final packaging if that is how it will sit in the display.
Datasheets describe products the way drawings describe displays: nominally. A jar with a label overhanging the base by half a millimeter, a box with a slight bulge at the seam, a lid that needs finger clearance to lift — none of that appears in the dimensions the fabricator was given, and all of it appears the moment the real item meets the real well. The fit failures I see almost never trace to a wrong part; they trace to a right part meeting a product nobody measured. Peel the protective film before testing; film adds thickness and hides how surfaces actually meet.
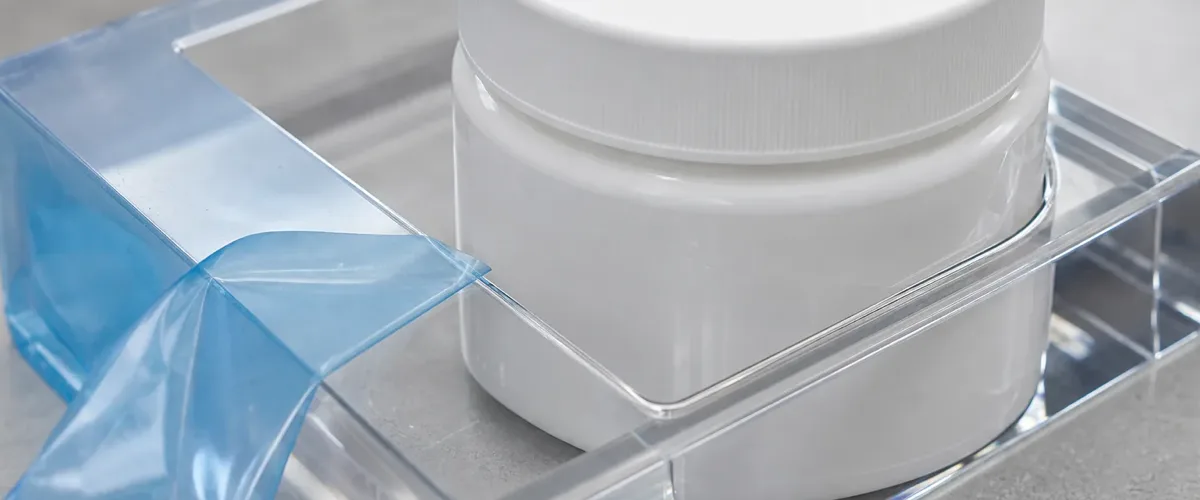
The one-minute check that outranks every drawing: the buyer's actual product seated in the sample's well, protective film peeled so surfaces meet the way they will in the store.
Then test the way the display will be used, not just the way it will be photographed. Pull the product out one-handed, the way a shopper does. Load all positions, not one — a rack that holds one card gracefully can bind at full load. If retail staff will refill it, check there is clearance for a hand, not just for the product. When a well is deliberately snug, decide on the sample whether snug means secure or means scratched on every removal, because at [pre-production sample approval](/guide/physical-acrylic-sample-vs-3d-render/) that choice is a polite email, and after bulk it is a dispute.
If the product cannot travel to you, send it to us instead. We routinely run fit checks on the buyer's actual item at the factory and return macro photos and measurements of the seated fit before the sample even ships — it removes a full shipping round-trip from the approval loop.
---
## Carton fit: the check most buyers skip {#carton-fit}
The third check is the one I almost never see on a buyer's own list: pack the approved sample into the actual shipping carton, with the actual protection, before signing off. A display that fits its carton on paper can fail it in corrugate, and the failure surfaces at the worst possible moment — after production, at packing.
The arithmetic is unforgiving. A 300 mm-wide display with 8 mm of foam protection per side and 2 mm of insertion clearance per side needs 320 mm of carton inner width. Quote the display's exterior alone and the carton is 20 mm too small; the packer then either forces it (foam compressed to nothing, corners bearing on cardboard) or ships it under-protected. Rounded corners cut the other way — a generous corner radius changes the effective footprint and can leave a corner-fitted insert loose. And parcel-shipment testing standards exist for good reason: ISTA's 3A procedure simulates the drops and vibration of individual parcel delivery for packages up to 70 kg[^ista-3a], and protection that is not actually in the carton cannot pass any of it.
The 20 mm nobody quoted: a 300 mm display consumes 320 mm of carton inner width once 8 mm foam and 2 mm insertion clearance per side are counted. The same display quoted against the bare carton dimension ships with its corners on the corrugate.
The fix costs nothing at sample stage: put the sample in the carton, with the foam, and close the flaps. If the cartons are already ordered, tell us their inner dimensions and we check the packed stack before approval — enlarging a carton or trimming a flange is a sample-stage conversation, not a production-stage one.
---
## The QC photo set to request with your approval {#qc-photo-set}
The fourth check is the one that keeps working after the sample leaves the bench: agree, at approval, on the photo set the production run will be checked against. The approved sample becomes the golden sample — and photos of it become the reference standard both sides point at instead of adjectives.
The eight shots we recommend fixing at approval: front face square-on; both side profiles; top-down showing interior layout; a macro of the primary edge finish; a macro of any printed or engraved artwork; the product seated in its well; the unit packed in its carton with protection visible; and the caliper on the most critical single dimension, reading visible. On golden samples I shoot the set myself before it enters the order record — eight photos, two minutes, and every later question — is this the approved gloss, is the print in the approved position — has a picture to answer it.
Then the set earns its keep at scale. We inspect 100% of units against the golden sample before packing, and on programs where the buyer requested it, the same reference angles are re-shot on production units and sent before the balance payment. One [beauty-brand counter display program](/case-studies/beauty-brand-counter-display-program/) we produced ran exactly this way: the signed-off samples became the golden samples for the run, and every one of the 650 production units was checked against them at final inspection. When my inspection team can hold a production unit next to the golden sample and the buyer's own photo set, "matches the approved sample" stops being an opinion.
---
## What sample approval does not lock {#not-locked}
An honest checklist also names its edges, and the most dangerous assumption I run into after approval is that it froze everything. Three things stay outside the lock, and each needs its own gate.
**Sheet-batch color.** Acrylic sheet is produced in batches, and tinted, frosted, and colored grades can shift measurably between batches. Color scientists grade visible difference in delta-E: a difference of 1–2 is barely noticeable, while anything above 3 is treated as unacceptable in most industries[^delta-e] — and batch-to-batch sheet variation can sit inside that noticeable band even when every part is built exactly to spec. The approved sample locks the color family, not the batch. For color-critical programs, ask for a chip from the actual production batch before cutting starts; we hold bulk runs for exactly that confirmation when the buyer flags color as critical.
**Packaging spec.** Unless the carton, insert, and protection were part of what you approved — which is why the carton-fit check above belongs inside approval rather than after it — packaging remains an open variable. Close it explicitly: approve the packed configuration, not just the part.
**Anything changed afterward.** A sample approved "except 20 mm shorter" is not an approved sample; it is a new spec with no sample behind it. Dimension and artwork changes after approval reopen the gate — sometimes with a full revised sample, sometimes with a dimensioned drawing confirmation, but always in writing before production. How artwork files are prepared before that loop starts is covered in our [artwork file readiness guide](/guide/artwork-file-readiness-custom-acrylic/); and for anyone still deciding whether a physical sample is worth ordering over a rendered preview, the [render-versus-sample comparison](/guide/physical-acrylic-sample-vs-3d-render/) makes that case separately.
---
## From approved sample to production start: the sign-off packet {#sign-off-packet}
Approval is not a feeling; it is a packet. Production should start from a bundle that a stranger could pick up and build from, because six weeks later, that is functionally what a production line is. Ours releases when five items are together:
1. **Written approval naming the sample version** — "approved: PPS v2 as measured" in an email is enough; "looks good!" under a photo is not
2. **The measured spec sheet** — the caliper values from your dimension lock, now the contract numbers
3. **Locked artwork files** — final files, final placement, no "small tweak coming"
4. **Confirmed quantity and packed configuration** — including the fit-tested carton spec
5. **The deposit** — our trigger is 30% down, 70% balance before shipment
Two expectations are worth setting here. First, sample speed is not production speed: our samples ship in 3–5 days because one piece moves through the shop alone, while production runs 15–20 days because 500 pieces move through every station in sequence — a fast sample is evidence of priority, not a preview of bulk lead time. For a program racing a fixed show date, the [sample-to-bulk deadline guide](/guide/sample-to-bulk-trade-show-deadline/) walks that calendar properly. Second, the golden sample should live on after sign-off: I keep the approved sample on the QC bench for the whole run, and buyers with recurring programs keep a counterpart on their side, so a reorder next year starts from a physical standard rather than a memory.
---
## Reading a sample as a supplier-selection gate {#supplier-gate}
A pre-production sample is also the cheapest audit you will ever run on a factory nobody on your team has visited. Buyers comparing suppliers — or preparing to leave one — should read the sample twice: once as a part, once as a preview of the process behind it.
As a part, insist it is production-grade before weighing it: the same material the bulk run will use, the same edge finish, the same packaging. A sample polished by the factory's best hands on material the bulk run will never see tells you nothing except what the showroom looks like. We build samples on our production line, with our production process, because a sample that flatters us into an order we then can't match at 500 pieces costs both sides more than the order was worth.
As a process preview, watch for three behaviors. Did measured dimensions come back on a spec sheet unprompted? Did the factory volunteer what the sample does not lock — batch color, packaging — or leave the assumption standing? And when a change was requested, did it come back re-confirmed in writing, or just verbally absorbed? The question I ask on every buyer qualification call is some version of this: not "was the sample good," but "did the process around the sample make the next 500 pieces feel predictable." A supplier disciplined at one piece rarely collapses at five hundred; the reverse is also true, and the sample stage is where it shows first.
If you want to run this checklist on us, we make it easy: [send your drawing or a reference photo](/contact/?source=pre-production-sample-approval-checklist) and we'll quote a sample alongside the bulk run — measured spec sheet included, ISO 9001 process behind it, and 2,000+ custom projects' worth of reasons to trust the part over the picture. Or if the design itself is still moving, [start with our customization team](/customization/) and put the checklist to work on version one.
[^sheet-tolerance]: [Thickness tolerance of ACRYLITE extruded FF acrylic sheet — ACRYLITE knowledge base](https://www.acrylite.co/resources/knowledge-base/article/what-is-the-thickness-tolerance-of-acrylite-r-extruded-ff-acrylic-sheet?category=product-properties) — manufacturer tolerance table showing a nominal 0.118 in (3.0 mm) extruded sheet permitted at 0.106–0.130 in (≈2.7–3.3 mm), the source for the sheet-stock variation behind measured-dimension approval.
[^ista-3a]: [ISTA 3A test procedure — International Safe Transit Association](https://ista.org/test_procedures.php) — general-simulation test for individually shipped parcels up to 150 lb (70 kg), simulating the drops, vibration, and handling of parcel delivery; the benchmark context for why packed protection must physically fit the carton.
[^delta-e]: [What is Delta E? — Konica Minolta Sensing Europe](https://sensing.konicaminolta.eu/mi-en/colourblogtop/colour-blog/whatisdeltae) — color-measurement explainer stating the delta-E perceptibility scale (below 1 invisible, 1–2 barely noticeable, above 3 unacceptable in most industries), supporting the sheet-batch color-variance caveat in the "what approval does not lock" section.