---
title: "Custom Board Game Pieces: OEM Manufacturing Guide"
description: "How indie studios order custom board game pieces from an acrylic OEM: per-set MOQ math, color consistency across 150+ pieces, engraving vs UV print, packaging."
category: "Industry"
author: "William Cho"
authorCredential: "Founder of Wetop Acrylic — building custom acrylic in Shenzhen since 2008, 2,000+ B2B projects shipped across 25+ countries"
datePublished: 2026-08-17
dateModified: 2026-08-17
primaryKeyword: "custom board game pieces"
url: https://wetopacrylic.com/guide/custom-board-game-pieces-manufacturing/
---
## What ordering custom board game pieces from an OEM factory looks like {#oem-path}
Most of the custom board game pieces inquiries reaching our factory now come from studios of two or three people. Ten years ago these briefs came from established publishers with purchasing departments; since the crowdfunding wave, they come from designers who just funded a print run, hold a parts list of 150-plus pieces, and are dealing with a factory for the first time. The question underneath every one of those emails is the same: can a manufacturer take this from vector file to finished set without a distributor-scale order?
It can, and the mechanics are simpler than most first-time studios expect. You supply artwork and a piece manifest; we quote per design; a physical sample set ships in 3-5 days; bulk production runs 15-20 days after your sign-off, with every piece passing 100% inspection before packing. Our minimum order is 100 pieces per design — and as the [MOQ math section](#moq-math) shows, a normal game run clears that threshold without trying.
I wrote this guide for that studio: the one comparing a print-on-demand marketplace against a real OEM run, unsure what a factory needs from them and what they are allowed to demand back. We build [acrylic game pieces](#acrylic-vs-molding) and tokens as one of the small-parts precision categories our lines have run for years — the same programs and jigs that cut [OEM component runs](/case-studies/custom-acrylic-component-oem-precision-run/) hold tolerances on a player token just as well.
---
## Why sheet acrylic beats injection molding at indie-run volumes {#acrylic-vs-molding}
The economic argument for acrylic game pieces is the absence of tooling. Injection molding — the process behind mass-market plastic miniatures — requires a machined metal mold for every distinct shape, and mold costs range from about $100 for a simple 3D-printed cavity to $100,000 for complex production tooling before the first part exists.[^mold-cost] Laser-cut acrylic replaces the mold with a cutting program: a file, not a tool. Changing a piece shape costs an afternoon of programming, not a re-machined cavity.
That difference decides who can afford which process. A publisher ordering 50,000 sets amortizes a mold until it disappears from the unit price. A studio ordering 300 sets cannot — tooling would dominate the entire project budget. The first question I ask a studio comparing quotes is which pieces genuinely need to be sculpted, because everything flat belongs in the no-tooling column. Sheet acrylic gives that studio access to factory-grade parts at set counts that would be a rounding error to an injection molder.
The material itself holds up its end. Cast acrylic (PMMA) carries a density of 1.18 g/cm³ and a Rockwell M92 surface hardness[^pmma-props] — pieces have a glassy, substantial feel in hand, noticeably denser than most woods, with a hard surface that shrugs off the constant handling a game session deals out. And because color runs through the sheet, a chipped edge shows the same color underneath, not a painted shell over a different core.
| | Laser-cut acrylic | Injection-molded plastic | Wood |
|---|---|---|---|
| Per-design setup | Cutting program + jig | Machined mold ($100-$100,000)[^mold-cost] | Cutting program or die |
| Economic run size | 100 sets and up | Tens of thousands of sets | Hundreds of sets |
| Color | Through-body, sheet catalog | Pigmented resin per mold run | Stain or paint on surface |
| Transparency | Clear, tinted, frosted available | Possible, tooling-dependent | Not available |
| 3D sculpted shapes | No — flat profiles with polished edges | Yes — full 3D miniatures | Limited |
| Best fit | Tokens, markers, counters, standees — any flat profile | Sculpted miniatures at mass volume | Rustic or natural-theme pieces |
The honest limit sits in that fifth row: acrylic pieces are cut from flat sheet. If your game needs sculpted 3D miniatures, injection molding or resin casting is the right process, and I will say so in the first reply rather than quote you into the wrong material. For tokens, player markers, resource counters, standees, and every flat-profile piece in the box, sheet acrylic is the stronger process at indie volume.
---
## How one order keeps its color across 150-plus pieces {#color-consistency}
Color consistency in a game set is a batching decision made before cutting starts, not a sorting exercise after. Acrylic sheet color varies slightly from production lot to lot — two "red" sheets made months apart can sit visibly apart when pieces from each land on the same board. The fix is procedural: we reserve enough sheet from a single lot to cut the entire order in that color, spares included, before the first piece is cut.
This matters more for game sets than for almost anything else we build, because the end customer performs a direct comparison every time they play. Nobody holds two store fixtures side by side; every player holds two red tokens side by side. I have seen a buyer lay pieces from two suppliers' runs on a table, and the mismatched pair reads as a defect even when each piece is individually perfect.
Reorders extend the same discipline across time. We keep retention pieces from your production run, and when a reprint order arrives, the new sheet lot gets checked against those physical references before we commit it. For brand-critical opaque colors, we match sheet against Pantone targets — the process and its honest limits are covered in our [Pantone color matching guide](/guide/pantone-color-matching-acrylic-oem/). For translucent jewel tones, the physical retention piece is the better reference than any code, because perceived color shifts with thickness and light.
What you should do at the brief stage: name which colors are identity-critical (player colors usually are) and which are functional (a neutral scoring track can drift a shade without anyone noticing). That single sentence in an RFQ tells a factory where to spend its matching effort.
---
## Per-set vs per-piece MOQ math for game sets {#moq-math}
Our minimum order is 100 pieces per design — per design, not per set, and that distinction works in a game studio's favor. A "design" is one geometry in one color and finish: your hexagonal resource token in translucent amber is one design whether it appears once per set or forty times. In a run of 100 sets, even a design used once per box reaches the 100-piece production floor automatically.
Here is the math on a representative 150-piece set at a 100-set run:
| Piece type | Designs | Per set | Pieces per design at 100 sets |
|---|---|---|---|
| Player markers (4 colors) | 4 | 16 | 400 each |
| Resource tokens (3 shapes) | 3 | 108 | 3,600 each |
| Round / score markers | 2 | 20 | 1,000 each |
| Unique objective markers | 6 | 6 | 100 each |
| **Total** | **15** | **150** | **15,000 pieces** |
Even the rarest piece — a unique marker appearing once per set — lands exactly at MOQ. The shared tokens come out in the thousands. A 100-set order that sounds small on a sales call is a 15,000-piece production run on our floor.
What actually scales cost is not the MOQ line but per-design setup: each distinct geometry needs its own cutting program, its own jig, and its own first-article check. Fifteen designs cost more setup than five at the same total piece count. When a studio needs to trim a quote, the lever I point at first is design consolidation — one token shape reused across three colors is three designs, but one shape engraved with three different icons can sometimes do the same job as one geometry with three decoration passes. The deeper economics of how our 100-piece minimum behaves across multi-design orders is worked through in the [MOQ economics guide](/guide/moq-50-pieces-economics/).
Custom game tokens outside a boxed set — promo tokens, convention exclusives, replacement packs — follow the same per-design rule, which is why a 100-piece promo token run is an order we take without hesitation.
---
## Glitter, metallic, and frosted sheets are stock materials, not exotica {#specialty-sheets}
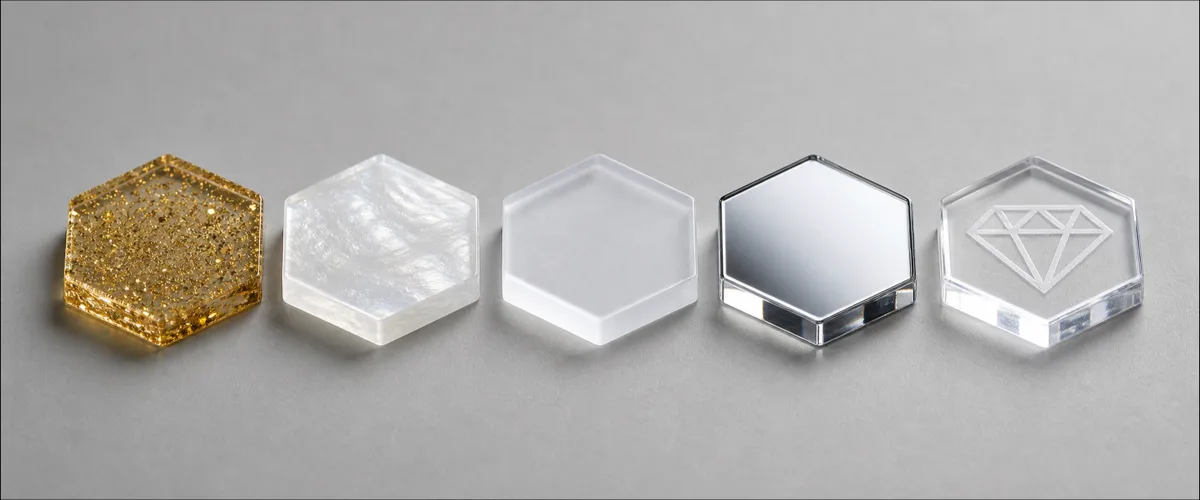
The specialty finishes studios ask about most — glitter, metallic, pearlescent, frosted, mirrored — are standard acrylic sheet types, not custom formulations. The effect is in the sheet itself: glitter and pearlescent particles run through the body of the material, frost is a surface texture in the sheet, and mirror is a factory-applied backing. We source the sheet per order from the same suppliers that stock clear and solid colors, so a gold glitter player token is not a premium engineering request. It is a material line on the quote.
Specialty finishes live in the sheet, not on it: glitter particles suspended through the body, pearlescent swirl, frost, mirror backing, and a laser-engraved icon recessed into clear stock. Every one of these is a catalog sheet type, quoted as a material line.
The one rule I hold studios to on specialty sheets: approve them physically. A glitter sheet's particle size, a metallic's warmth, a frost's opacity — none of it survives translation through a phone screen, and "gold" spans a dozen visibly different sheets across suppliers. We send a swatch or a cut sample piece in the actual material before the run, exactly because these finishes are subjective in a way dimensions are not. Our [sample vs render guide](/guide/physical-acrylic-sample-vs-3d-render/) covers why a $40 sample round is the cheapest insurance in the whole project.
Two practical notes from our production side. First, frosted and glitter sheets hide fingerprints and micro-scratches far better than gloss clear, which makes them forgiving choices for pieces handled hundreds of times per game. Second, mirrored sheet is directional — it has a face — so pieces that flip during play should use through-body finishes instead. These are the small calls a factory should be making for you at the quoting stage, before they become reprint lessons.
---
## Engraving or UV print: how tokens carry their markings {#engraving-vs-uv}
Every marked piece in your set takes one of two decoration routes, and they behave differently in the hand. Laser engraving removes material: the mark sits below the surface of the token as a frosted, tone-on-tone recess that handling physically cannot reach. How deep is a settings decision made per job — deep enough to read and to survive years of shuffling, shallow enough to leave the piece its strength — and it is set on the sample you approve, not fixed by the process. UV printing adds material: full-color artwork cured as a thin ink film on the surface, capable of gradients, multi-color iconography, and photographic detail that engraving cannot produce.
A 3 mm token in cross-section: the engraved mark is recessed below the handling surface, while UV-printed artwork sits on top of it. Engraving trades color for permanence; UV print trades surface exposure for full color.
The decision rule I give studios: use engraving for the marks that define what a piece *is* — faction icons, denominations, player symbols — because those must survive years of shuffling, stacking, and bag storage untouched. Use UV print where color itself carries the information: multi-color artwork, character portraits, board-matching iconography. The two routes are not exclusive; a common build on our lines is an engraved icon for identity plus a UV-printed color field on the reverse face, on the same 50-set run.
Placement matters as much as method. UV print belongs on token faces, not on edges that slide against other pieces or the box insert during transit and play. When artwork must reach a high-rub zone, we flag it at the quoting stage and propose either moving the art or switching that element to engraving. The full breakdown of how UV printing behaves on this material — adhesion, resolution, where it earns its cost — is in our [UV printing on acrylic guide](/guide/uv-printing-on-acrylic/).
---
## Packaging that survives the trip and sells the game {#packaging}
Piece packaging has three layers, and studios usually brief only the outermost one. Inside the box, pieces need organization — bagged by type or seated in an insert tray — so the set survives distribution and reads as premium on first opening. Around that goes the retail box. Around everything goes export packing rated for an ocean or air journey and the parcel network at the far end.
We build the acrylic layer of that stack in-house: display-grade [acrylic boxes](/products/acrylic-boxes/) with fitted lids for deluxe and collector editions, and organizer trays cut to hold each piece type in its own well. A clear-lidded piece tray does double duty — it protects the set in transit and becomes the storage the player actually uses, which is the kind of component reviewers photograph. We have run this exact play for product-launch clients; the [packaging insert case study](/case-studies/custom-acrylic-packaging-insert-product-launch/) shows how a fitted insert turned unboxing into part of the product.
Printed cardboard cartons are not our production line, and I would rather say that plainly than quote badly on someone else's process — but custom packaging is part of how we hand an order over. Sets leave our floor bagged or tray-seated per your spec, protected against piece-on-piece scratching, and packed retail-ready, so what arrives at your fulfillment partner is stock, not a kitting project.
---
## From parts list to approved first article {#first-article}
A production-ready brief for a game set needs four things: vector outlines (AI, PDF, or DXF) for every piece geometry, a piece manifest listing quantity per set for each design, color and finish targets per design, and your decoration artwork with placement marked. No vector files yet? Send dimensioned sketches or reference photos — redrawing a token outline is routine pre-production work for us, not a blocker.
From there the sequence is fixed. We quote per design so you can see exactly where the money sits and trim intelligently. On approval, we cut a sample set — one of each design in final material, color, and decoration — and ship it in 3-5 days. You put real pieces on a real board, check color against your art, feel the engraving depth, and correct anything that reads wrong. Bulk production runs 15-20 days from your sample sign-off, on the same ISO 9001-inspected lines as every order, with 100% piece inspection before packing.
Two corrections at the sample stage cost days. The same corrections discovered across 300 delivered sets cost a reprint and a launch window — which is why I treat the sample loop as non-negotiable even when a deadline is loud. Since founding Wetop in 2008, I have never once regretted holding an order for a sample round, and I have watched more than one rushed skip-the-sample decision come back as a reprint. If your campaign has already set a delivery promise, tell us the date in the first email; sequencing sample and bulk around a fixed deadline is a planning question we answer before you commit, not after.
Half-ready parts lists are normal — most of the ones I read still have two or three designs described in words rather than drawn. Send yours through our [custom quote form](/contact/?source=custom-board-game-pieces-manufacturing) with whatever quantities and target dates you have. The reply lands within 24 hours, carrying per-design pricing and honest flags rather than a form letter.
[^mold-cost]: [Formlabs — How Much Does Injection Molding Cost?](https://formlabs.com/blog/injection-molding-cost/) — states injection mold tooling ranges from roughly $100 for simple 3D-printed molds to about $100,000 for complex machined production molds, supporting the tooling-economics comparison against laser-cut sheet acrylic.
[^pmma-props]: [AZoM — Polymethyl Methacrylate (PMMA, Acrylic) material properties](https://www.azom.com/article.aspx?ArticleID=788) — publishes cast acrylic density of 1.18 g/cm³ and Rockwell M92 surface hardness, supporting the piece-feel and handling-durability claims.