---
title: "Adhesive Backed Acrylic & Magnetic Components"
description: "Adhesive backed acrylic components explained: liner grades, magnetic sheet vs disc magnets, polarity QC at volume, and the sample-before-bulk program loop."
category: "Manufacturing"
author: "Dillion Chen"
authorCredential: "Production Manager at Wetop Acrylic — running laser, CNC, polishing, and UV printing lines since 2014, 1,500+ custom projects personally overseen"
datePublished: 2026-08-24
dateModified: 2026-08-24
primaryKeyword: "adhesive backed acrylic"
url: https://wetopacrylic.com/guide/adhesive-magnetic-acrylic-components/
---
## Adhesive backed acrylic: the spec line that decides the reorder {#liner-grades-decide}
Three adhesive grades cover nearly every adhesive backed acrylic component we build: removable, for parts that must come off a wall or fixture cleanly; permanent transfer film, for flat lightweight parts that never move again; and VHB-class acrylic foam tape, for parts that carry weight or bond to textured surfaces. The grade is one line on the spec sheet, and it decides more reorders than the acrylic itself — it is the first line I read on any component RFQ that crosses my desk.
Adhesive backed acrylic is a fabricated acrylic part — a photo square, a sign face, a shelf divider, a frame back — that ships with pressure-sensitive adhesive already laminated to it, ready to peel and place. Its magnetic cousin ships with a magnetic sheet or embedded disc magnets instead. We cut, polish, and print these components at a 100-piece MOQ, with samples in 3-5 days and production in 15-20 days, and for buyers like photo labs and fixture builders the acrylic is only half the product. The other half is hardware we apply on the back — and that half has its own failure modes.
One boundary before anything else: this is not a guide about how to mount a display. If the job is sizing a magnet to hold an acrylic panel on a wall — grades against substrate thickness, embed versus surface, pull-force margins — that math lives in our [acrylic magnet mount spec chart](/guide/magnet-mounting-acrylic-spec-chart/). This guide is for the buyer on the other side of that decision: the one ordering hundreds or thousands of parts with the adhesive or the magnets already applied, who needs the liner grade, the magnet format, and the polarity to arrive right on every piece.
## Removable, permanent, or VHB-class: matching the liner grade to the job {#adhesive-liner-grades}
The liner-grade decision follows the end of the part's life, not the beginning. Ask what happens when the component comes off — or whether it ever does — and the grade picks itself. A removable adhesive acrylic part peels off paint cleanly after a season; a permanent transfer film bonds a badge to a machine housing for the machine's lifetime; a VHB-class foam tape carries real weight on real-world walls.
| Grade | Adhesive form | Bond character | Right jobs | Wrong jobs |
|---|---|---|---|---|
| Removable | PSA film with low-tack acrylic adhesive | Holds light parts, releases without residue | Seasonal retail graphics, rented walls, price-channel strips | Anything heavy, anything permanent |
| Permanent | Transfer film, high-tack acrylic adhesive | Thin, strong, needs a flat smooth surface | Badges, sign faces, flat panels on metal or glass | Textured walls, powder-coat, damp areas |
| VHB-class | Acrylic foam tape, roughly a millimeter thick | Foam core wets out onto texture, carries load | Heavier panels, painted drywall, outdoor fixtures | Parts that must ever come off cleanly |
Acrylic itself sits in the middle of the bonding-difficulty range. Published polymer surface-energy tables put PMMA at a critical surface tension of 37.5 dynes per centimeter[^accudyne-pmma] — high enough that a properly specified acrylic adhesive wets out and holds, low enough that adhesive choice actually matters, which is not true of, say, bare steel. That is why the grade line deserves more attention than most RFQs give it: the same part with the same dimensions behaves completely differently on a removable liner versus a foam tape.
"Holding power" on a datasheet is not a marketing adjective either. Peel adhesion is rated under standardized pull tests — the Pressure Sensitive Tape Council publishes the test methods used across the industry to measure PSA tape performance[^pstc-methods] — so two liner options can be compared on numbers generated the same way. When we quote an adhesive-backed run, we name the adhesive family we laminate and its rated peel adhesion, and we'd recommend holding every supplier to that standard: a fabricator who answers with a brand and a number bought the material on spec, not on price.
### The film and the liner are two different papers {#film-vs-liner}
One vocabulary trap costs buyers real confusion on almost every first adhesive-backed order: the protective film on the face of the acrylic and the release liner on the adhesive are two different layers that both peel off. The face film protects the polished surface in transit and comes off at unboxing. The release liner protects the adhesive and comes off at installation — sometimes weeks later, by a different person. If your installers report a "liner that won't come off," the first question I ask is which side of the part they are pulling, because half the time the answer is the face film, over-cured from sitting in a hot vehicle. Spec both layers explicitly: face film type on the front, liner grade and tab position on the back. A peel tab on the release liner costs almost nothing at our lamination station and saves every installer a fingernail search.
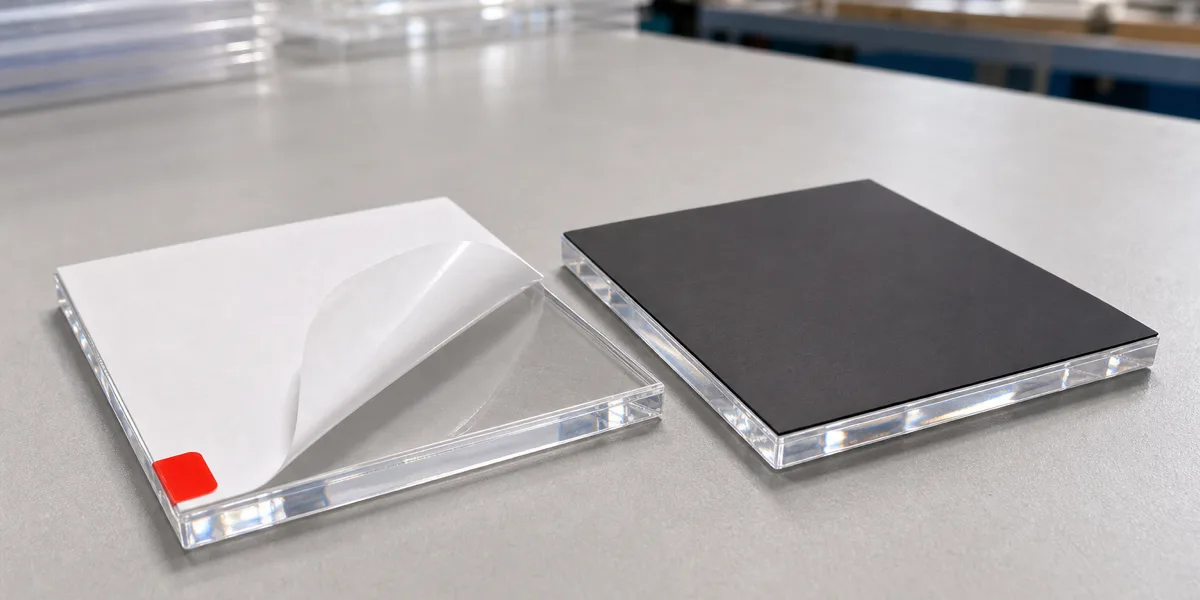
The hardware layer is a fraction of the acrylic's thickness, but it carries the entire mounting function — grade, format, and orientation all have to be on the drawing.
## Magnetic backing: sheet magnet or disc magnets {#magnetic-sheet-vs-discs}
Magnetic acrylic components come in two formats, and they solve different problems. Flexible magnetic sheet laminates across the whole back of the part and spreads a light hold over the full face — the classic photo-lab build, where a printed acrylic square grips a steel surface or a ferrous counter-plate and stays dead flat. Sintered neodymium discs concentrate a much stronger hold at discrete points and suit parts that snap to a defined position: frame backs, box lids, swappable sign faces.
The choice follows weight and repositioning. Sheet magnet holds a lightweight panel and forgives placement — slide it, straighten it, take it down daily — which is why photo products live on it; when a photo lab brings a magnetic brief, I route it to sheet magnet almost every time. Disc magnets are graded by the N-number system; the grade reflects the material's maximum energy product, and a higher number means a stronger magnet from the same volume[^kjmag-grade]. Discs earn their cost when the part is heavier, when alignment must repeat exactly, or when the magnet must hide inside a machined pocket. We buy both as components — magnetic sheet by the roll, discs by grade and size — alongside the acrylic we fabricate, and on program orders we can quote the magnet material supply together with the finished part, in custom roll widths where the program needs them.
Two neighboring topics stay out of scope here, deliberately. How much pull force a given disc delivers through a given acrylic thickness is the sizing question the [magnet mount spec chart](/guide/magnet-mounting-acrylic-spec-chart/) exists to answer. And if the real question is retail security — keeping the product on the fixture, not the fixture on the wall — that is the territory of our [magnetic mounting and anti-theft guide](/guide/magnetic-mount-anti-theft-acrylic-displays-guide/). For the product side of magnetic frames themselves, see our [magnetic acrylic frames](/products/acrylic-frames/acrylic-magnetic-frames/) line.
Same acrylic part, two backs: a release liner half-peeled off the adhesive grade, and a full-face magnetic sheet lamination beside it.
## Magnet polarity QC at volume {#magnet-polarity-qc}
A magnet installed backwards is the most expensive kind of defect: dimensionally perfect and functionally dead. The part passes every caliper check, the pocket depth is right, the bond is sound — and the piece pushes away the counterpart it was built to grip. On a two-magnet system, polarity is not a property of one part; it is a relationship between two, and it only exists relative to the mating piece.
That is why polarity has to enter the order as a spec, not an assumption. Since 2014, I've learned to treat any magnetic drawing without a defined counterpart as unbuildable and ask, before quoting: what does this part mate with, and can you send one? The counterpart — the buyer's existing frame half, the steel fixture plate it grips, the previous supplier's part — becomes the reference standard on the line. Assembly jigs are then built so discs load in one orientation only, marked face out, and a wrongly flipped magnet physically cannot seat flush in the fixture.
Inspection closes the loop. Our standard 100% inspection covers dimensions and finish on every piece before packing; on magnetic components it adds a mate-check — each part is clicked against the reference counterpart, because the only meaningful polarity test is the mating test. When a buyer reports a sample whose magnets repel instead of seat, the correction is procedural, not apologetic: photos and the order reference identify the batch, the jig orientation gets corrected against the counterpart, and a replacement sample ships before any bulk quantity is authorized. One flipped disc on a sample is a fast fix. The same flip replicated across a bulk run, discovered in the buyer's warehouse, is the scenario this whole section exists to prevent — and it is preventable precisely because polarity, unlike a scratch, never happens to a single piece at random. It is always the jig, which means catching it once catches it everywhere.
## Sample before bulk: how component programs actually start {#sample-before-bulk}
Every component program we run — photo labs pulling thousands of [magnetic-backed photo blocks](/products/acrylic-blocks/acrylic-photo-blocks/) a year, fixture builders kitting adhesive-backed parts into assemblies — started the same way: with a small sample order that locked the spec. Samples ship from us in 3-5 days, cut from the same sheet stock we will run the bulk order on and laminated with the same adhesive or magnet material, and production follows in 15-20 days from a 100-piece MOQ once the sample is approved.
The sample locks three things a drawing cannot. First, real liner behavior: peel the release liner yourself, stick the part to your actual surface, and take it off again if the grade is removable — on your paint, not a lab panel. Second, real magnet performance: the counterpart snapping to the sample tells you more than any pull-force table, because the test includes the real steel, the real gap, the real alignment. I tell program buyers to treat the sample week as a rehearsal of their own fulfillment, not a quality check on us. Third, polarity, permanently: the approved sample becomes the reference standard the production line mate-checks against, so approval is not a formality — it is you defining "correct" for every piece that follows. The [delivered print-lab photo-block record](/case-studies/acrylic-photo-blocks-print-lab-bulk-order/) documents repeat purchases, shipment planning, and quality discussions without claiming this magnet-specific approval loop; the [photo-booth magnet frame program](/case-studies/photo-booth-magnet-frames-event-co/) is the relevant placement example.
High-volume buyers should also use the sample stage to confirm capacity, because a component program is a schedule commitment, not just a part spec. Ask for the production schedule in writing before the deposit: which weeks the quantity occupies, and what the standing lead time on reorders will be. Our lines — 8 laser cutters, CNC stations, polishing, lamination and assembly — run display work and component work side by side, and we confirm program slots rather than assume them. Where a deadline is close, split shipment is the normal answer: an urgent first batch by air, the balance following by sea, agreed at order placement so the freight math is planned rather than panicked. For repeat programs, the approved sample plus the retained spec sheet is what makes reorder lead times boring — in the good sense.
## When only part of the quote is competitive {#sample-competitive-sku-first}
Multi-item component quotes rarely come back uniformly priced. A photo lab quoting acrylic magnets, blocks, and adhesive-backed squares in one RFQ might find one line lands at a competitive price while another comes in high — and the natural instinct, stalling the whole program until every line is cheap, is the wrong move. Sample the competitive item first.
The reasoning is practical. A sample run on the strongest SKU starts generating real information now: how the liner grade behaves in a real fulfillment flow, how end-customer surfaces take the adhesive, whether the magnetic version needs a stronger sheet. Those findings almost always reshape the remaining items — a thickness drops, a size consolidates, a quantity doubles — and respecced items get requoted. I've watched a single sampled SKU turn an uncompetitive three-item quote into a two-year program, because the sample rewrote the other two specs into something buildable at a better price. The alternative — negotiating every line on paper before touching a physical part — optimizes prices for specs that were going to change anyway.
What to send for a component quote, whether it is one SKU or six: the part drawing or a reference sample; material and thickness; the adhesive grade or magnet format if you know it, or the mounting surface and counterpart if you don't; quantity per SKU with annual volume if it is a program; the destination; and the deadline that matters. From that we return a quote with the hardware called out explicitly — liner grade, magnet format, polarity convention — so what you approve is what every production piece carries. Send it through our [quote form](/contact/?source=adhesive-magnetic-acrylic-components), or start from the [customization page](/customization/) if you are still defining the part. Sample first, bulk second — in this product family more than any other, that order of operations is the whole game.
[^accudyne-pmma]: [Polymer surface-energy table — PMMA (acrylic, plexiglas) critical surface tension 37.5 dynes/cm, water contact angle 70.9 degrees (Accu Dyne Test)](https://www.accudynetest.com/polytable_03.html) — the published surface-characteristics data behind the claim that acrylic is a bondable but adhesive-sensitive substrate: high enough surface energy for acrylic PSAs to wet out, low enough that grade selection matters.
[^pstc-methods]: [PSTC Test Methods — Pressure Sensitive Tape Council](https://www.pstc.org/test-methods) — the industry body's standard procedures for laboratory quality control and performance measurement of pressure-sensitive adhesive tape; the peel-adhesion ratings on adhesive datasheets are generated under these standardized methods, which is what makes liner grades comparable across brands.
[^kjmag-grade]: [Magnet grades explained — K&J Magnetics](https://www.kjmagnetics.com/blog/magnet-grade) — explains the neodymium N-number system: the grade derives from the material's maximum energy product in MGOe, and in general a higher number indicates a stronger magnet from the same volume.