---
title: "Acrylic Block Frames — Bulk Buying Guide for Photo Labs"
description: "How photo labs buy acrylic block frames in bulk: printing routes, photo-grade finish specs, protective film policy, resale packaging, and reorder consistency."
category: "Buyer Guide"
author: "Dillion Chen"
authorCredential: "Production Manager at Wetop Acrylic — running laser, CNC, polishing, and UV printing lines since 2014, 1,500+ custom projects personally overseen"
datePublished: 2026-07-08
dateModified: 2026-07-08
primaryKeyword: "acrylic block frame"
url: https://wetopacrylic.com/guide/acrylic-block-frame-photo-printing/
---
## What an acrylic block frame is — and why photo printers resell them {#what-is}
An acrylic block frame is a solid slab of cast acrylic, typically 15–20 mm thick, that displays a photo one of three ways: held between the block and a magnet-paired front, bonded to the face, or UV printed directly onto it. It stands on its own. No hinge, no easel, no hardware.
This morning's run on our diamond-polishing line was photo blocks, a batch of thick clear slabs coming off the wheels one at a time. After the final pass, the operator holds each face under a raking light at a low angle. If the surface shows any haze, swirl, or a pit that would sit behind a customer's photo, the block goes back on the line or out of the batch. It's the check I trained every polisher on this line to run, and it is the whole difference between an acrylic block frame that is photo-grade and one that is just a lump of clear plastic.
That self-standing simplicity is why photo printing businesses resell them. A paper print sells for the cost of paper; the same image on a thick polished block sells as a premium desk piece, and the lab keeps the margin difference. The blocks themselves come from our [acrylic blocks line](/products/acrylic-blocks/), the same fabrication family as our [custom acrylic frames](/products/acrylic-frames/) — but the buyer this guide is written for is not a consumer ordering one. It's the print lab, the print-on-demand seller, or the gift brand ordering a hundred blanks and putting its own product on top.
## Block frame anatomy — thickness, edge finish, and base stability {#anatomy}
Four attributes decide whether a block frame works as a product: thickness in the 15–20 mm band, a flat polished face for the photo, polished edges that read as premium at desk distance, and a base that sits flat without rocking. Everything else (size, corner style, print route) is a program choice on top of those four.
Thickness does two jobs at once. Structurally, 15–20 mm is what lets the block stand freely at common photo proportions; visually, it creates the deep edge that refracts light and makes the piece read as an object rather than a frame. Go thinner and the block needs a base or easel, which moves the product into standard frame territory: a different product with different hardware and a different price story.
Edge finish is where I spend my inspection time. In 12+ years running these lines I've rejected more blocks for edge tooling marks than for anything inside the material. A diamond-polished edge is glass-clear and shows the photo's colors refracted through the block's depth; a saw-cut or poorly flame-finished edge shows tooling marks the moment a desk lamp hits it. Faces matter even more: the display face must be flat and clean enough that the print sits against it without visible distortion. That's the raking-light check from our polishing line, applied piece by piece.
Sizing follows the prints your lab already sells. Most block programs are built around standard print formats (4x6, 5x7, and 8x10 inch equivalents) in portrait or landscape, with the block cut a margin larger than the image. Corners can run square, chamfered, or radiused; chamfers catch light and hide handling wear best in our experience.
## Photo block printing routes — UV direct print vs face-mount vs insert {#printing-routes}
Photo block printing runs through one of three routes, and the choice decides who controls print quality: UV direct print means the factory prints your artwork onto the block; face-mount means the lab bonds its own prints to the face; magnetic insert means the end customer slides a photo in and can swap it later.
**UV direct print.** We print full-color directly onto the acrylic — capability in-house since 2020 — with the image fused to the block, no paper layer at all. This suits batch artwork: branded gift lines, a fixed design per SKU, corporate programs. It's the route behind our [photo block e-commerce launch case](/case-studies/custom-acrylic-photo-block-ecommerce-launch/), where a brand shipped printed blocks as a finished product. What it does not suit is one-off customer photos, unless the order batches them deliberately. The mechanics of ink adhesion, white-ink underlayers, and color handling are covered in our [UV printing on acrylic guide](/guide/uv-printing-on-acrylic/).
**Face-mount.** The lab prints the photo on its own equipment and bonds it to the block face, keeping per-order color control in-house and ordering only blanks from us. It's the route I point most photo labs to first: the highest-volume pattern among the labs we supply, because it slots into the workflow they already run.
**Insert.** Magnet pairs hold a swappable print between the block and a thin front panel. The end customer controls the photo, swaps it in seconds, and the product becomes reusable. This is the route to pick for gift programs where refreshing the photo is the selling point.
One display-life note, whichever route a program takes: photographic prints fade with light, and conservation guidance from the Library of Congress is blunt about limiting light exposure for displayed photographs[^loc-photo]. UV-printed and face-mounted blocks live on desks and shelves, not archives. It's worth a care-card line in your packaging telling customers to keep the piece out of direct sun.
## Optical clarity — the finish specs that make a block photo-grade {#optical-clarity}
Photo-grade clarity is a spec, not an adjective. It means clear cast acrylic — the material transmits up to 92% of visible light per manufacturer data measured under ASTM D1003[^plexiglas-transmission] — plus diamond-polished faces and edges, and a face flat enough that the mounted or printed image shows no waviness at viewing distance.
The material gets you most of the way; the finishing line gets you the rest. Cast acrylic starts optically clear, but every cut edge starts opaque, and the polishing route decides what it becomes. Diamond polishing mills the edge with a diamond cutter head to an optically flat finish; flame polishing melts the surface glassy but can introduce stress and slight undulation on thick stock. For 15–20 mm photo blocks, diamond is our default. The full comparison lives in our [diamond vs flame polishing guide](/guide/diamond-vs-flame-polishing-acrylic/).
What should a lab actually write into a purchase order? Keep it observable: faces free of haze, swirl marks, and inclusions under angled light; edges polished clear with no tooling lines visible at arm's length; no visible distortion of a test image placed against the face. Those are the acceptance criteria our own inspectors apply, and they're checkable in your receiving room without instruments. I deliberately don't quote flatness numbers in microns here. For a desk-distance photo product, the angled-light check catches everything a customer would ever see, and a supplier hiding behind lab-only tolerances is dodging the check your customers will actually run.
## Scratch prevention and protective film — from our line to your end customer {#protective-film}
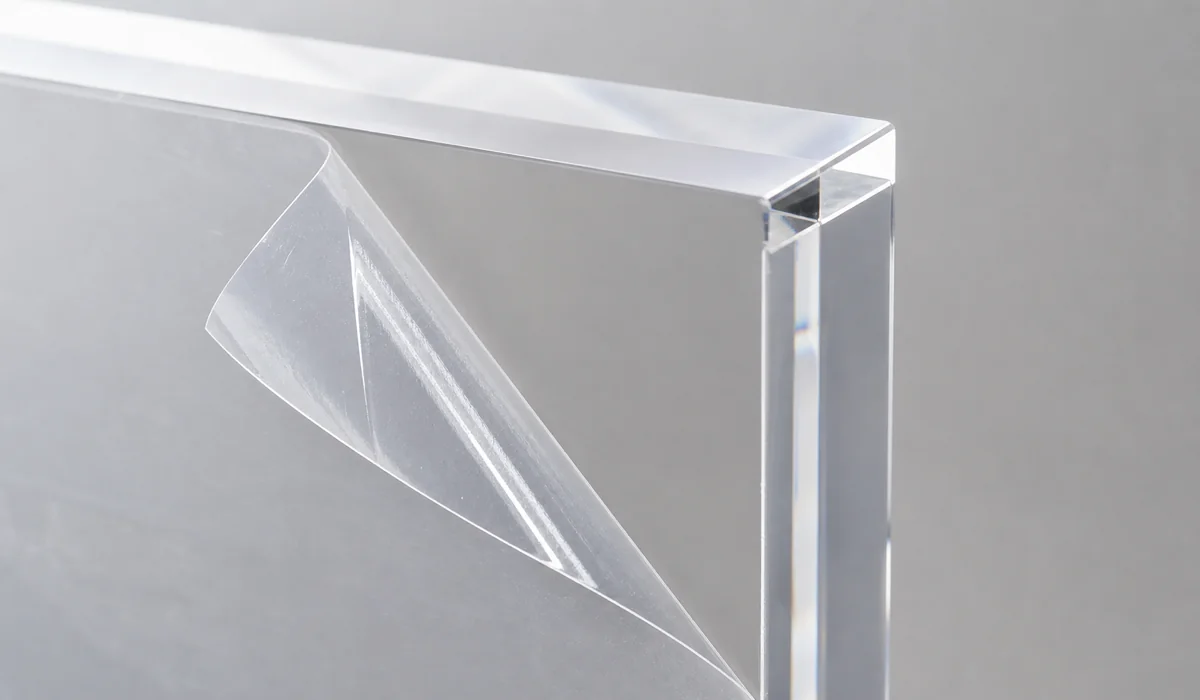
Every acrylic block frame leaves our line with protective film on both faces, and the film should stay on until the end customer unwraps the product. Acrylic's one real weakness is hard-surface scratching, and the film is the scratch barrier through every stage where blocks get handled in bulk: our packing, the freight, the lab's receiving and printing stations, the fulfillment line.
Protective film half-peeled on a finished block: the film travels with the product through the lab's whole fulfillment chain. The end customer does the final peel.
The question I get from labs most often is when to peel. The working rule: peel only the face you must work on, only at the station where you work on it. A face-mount lab peels the bonding face at the mounting table and leaves the display face filmed. An insert program may never peel at all before shipping. UV-printed blocks get re-filmed after printing on our line before they're packed. Buyers on our books have made film-on-at-delivery an explicit order condition: they confirm the finish under the film before final payment, and the film still ships intact to their customers.
Two practical film notes from the production side. First, specify film type if the lab's process is heat- or adhesive-sensitive: standard PE film peels clean at room temperature, but a lab running heat-assisted lamination nearby should tell us so we film accordingly. Second, teach the end customer the peel. A small "peel here" tab and a care card turn the unwrap into a product moment instead of a fingernail hunt. The broader film policy, including how film interacts with shipping abrasion, is in our [protective film guide](/guide/acrylic-protective-film-shipping-display/).
## Bulk ordering for print labs — MOQ, reorders, and batch consistency {#bulk-ordering}
Bulk photo block ordering starts at a 50-piece MOQ, with samples in 3–5 days and production in 15–20 days on standard terms (30% deposit, 70% before shipment). The pattern that works: a pilot order in one or two sizes, sold through the lab's own channel, then repeat orders that scale the sizes that moved. That is exactly how the print-lab programs we supply have grown.
The number that matters more than the first price is reorder consistency; in my experience the reorder, not the pilot, is where a supplier shows its discipline. A photo product line lives or dies on batch two matching batch one: same clarity, same edge finish, same corner treatment, same packaging fit. We run repeats on the retained cutting programs and polishing settings from your approved first batch, keep a physical retained sample to check against, and pass every unit through 100% inspection before packing. One of our printing-group customers came back with a repeat purchase order on precisely this basis; the reorder mechanics are documented in our [print lab bulk order case study](/case-studies/acrylic-photo-blocks-print-lab-bulk-order/).
What drives per-unit cost at each tier is worth knowing before you negotiate. Sheet utilization is the big one: block sizes that nest efficiently on a standard sheet cost less per piece than sizes that strand offcuts. Setup amortization is the second: cutting programs and polishing changeovers cost the same for 50 pieces as for 500, so tiers at 200 and 500 units drop the per-piece number meaningfully. Mixed-size orders within one PO are fine; they just set up as separate runs. If the program needs branded packaging or a printed insert card alongside the blocks, fold it into the same order through our [customization service](/customization/) rather than sourcing it separately: one supplier, one QC gate, one delivery.
## Packaging for resale — gift boxes, inserts, drop-ship readiness {#packaging}
A photo block sold as a premium product needs packaging that survives two journeys: the bulk freight from our dock to the lab, and the single-parcel trip from the lab to the end customer. Spec both at order time and the blocks arrive retail-ready instead of needing a repack line. Packed-carton dimensions and gross weights are supplied with the quote, so your forwarder can price the freight leg before you commit.
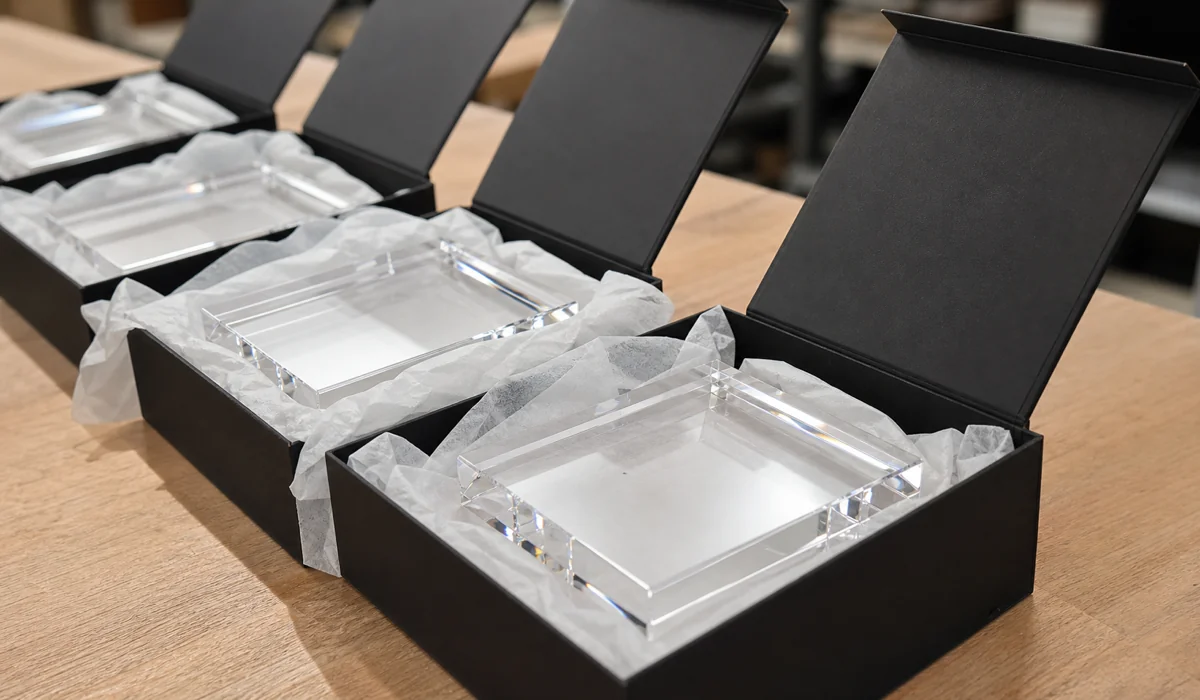
Blanks packed retail-ready: tissue-lined gift boxes inside export cartons. The lab prints, mounts, and ships in the same box the block arrived in.
The configurations we build for labs, in ascending order of readiness: bulk-packed blocks with film and paper interleaf, cheapest per unit, for labs with their own retail packaging; individual gift boxes with tissue or foam insert, sized to the block, so the packing team drops the finished piece back in the box it came from; and drop-ship-ready packs, where the gift box sits inside a single-wall shipper that takes a label directly. For programs where every unit ships as its own parcel, that last configuration removes an entire packing station from the fulfillment chain. I've seen more film damage at repack benches than anywhere in freight, so removing that touch is not just a labor saving.
Three spec details that save rework later. Insert fit should be checked against the filmed block, because film adds a hair of thickness, and an insert cut to the bare block grips too tight after printing. Programs selling multiple block sizes should keep one shipper footprint where possible so postage bands stay predictable. And put your care card and peel instructions in the box spec now; adding them at reorder means opening every box once. All of this is confirmed physically at the sample stage: the 3–5 day sample can ship in its production packaging on request, so you approve the unboxing, not just the block.
## QC and defect handling for photo-grade blocks {#qc-defects}
Every photo block passes 100% piece-by-piece inspection before packing — faces and edges under angled light, corners checked for chips, film intact — because I've learned that a photo product has zero tolerance for the defect sitting directly behind someone's family picture. That inspection gate, plus the retained-sample check on repeats, is what ISO 9001 process discipline looks like on this specific product.
Defects still need an honest framework, because bulk acrylic has failure modes and a supplier who claims otherwise is hiding the RMA policy. The categories that matter for blocks — scratches under vs over the film, internal inclusions, edge chips, polishing haze — each carry different eligibility, and we publish exactly how we classify and resolve them in our [acrylic block defects and RMA guide](/guide/acrylic-block-defects-rma-policy/). Read it before the first PO; it's the document a receiving team will use if a carton ever arrives wrong.
For your side of the gate, keep receiving simple: inspect a sample of each carton under angled light on arrival, photograph anything questionable with the film still on, and send photos within the claim window. Film-on photos let us trace whether damage happened on our line, in transit, or after unpacking, which is what makes resolution fast instead of adversarial.
If you run a photo printing business and the product on this page looks like your next SKU, send us your print sizes and monthly volume through the [project inquiry form](/contact/?source=acrylic-block-frame-photo-printing) — you'll get a spec-level quote with sample options, not a catalog reply.
[^loc-photo]: [Caring for Your Photographic Collections — Library of Congress](https://www.loc.gov/preservation/care/photo.html) — preservation guidance recommending limits on light exposure for displayed photographs, supporting this guide's display-life advice for printed and mounted photo blocks.
[^plexiglas-transmission]: [Light transmission — PLEXIGLAS (Röhm)](https://www.plexiglas.de/en/service/product-info/light-transmission) — manufacturer data showing clear-transparent PMMA transmits up to 92 percent of light in the visible range, the optical-clarity value cited in this guide's photo-grade finish section.